Christmas tree made of beads- This is an excellent New Year's craft, which is created to decorate the interior during the winter holidays. If you have not yet mastered all the subtleties of beading, then do not worry - we will show you how you can create the simplest Christmas tree. But, of course, experienced craftswomen will find something interesting for themselves in our selection.
Christmas tree made of beads for beginners - master class
If you do not know how to weave from beads, you can still please yourself and your household with a wonderful craft. The principle of making such a Christmas tree is extremely simple, but the result is a rather spectacular Christmas tree.So, you need to take several ordinary sewing pins (you can buy them at a sewing store) and string several large beads on them. The material should not only be green - it can be red, yellow or blue. The amount of material to be strung on can be arbitrary, the most important thing is that one part of the pin is completely filled. Prepare 5 of these filled pins for the first tier of the tree and 8 for the second.
Take a red ribbon (the toy will then hang on it) and fix 5 pins on it, tighten and form a triangle. In order to fix such a triangular position, you will need to use a decorative star - it will at the same time be the main decoration for the upper part.
Take a small piece of wire and attach it to the bottom of the first pin of the first tier, then start forming the second tier, gradually attaching the rest of the pins, alternating with large green beads. In order for the lower tier to turn out flatter, you should fasten large green beads. Now I'm ready tree made of beads - beginners they can easily repeat this master class.
Christmas tree made of beads - master class
A coniferous tree with golden cones will become a real interior decoration on the eve of the winter holidays. To create a craft, the first thing you should do is to weave a lot of blank legs, which consist of three loops. One loop should contain 9 beads. Weave also 60 pieces of blanks of golden cones.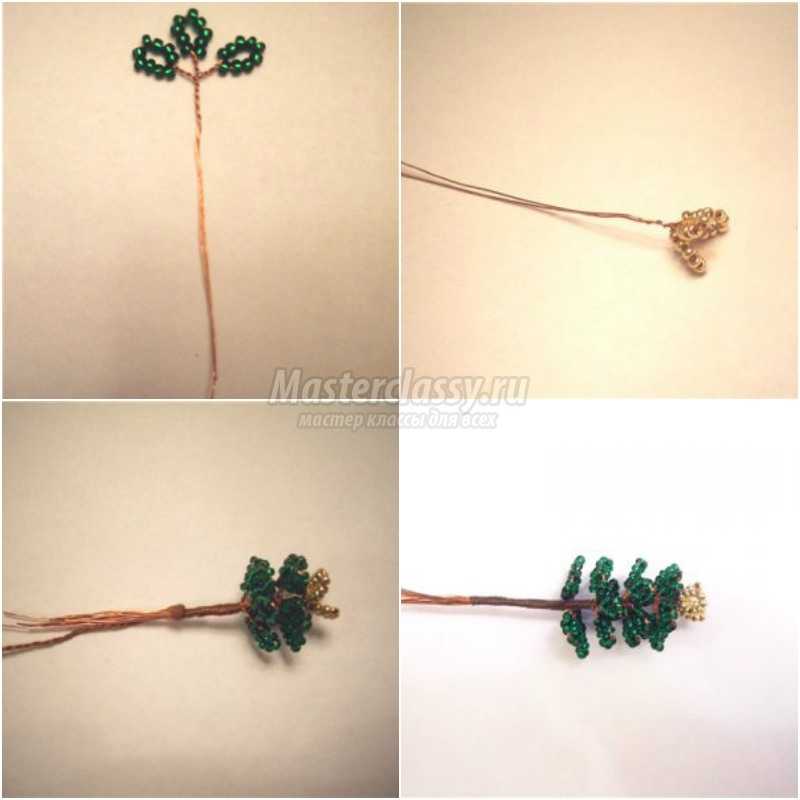
Now start shaping the crown. Weave a 15-piece apical loop. beads, surround it with exactly the same loops in the amount of three pieces. Go down below and attach 8 greenish blank branches. As a result of your work, you have 4 tiers, it remains only to attach 3 branches and the crown is ready.
Add 4 more pieces of sturdy wire to the free ends of the wire to serve as the base for the trunk and roots.
Take the blank of the golden cone and screw 4 greenish branches to it in pairs, then wrap it with thread. Make more heels of the same blanks and screw them three in a row to the crown. For the next couple of rows, six branches should also be made, but each of them should have 6 green legs.
Do not forget that every time you attach the workpieces to the barrel, you need to tighten them with a thread.
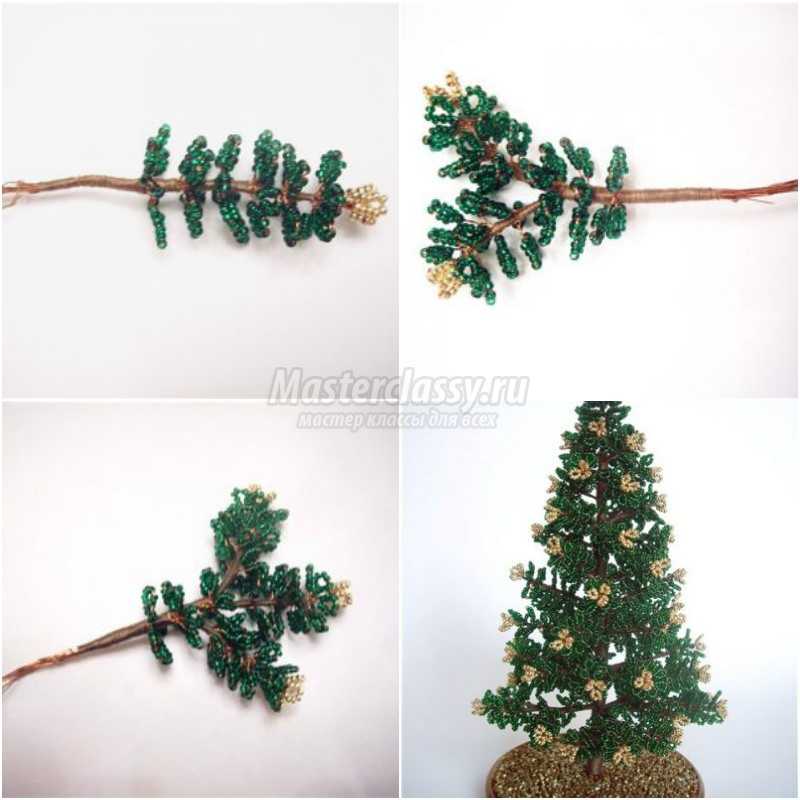
Pour gypsum into a beautiful planter and place it in it, securing the bent wire roots. Dry and then coat the surface of the plaster with glue - this will help to fix the shiny decor.
Christmas tree made of beads - master class, photo
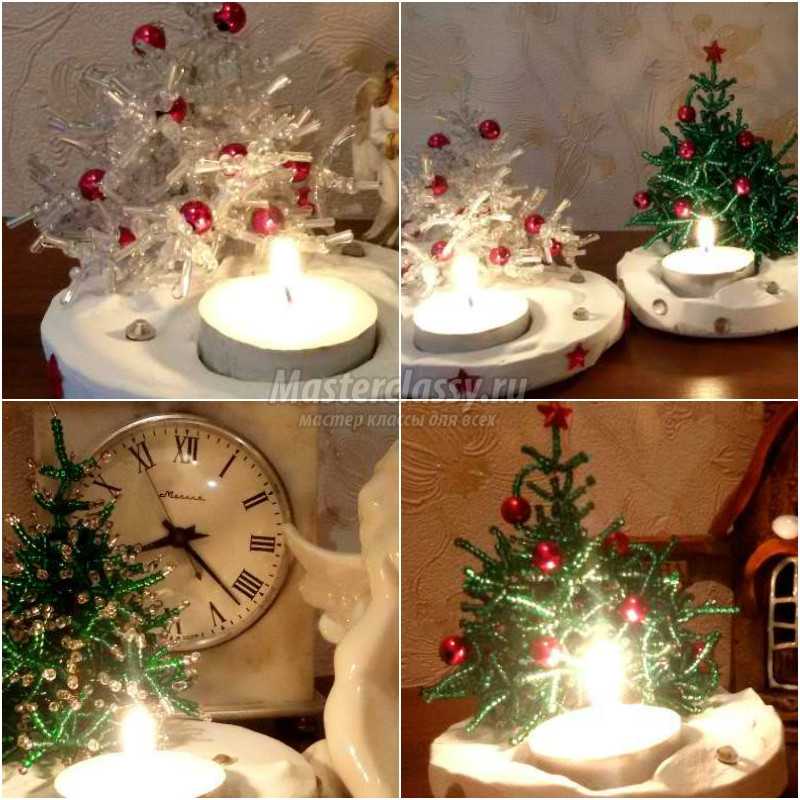
The creation of a Christmas tree candlestick can be called a real New Year's magic. Just think how beautiful such a figurine will look on a festive table! In addition, such a beautiful souvenir can be presented to family or friends.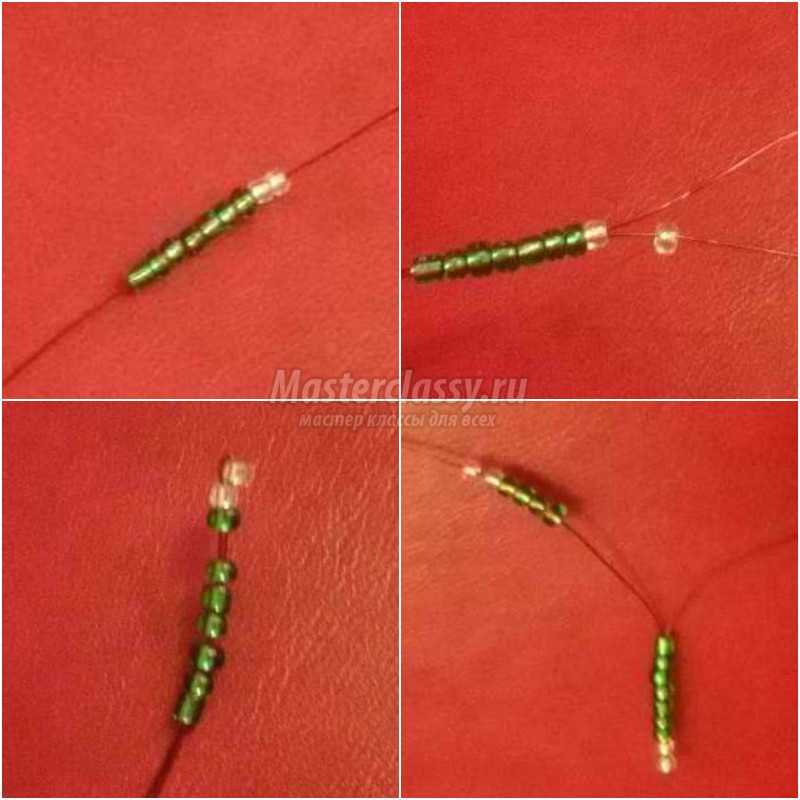
Weaving should start from the top. To create the top needle, 7 green and 2 white beads should be put on a thin wire. Pass the end of the wire back from the white side, skipping the very first one. Pull up the beads and we can state that the upper needle is ready.
Go to the manufacture of side: string, guided by the photo, 4 green and 2 white. Pull them tightly to the base and re-thread the end of the wire, excluding the first round. You have got the first side needle, using the same manipulations, type the second side needle, then the third and fourth in turn - the result should be a cute twig.
Put 3 more beads on the trunk and repeat everything a couple of times to make 2 more circles of side needles come out - as a result, you will have a top with an upper needle, as well as three side circles with an interval of 3 beads on the trunk.
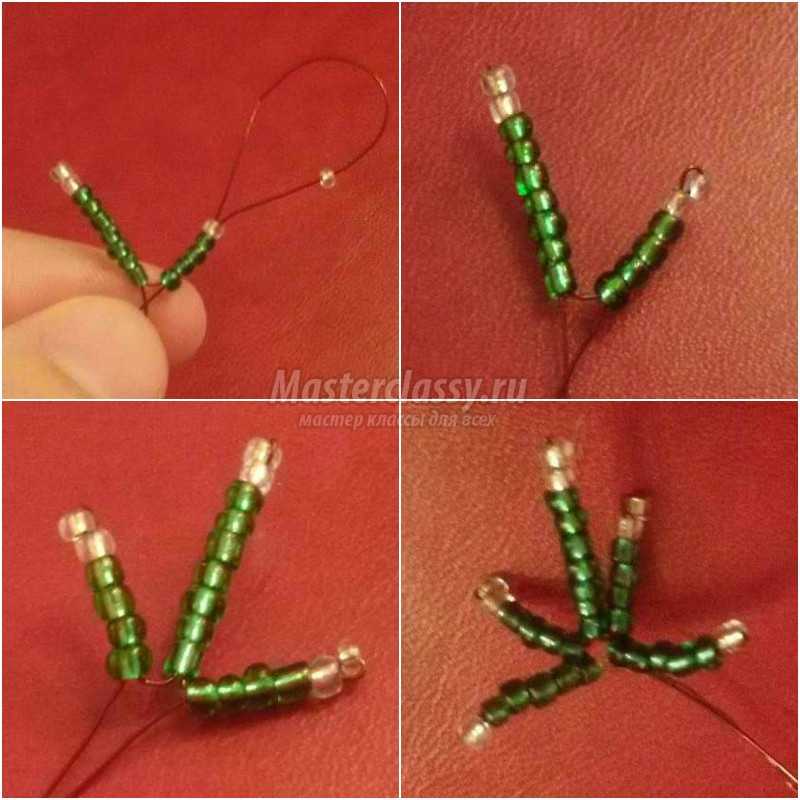
We can congratulate you - you have mastered the method of the needle technique, using it, make 3 identical branches, consisting of the upper needle, as well as a number of side ones. They will need to be attached to the top, attach from the side, tighten the beads on the barrel and twist the wire pieces together, while twisting the wire tight enough to cut the barrel hard and strong. Add a couple more "Christmas tree legs" in the same way.
The blanks for the fourth tier will simply be one row longer, and for the fifth they will be exactly the same as for the fourth, but only 2 pieces of them should be made, and then connected in pairs. So your wonderful is ready, but now you need to worry about creating a decent stand.
In order not to stain the fluffy figurine, it is necessary to wrap it in cling film or foil. Dilute the gypsum (or alabaster) to a state of thin sour cream with ordinary water (pour gypsum into the water). Pour the diluted gypsum into a suitable mold. Twist the wire tail of the craft into a loop and quickly put it in the mass, put also a tea candle next to it.
Then comes the moment of decoration - the delivery itself can be painted in any color, decorated with beautiful rhinestones. Well, now, on New Year's Eve, you can put a wonderful craft on the table, light a candle and enjoy the beauty.
Christmas tree made of beads - photo:
You will find many beaded Christmas trees, be sure to use them in your work.
Christmas tree made of beads - step-by-step master class
Cutting beads are also perfect for needlework; no less beautiful products will be obtained from this material.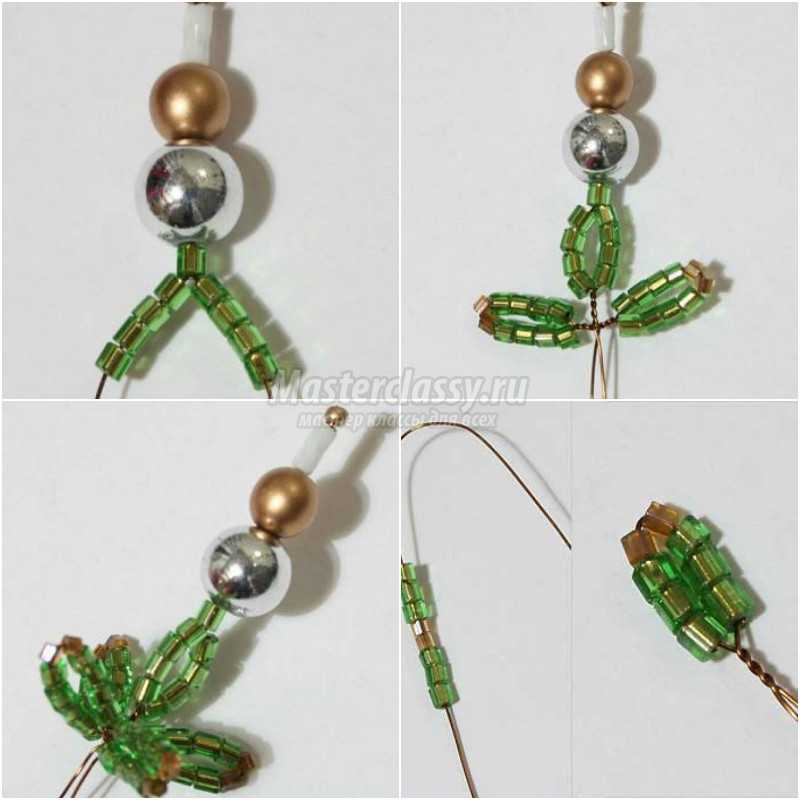
So, the work will start with the manufacture of the top. You need to cut a piece of wire 45 cm long (the wire should be copper or just brown). In the middle of the piece, string a golden bead, followed by a sequence of white glass beads, a large gold and silver bead, and a green cut bead. Pass the second wire tip through this entire dialed sequence. Cast on 4 light green cuttings for each tip.
Then twist both wire ends together 3-4 turns, at each end add 4 green-2 brown-4 green chops, and loop. Twist the ends by 2 turns, and then again make 2 exactly the same loops - you get the first tier.
Go to the creation of the second tier - for this you need to cut off 4 wire pieces, the length of each should be 25 cm.Transform them into 4 branches, each of which should contain 3 loops, which should be recruited as follows: 3 green-2 brown-3 green ... Twist the wire from the loop to the loop 4-5 turns, from the last loop 3 turns.
For the third tier, you will already need 4 wire pieces 30 cm long, you will get branches of 5 loops, the first 3 will be made, as for the second tier, and in the next 3 green ones together, you should type 4.
For tier 4, you cannot do without 8 pieces of wire, their length will still be the same - 30 cm.Each branch will have 5 loops: do the first 3 in the same way as for the second tier, in the next 2, dial 6 light green. Place these blanks in pairs, screwing them 3-4 turns with a spiral.
For the 5th tier, prepare 4 pieces of wire 35 cm long, i.e. you will have 4 blanks with 7 loops each. The last 4 should be different - in them type only 6 pieces of green felling.
Start the 6th tier in the same way as the fourth, but at the same time collect the blanks together differently. Cut an additional piece of 20 cm. From the last loop, wind 12 turns with a spiral with this additional piece, then attach the second workpiece to 15 spiral turns.
7th tier: prepare 4 pieces of 60 cm each. In the middle of the wire, make the first loop, then dial 6 more pieces, as in the sixth tier, while the second wire end should remain long. After the last loop, twist 7 turns. Twist 7 loops on the long end. With an extra piece of wire, twist the branch down 8 turns in a spiral.
For the 9th, repeat the same as for the eighth, only the number of turns should be 18.
For the 10th tier - 4 x 70 cm, 4 x 35 cm. The large branch should have 8 and 9 loops, the small one - 7, spiral turns - 22. Guided by the photo, collect the tree.
Christmas tree with golden nuts.

Materials:
Beads are green and brown,
wire 0.4, threads,
floss, for winding branches, and trunk.
harder wire for the frame.
gypsum
PVA glue,
decor,
acrylic varnish.
Several tiers of a branch, you can repeat, but increase downward. to create the correct shape. I wrapped the trunk with thread, not all of it. when I put it in a plaster stand (plaster stand in combination with water), the lower part was coated with a mixture of plaster and PVA glue (one to one, the mixture is thick, but not very, applied with a brush, or not very thin stick, creating an image of bark). I put it to dry overnight, and in the morning, covered with acrylic paints, the trunk, and the stand. After that, she decorated it with moss, stones, beads.


Author lunnaya
Beaded Christmas tree in needle technique.

For work we need:
Cutting beads 2-3 colors, I took 2 colors, it took me about 80 grams;
wire 0.3 mm - 3 coils, it is advisable to have pliers on hand, as it will be easier to pull the wire.

Our twig will be done according to the following scheme:
"needle" of 7 beads in the center, around it 4 needles of 5 beads (alternation of colors is arbitrary).
Then we put on 2 beads on both ends of the wire and make the next row of needles, 4 pieces of 5 beads each, then 2 again for passing and another row.

To make a needle, pass the free end of the wire back through the 4 lower beads, pulling them tightly to the base.
The twig should not "fall apart".

3-4 small branches can be twisted into one large one.
We leave one in the center, this will be the crown, we begin to form a circle around it, carefully braiding the trunk with wire. After all, the trunk as such will not be, the branches fit tightly to the wire in the center.

Make 5-6 rows in a circle for a small tree, or more if desired.

When the tree is ready, we will make the base. Do not rush to straighten all the needles, you will do this later.
I need a fairly large base, because the tree will go as a gift and it will be necessary to make an inscription on it, but it can be made smaller.
A box of baby juice came up to me, into which I poured plaster solution and inserted a Christmas tree. When the plaster froze, she cut the box and took out the tree.

The decor of the base - according to your desire, you can make grass, you can snow - whatever you want!
After painting, you can straighten the branches and give the work a final look.

The deckhouse sparkles amazingly!

And if you drop a few drops of spruce essential oil on the base, it will turn into a healing forest guest!

Written by Inna Vuymina
Fir-tree from the cabin.

To make one beaded Christmas tree with your own hands, you will need:
Green cabin - 50 gr.
brown cabin - about 5g.
brown wire (or copper) about 50m
alabaster
colored pebbles (or other decor)
two beads for pearls
bugle
stand
The Christmas tree consists of 10 tiers. Each tier has four branches.
We begin to weave a Christmas tree from the top of the head. Cut a wire 45 cm long. In the middle of the wire you need to string a bead of gold color and a group of white glass beads, beads of gold and silver, 1 bead-cut green. Pass the other end of the wire through the entire group. Cast on 4 green beads on each end of the wire:

After that, you need to twist both ends of the wire together 3-4 turns. At each end of the wire, cast on 4 green beads, 2 brown, 4 green, twist into loops.

Twist the ends of the wire 2 turns and make two more loops, as shown in the following photo:

We proceed to making the second tier of a Christmas tree from beads with our own hands. We cut off 4 pieces of wire 25 cm long. We make 4 branches of three loops each with a set: 3 green beads, 2 brown, 3 green.

Twist the wire 4-5 turns from eyelet to eyelet, 3 turns from the last eyelet.

Let's start making twigs for the third tier of a do-it-yourself Christmas tree. To do this, we make 4 branches of 5 loops from 4 pieces of wire 30 cm long. The first three loops, as on a branch from the second tier, in the next two loops, instead of three green ones, dial 4:

As you understand, you need to weave 4 such branches, as in the photo above. After that, we prepare the branches for the fourth tier of the beaded Christmas tree. This will require 8 pieces of wire 30cm long. You need to make 8 branches with five loops in each:

The first three loops, as you can clearly see in the photo, are the same as on the branch from the second tier; in the next two loops, cast on 6 green beads. After the last loop, twist the wire down 4-5 turns. From two such branches, collect one by screwing them with a spiral for 3-4 turns:

5th tier: from 4 pieces of wire 35 cm long, make 4 branches of 7 loops each. The first three loops, as on a branch from the second tier, in the next four loops, dial only 6 green beads each.
The 6th tier of the Christmas tree: we start it in the same way as the 4th tier (8 pieces of wire, 8 branches of five loops each) But we collect the branches in pairs a little differently. It is necessary to cut an additional piece of wire 20 cm long. From the last loop, wind 12 turns with a spiral with an additional wire. Then screw the second branch on 15 turns with a spiral:

Twigs for the 7th tier of a Christmas tree made of beads: cut 4 pieces of wire 60 cm long. Make the first loop in the middle of the wire. Next, cast on 6 more loops, as on the 6th tier, on the same end of the wire so that the other end remains long.

After the last loop, twist 6-7 turns. On the other (long) end of the wire, also make 7 loops:

With an additional wire, twist the twig with a spiral downward by 8 turns.
Tier 8: cut off 4 pieces of wire 60 cm long and 4 pieces of 30 cm each.Twist branches from 60 cm wire, as for tier 7, from 30 cm wire - twigs with five loops:

Collect one of these two branches, screwing them with a spiral. First, start a spiral on a twig with two ends - 15 turns, then screw a small branch for 15 turns:

Tier 9: the same as for tier 8, only increase the number of wire turns from 15 to 18.
Tier 10: cut 4 pieces of wire 70 cm each, 4 pieces 35 cm each. Make twigs in the same way as for tiers 8 and 9. Only in a large branch, dial 8 and 9 loops, in a small one - 7. Number of turns spiral increases to 22.
Now the branches for all the tiers of our beaded tree are ready, you can start assembling the tree.
Take additional wire (do not cut off the spool!) And, starting from the top, wind the ends of the wire downwards.

An additional rod is not required because due to the number of tiers (and branches in each of them), the trunk thickens and does not bend.

The distance between the tiers is from 0.8 cm (from the top) to 1.2 cm (to the bottom).


After assembly, it remains to plant the tree in the stand. To do this, you need to dilute the alabaster and stick a Christmas tree into it, wait until the alabaster dries. Then, with the help of transparent glue, decorate the frozen alabaster soil with colored stones, moss, cotton wool with sequins, beads.
Here is our resulting green beauty, it even seems that the festive scent of pine needles is in the air:

A Christmas tree can be made not only from beads or cuttings, but also from bugles. In addition, you can dress up the Christmas tree:

Author Elena Bashkatova
Small green Christmas tree.

To make a small green Christmas tree from bugles, you should prepare for work:
Copper wire 0.3mm (for twigs);
- copper wire 0.5 mm (to stiffen the branches);
- 3mm aluminum wire (for the tree trunk);
- green bugles (for a fifteen centimeter tree, you need 300 grams);
- floristic tape (green or brown);
- PVA glue, alabaster, wood support.

The Christmas tree shown in the photo can be made in a week, with a load of 3-4 working hours a day. For a set of bugles on a wire, it is convenient to use an automatic bead sealer.
Initially, we mix all the bugles in a special container. We begin to collect bugles on the wire, we collect about 4 meters, without removing the wire from the coil, we begin to make the first branch.
We put 2 pieces of glass beads, put on the wire, together. We fix it for 1-2 turns. On the other hand, we do the same.


Thus, we should make strips:
4 strips for the branches of the first row and the crown of 5 cm.
3 strips for the branches of the second row, 6 cm each.
3 strips for the branches of the third row and the crown of 7 cm.
Along the strip we put on a 5 mm copper wire folded in half, tighten the strip a little (up to about three centimeters - on the branches of the first row), we twist everything - the branch is ready.


To make the branches of the fourth and further rows, we act according to the following scheme: From about the fourth to the eighth row, we make branches consisting of two small ones. Try to keep the branches of each new row longer than the previous ones, by about 1 centimeter.
We make the branches of the remaining, lower rows from three branches. In this case, the central branch will be twice as long as the lateral ones.


You shouldn't do all the branches in advance. The herringbone is made differently from all beaded trees. It is more convenient to collect it right away - this way you will see how many branches are required in each row, and how long they should be made.
We fix one branch on the wire - this is the trunk and the crown. On the sides we fix three small branches of the first order, wrap with florette.

Below, stepping back a centimeter, we fix 3 branches of the second order.
Thus, we fix all the branches from top to bottom, wrap the trunk with floor tape. Since the tree trunk will not be visible, you do not need to paint it.
We fix our Christmas tree in a stand using children's plasticine (for stability). We apply a mixture to fix the tree in a stand (alabaster 2 parts + PVA 1 part + water). After the mixture has not completely dried, we decorate the pot with multi-colored stones, they will stick. The mixture will dry up and our Christmas tree is ready!

Fluffy beaded Christmas trees:

Different shades of green beads are useful for work.
You can mix different colors, so the Christmas trees will take on a special, individual look. At least 60 grams of Chinese large beads (number 8) are required per tree.
It is imperative to take the wire reinforced, thick, so that it can hardly get into the bead.
Thick copper wire is the key to the beautiful shape of our Christmas tree branches.
In addition, we will need floral tape, plaster of Paris, gouache, pliers, aluminum wire (for the trunk) and decorative elements for the final design of the New Year's craft.

How to make a beaded Christmas tree. We use a spinner to string the beads onto the wire. You need to pick up ALL the beads on the wire IMMEDIATELY.

We start weaving using the buttonhole technique. The essence of weaving is simple - we need to make a large number of loops from all the beads, constantly increasing their size. We start with 12 bead loops.

In the second loop we will make 13 beads, in the third - 14.

You can increase the number of beads in the loops without counting, "by eye".


As a result, such a complex structure should be obtained from parallel, constantly increasing loops.

Let's make a small bud for the top of the head. We will weave an element of 5 loops, the legs of which are collected at a single point.

To prevent the wire from attracting attention, we will make it invisible. Paint the wire with green acrylic paint and wait for the paint to dry.


Now you can start forming the tree itself. To do this, take a piece of aluminum wire and bend the loop on one side. On the other hand, we will fix the top of the spruce.

It is necessary to securely fix the top of the head - wrap the entire tree trunk with floral tape.

Now we wind the wire with the dialed loops. Closer to the crown, it is necessary to place the end of the element with small loops.

We fix the attachment point again with floral tape.

Finally, we can shape our Christmas tree! Gently wrap the wire-trunk with our twig loops.


Each loop will have to be gracefully bent, this will give the tree the necessary volume.


Mix gypsum or alabaster with water - from this mixture we will make the lower part of the tree. Pick up a round mold, cover it with a bag, fill it with the mixture, and place a spruce from beads in the center.
When the plaster hardens, the wood can be taken out and freed from the cellophane.

Let's give the base a little rest. For now, let's start decorating the crown. For this, multi-colored rhinestones are useful.

We glue rhinestones on beaded branches. We use simple PVA glue.

While the rhinestones are gluing, continue to work on the base of the Christmas tree. Place some plaster mix and coat the lower part of the beaded Christmas tree trunk with it.

The barrel can be painted with green acrylic paint.

Do not forget about the "bottom", paint it white.

Apply white acrylic paint to the base of the tree.

When the paint is dry, turn on the fantasy. The base can be varnished, decorative primer and decorations can be glued to it.


Fabulous Christmas tree.

We need 2 Christmas trees
Wire (thickness 0.4 mm, length 10 m),
beads (10 g),
sequins (packing 20g),
scissors,
cork from a plastic bottle,
gypsum,
decor fabric,
braid,
ribbons

We string beads, sequins, beads on a wire 16 cm long ... 3 sprigs of 10 sequins each (pay attention to the beads we start and finish with the beads, and the sequins should also be the convex side in one direction) 5 sprigs of 15 sequins, 5 sprigs along 20 sequins, and 5 branches of 25 sequins each (10 g of beads and 20 g of sequins are needed for 2 Christmas trees)

I string in a row alternating beads and sequins, and when I twist the branches, I count the sequins, I shift the bead, move it back, cut off the desired length (it should not be small, then it is convenient to twist) and twist the twig, I string the next bead, count the sequins, etc.

Here's what it should be, we twist the Christmas tree 1 row - a branch of 15 sequins, the second row - 3 branches of 10 sequins, the third row - 4 branches of 15 sequins, the fourth row - 5 branches of 20 sequins, the fifth row - 5 branches of 25 sequins ( if you wish, you can continue 5 branches of 30 sequins each ....) We take a cork from a plastic bottle, dilute gypsum and fill our Christmas tree


Author Lyubov Zenkina
Fir-trees made of sequins and beads.

It was convenient for me to string beads with sequins like this: I poured some sequins into a bowl with beads, "poked" a wire into a sequin and immediately passed it among the beads (mostly some of them were strung)


This is how the Christmas tree is going in tiers.
We twist all the wires under each tier.

This is how I made the stand:
When all the tiers are assembled, we twist all the wires together and string a bead with a huge hole (I had dark wooden ones);
- Gently untwist the wire BEFORE the bead and divide it into 3 bundles;
- We twist each bundle separately.

We combine the beams, measure out about 3 cm and cut off the excess;
- We bend the legs, bend the ends.

These are the handsome guys.

And this I decided to experiment - I made from mother-of-pearl sequins-flowers. But since there were few of them, then I reduced the number of sequins, and increased the number of beads. It turned out well too :)
In this version: string on a wire: beads (2 pieces), sequins, beads (2 pieces) ... We start with beads and finish with beads.
1st row - a branch of 7 sequins, 2nd row - 3 branches of 5 sequins, 3rd row - 4 branches of 7 sequins, 4th row - 5 branches of 9 sequins, fifth row - 5 branches of 11 sequins.


I offer my own version of packaging.
So, from a plastic bottle with a narrow neck, we cut off the upper part using the method of "cutting off the excess from the bottom." We cover the Christmas tree and make sure that it is not "under the dome" and not too crowded, and so that it does not "flounder" much.
According to the shape of the bottom of the finished "dome" we cut out the BOTTOM from the plastic for our packaging (we put the "dome" on the plastic, circle it, cut it out).

We attach the bottom to the "dome" with pieces of scotch tape like this: in the place where the bottom will be fixed in the open state of the package (photo on the right) - just a piece of scotch tape, and where we open the bottom - at the end of the scotch tape from the side of the bottle we leave a "tongue" ( just bend a piece of scotch tape and glue it to yourself
You cannot glue the bottom dead, because the Christmas tree cannot be reached through the neck of the bottle.


Author Yong
Sequin Christmas trees


We need:
Beads (you can match the sequins, or you can have a different color)
sequins
braiding wire
rigid wire for barrel
thread for winding
a container for planting a Christmas tree (I have an ordinary cream cork, decorated with candy foil)
The Christmas tree consists of 17 branches + the crown.
First, we string a sequin on the wire alternating beads. Then we count 17-20 sequins and twist the loop, this will be the top of the Christmas tree.

The first row of twigs consists of 4 loops of 10 sequins twisted close to each other

Second row: 4 branches, 3 loops each. The loop consists of 15 sequins

Third row: 4 branches, 3 stitches each. The stitch consists of 20 sequins

Fourth row: 4 branches, 3 stitches each. The stitch consists of 25 sequins

Fifth row: 4 branches, 3 stitches each. The stitch consists of 30 sequins

When all the elements are woven, we assemble our Christmas tree. The distance between the branches during assembly is 0.8-1 cm. After assembly, we plant our Christmas tree in a suitable container, decorate and admire our beauty

Author vfhecz32
Little Christmas tree.

For work, we take green and white beads. In the middle of the wire we collect 11 beads in the following sequence: 4 green, 3 white and 4 green again.

We twist the loop.

In the same sequence, we collect beads on one end of the wire

And we form a loop.
In the same way, we form a loop at the other end of the wire.

Thus, we form branches for the top. The branch consists of seven loops. We need 4 of them (don't mind that there are more of them in the photo!) We twist all the branches together and form the top (sorry, there is no photo). We wrap the ends of the wire with floor tape.


And we twist them together.

Bend the loops to the edge.

We wrap the ends with florette. We need 5 pieces of such blanks for one tier.

When all 5 blanks are ready, we screw them to our top using floor tape.

The top with the first tier is ready!

For the 2nd, 3rd and 4th tiers we weave twigs as for the top - from seven loops. For one tier - 10 branches.

Twist the twigs in pairs - we get 5 blanks for one tier. We wrap with florette.

We fasten the twigs to the Christmas tree. The second tier is ready! We do the 3rd and 4th tiers in the same way. But for the 5th, we increase the number of white beads in the loop to 5. Those. our loop consists of 13 beads: 4 green, 5 white and 4 green. The number of loops on a branch is 7. For the 6th row, we form a loop from 15 beads: 4 green, 7 white and 4 green.

In principle, your tree may have more tiers, but it seemed to me that 6 is quite enough. After we have finished the last tier, we select a suitable "vessel" - in my case, it is a candlestick. Then we dilute gypsum with water 1: 1 and "plant" our Christmas tree. When the gypsum dries, you can cover it with a shiny varnish and sprinkle with white beads - it will be beautiful. Or you can come up with a more interesting decor. Be creative! New Year is just around the corner! Please your loved ones with this homemade New Year's surprise!

Author mari-m26
New Years is soon.

For this we need beads, wire cutters, and always a good mood.

We string beads and twist into a spiral.


If desired, we connect two, three spirals, as many as possible, it all depends on your taste.


Author Marina Zyablova
Fir-trees-beauties from beads.

Jewelry pendants for a fluffy beauty.


For work you will need:
Beads green (mixed 2 colors light and dark) as the main color of the tree;
- colored beads for the "garland" at the Christmas tree;
- wire (I have thin copper);
- bead (on the top of the Christmas tree);
- (for the leg) thing, see as in the diagram above:

We take 3 pieces of wire, about 25-30 cm each, put it together and twist it in the middle by cm 2.

Bend it in the middle, form a loop and twist it about 1 cm down.

On this twist we put on a bead (of any beautiful shape) and straighten all 6 wires under the bead - the twist remains only under the bead.

On our 6 wires we string beads - 2 wires with green beads, then 1 with color, then again 2 with green and 1 with color (you can see everything in the photo). Somewhere by 6 cm, we got segments with beads.
Any colored "garland" can be made (for my version, see photo # 11)

To prevent the beads from flying off the wire, we make a loop-twist at the very ends (then it will be cut off).

We fold our beaded wires (all of the same length - I have 6 cm each) in the same order - 2 green, 1 color ... as in photo # 8. And we twist all the wires together (where there are no beads).

We bend the wires in the form of "pepper".

Holding the top with one hand, the bottom with the other, twist it as in the diagram (photo # 3) where the number is 7

We just twist the wire under the Christmas tree.

 |  |
 |  |
Author Yong
Continuing to talk about different trees made of beads, this master class with step-by-step photos and detailed descriptions will teach you how to make wonderful miniature trees made of beads and wire with your own hands. The new year is not far off, so we will make a Christmas tree.
1. Fir-tree from the cabin
For the manufacture of do it yourself one beaded Christmas tree You will need:
- green deckhouse- 50 gr.
- brown deckhouse- about 5g.
- wire brown (or copper) about 50m
- alabaster
- colored pebbles(or other decor)
- two beads under pearls
- bugle
- stand
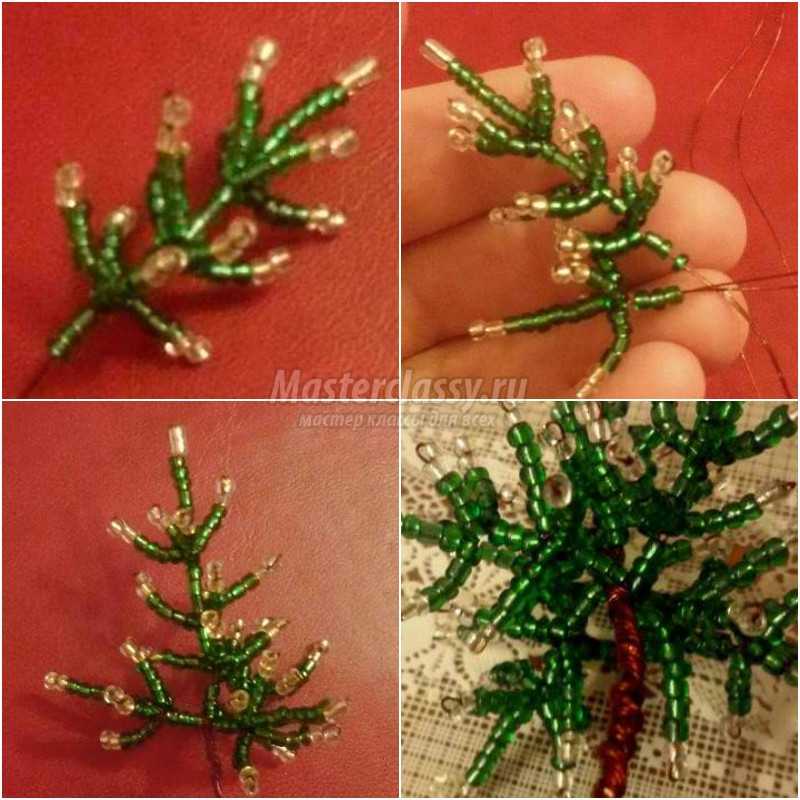
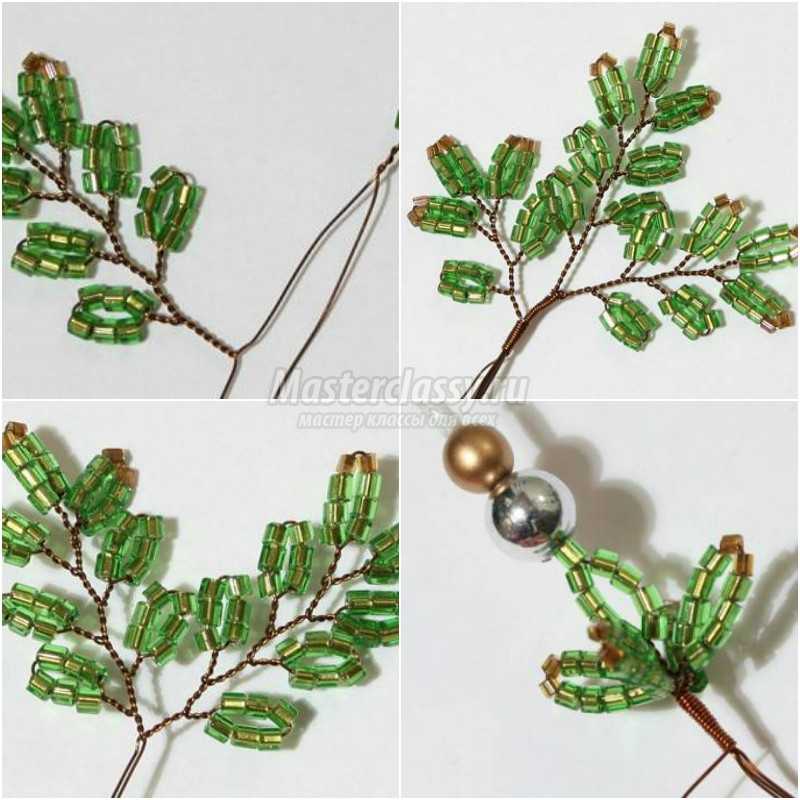
Begin weave a tree from the top of the head. Cut off a wire 45 cm long.In the middle of the wire you need to string bead gold color and group from white glass beads, beads of gold and silver color, 1 bead-cutter green. Pass the other end of the wire through the entire group... On each end of the wire, dial 4 green beads:

After that, you need to twist both ends of the wire together 3-4 turns. At each end of the wire, dial 4 green beads, 2 brown, 4 green, twist into eyelets.

Twist the ends of the wire 2 turns and do the same two more eyelets as shown in the following photo:

We proceed to manufacturing with with your hands second tier beaded Christmas trees... Cut off 4 pieces of wire 25 cm long.We make 4 of them twigs by three eyelets with a set: 3 green beads, 2 brown, 3 green.

Twist the wire 4-5 turns from eyelet to eyelet, 3 turns from the last eyelet.

Let's make twigs for third tier woven do-it-yourself trees... To do this, out of 4 pieces of wire 30 cm long, we make 4 twigs by 5 eyelets... The first three loops, as on a branch from the second tier, in the next two loops, instead of three green ones, dial 4:

As you understand, you need to weave 4 of these twigs as in the photo above. After that, we prepare the branches for fourth tier beaded Christmas tree. This will require 8 pieces of wire 30cm long. Need to do 8 branches by five eyelets in each:

The first three loops, as can be clearly seen in the photo, are the same as on twig from the second tier, in the next two loops, dial 6 green beads... After the last loop, twist the wire down 4-5 turns. Of these two twigs to collect one by screwing them with a spiral for 3-4 turns:

5 tier: from 4 pieces of wire 35 cm long, make 4 twigs by 7 eyelets... The first three loops, as on a branch from the second tier, in the next four loops, dial only 6 green beads each.
6 tier Christmas tree: we start it in the same way as tier 4 (8 pieces of wire, 8 branches of five loops each) But we collect the branches in pairs a little differently. An extra piece needs to be cut wire 20 cm long. From the last loop, wind 12 turns with a spiral with additional wire. Then screw the second branch on 15 turns with a spiral:

Twigs for 7 tiers beaded Christmas trees: cut 4 pieces of wire 60 cm long. middle wire the first loop. Next, cast on 6 more loops, as on the 6th tier, on the same end of the wire so that the other end remains long.

After the last loop, twist 6-7 turns. On another ( long) the end of the wire also make 7 eyelets:

Twist with additional wire twig spiral down 8 revolutions.
8 tier: cut 4 pieces wire 60 cm long and 4 pieces of 30 cm each.Twist twigs from a wire of 60 cm, as for tier 7, from a wire of 30 cm - twigs with five loops:

Collect one of these two branches, screwing them with a spiral. First, put the spiral on twig with two ends - 15 turns, then screw a small branch for 15 turns:

9 tier: same as for level 8, only quantity turns of wire increase from 15 to 18.
10 tier: cut 4 pieces of 70 cm wire, 4 pieces 35 cm. Make twigs in the same way as for tiers 8 and 9. Only in big twig cast on 8 and 9 loops, small - 7. Quantity turns spiral increases to 22.
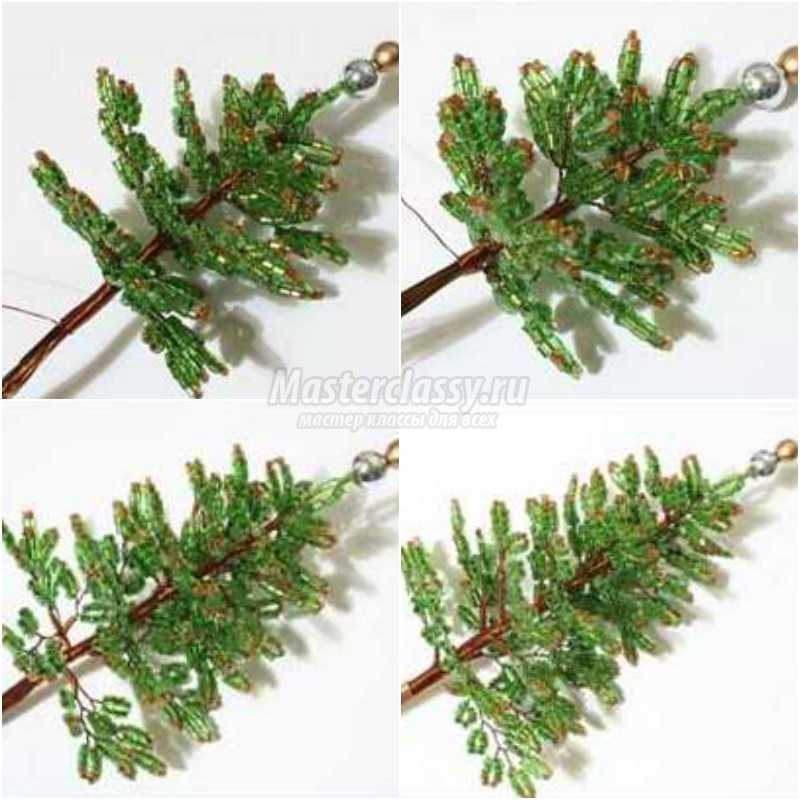
Now twigs for all tiers of our wood bead ready, you can start assembling wood.
Take additional wire(do not cut off the spool!) and, starting from the top, wind the ends of the wire downwards.

Additional kernel not required, because due to the number of tiers (and branches in each of them), the trunk thickens and does not bend.

Distance between tiers from 0.8 cm (from the top) to 1.2 cm (to the bottom).


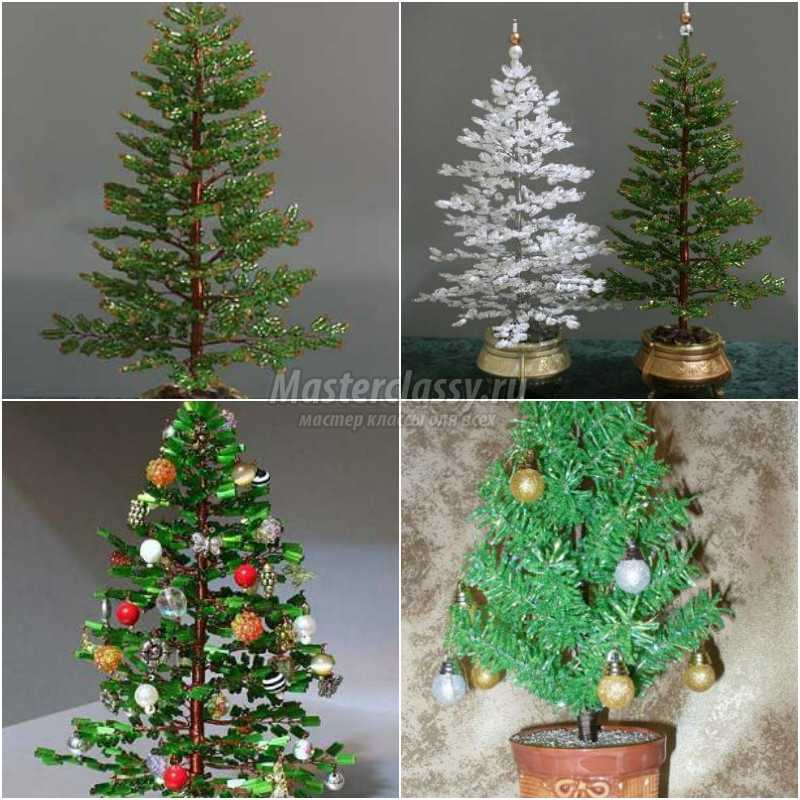
After assembly, there is put the tree in a stand... To do this, you need to dilute the alabaster and stick into it herringbone, wait for the alabaster to dry. Then with transparent glue decorate hardened alabaster soil with colored stones, moss, cotton wool with sparkles, beads.
Here is our resulting green beauty, it even seems that the air is in the air festive aroma of pine needles:

Maybe you want to create do it yourself Not only green herringbone but also her snow-white girlfriend?

Christmas tree can be made not only from beads or felling but also from bugles... Besides, herringbone it is possible and dress up:

Christmas tree made of beads will bring a festive atmosphere even to your workplace on the office table, decorate your home and serve as an excellent a gift made with soul do it yourself!
2. Christmas bead

You will need: beads 0/9
h = green - about 42 grams;
w = yellow - 36 pieces;
b = white - about 3 grams;
c = silver - 24 pieces;
cv = beads of luminous colors for jewelry 32x10 pieces;
BB = 0.3mm brown color guide;
BD = 40 cm wire for 1 mm stems.
Scheme:

Work description:
Stars (figure 1 of the diagram): String 4c (4 silver beads) in the middle of a piece of brown wire 60 cm long (BB), and thread the wire in the opposite direction after 3s, passing the first bead.
String 4s onto one of the ends of the wire, move them as close to the first row as possible and thread the wire in the opposite direction after 3s, passing the first (1h) bead. Repeat this procedure until you have 6 rows. Form a star out of them (see figure 2 of the diagram).
Treetop: Work in accordance with Figure 2 of the diagram. Barrel: Thread both ends of the wire together through 8z (8 green beads).
Side branch: At each end of the wire, make two branches as follows: string 5z onto the wire and thread the wire in the opposite direction through 4h, passing one bead (1h).
Barrel: Thread both ends of the wire together through 7h.
Side branches with candles: At each end of the wire, make two branches as follows: string 7z, passing one bead (1h), thread the wire in the opposite direction through 1h.
Candle: string 3b (3 white beads) + 1e (1 yellow bead), skipping one yellow bead (1e), thread the wire in the opposite direction, first through 3b, then through 5h.
Base: Bend the wire for the trunk in half. Wrap both ends of the wire around the base.
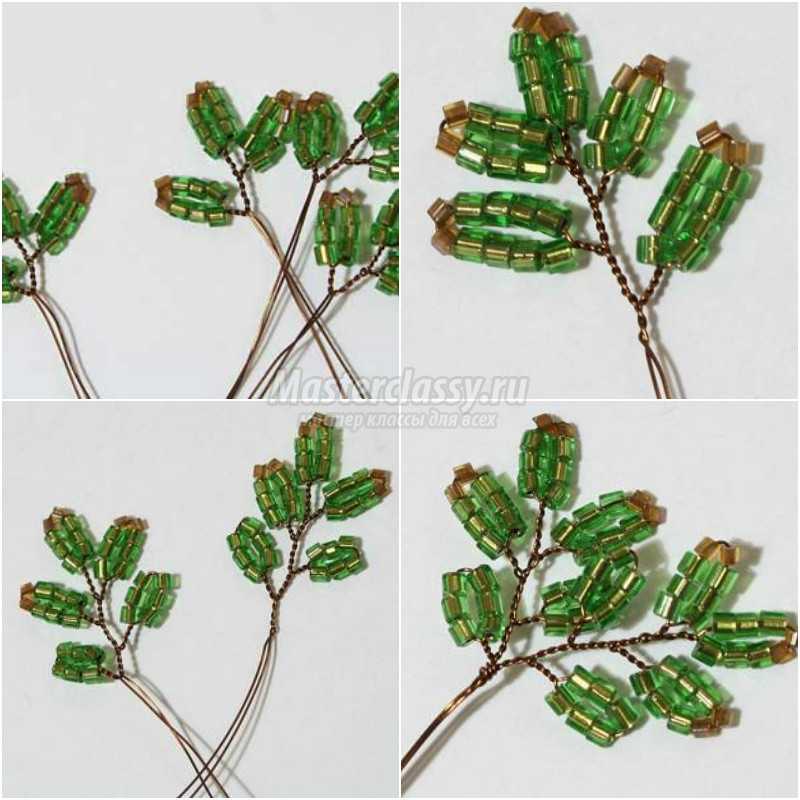
Use Basic Technique II to make 64 branches for the Christmas tree. Each branch should have a decoration or candle (in half). Make a candle or decoration after you have made the first "leaf" of the branch together with the neck (see the diagram, the place marked with an asterisk.) Before assembling the tree, make all the branches first.
Example: To make 1 branch with 4 "leaves" and decoration: 1: String 5z in the middle of 20 cm BB, twist the ends of the wire together into a "Neck" about 5 mm long
2: For decoration: String 10cv on the wire, slide the beads to the "Neck" itself, form a ring (for this, pass the wire through the first strung bead - 1cv). Twist both ends of the wire a couple of times together.
3: String 5s onto one of the ends of the wire, move them 5 mm away from the first "Neck", bend the wire and twist 5 mm in the direction of the Jewelry made and the first "Neck".
4: Twist both ends of the wire together in a "rib" about 5mm long.
5: String 5z on the other end of the wire, move them 5 mm away from the "Rib", bend the wire and twist 5 mm in the direction of the "Rib". Repeat step 5 with the other end of the wire.
Craft all branches of the Christmas tree according to the following table. Be very specific when doing this: the uniform appearance of the tree depends on the length of the individual branches:

Assembly: Pin the branches floor by floor to the base. In this case, fix the branches corresponding to one letter (line in the table) at the same level ("floor"):
starting just below the top, wrap the base with brown floral wire (BB) from top to bottom 1.5 cm.
Fasten the branches of group A at the same height around the base with a BB (1.5 cm).
Fasten the branches of group B at the same height around the base with a BB (1.5 cm).
Continue until all branch groups are pinned to the base. Under the last set of branches, wrap the base with 2cm brown flower wire (BB).
Secure the finished tree in a small flower pot with clay (s).
Source: http://jvolodina.freevar.com
3. Christmas tree "Fulfillment of desires"

Materials: 150 gr green beads and some gold beads, wire 0.3mm, reinforced threads, hard wire 2mm.
The herringbone consists of a crown and 11 tiers of branches.
The main element of the tree is such a trefoil. Each loop contains 9 beads.
Top of the tree:
Make the following element from gold beads: central loop 4 cm long, side 3 loops with 15 beads each. Twist all the loops.
Rows 1,2,3,4 are performed in the same way. Tie 2 shamrocks in each row onto the base with gold loops.
5 row: wind 3 shamrocks.
The tops of each branch (cones) are the same and are made of gold beads. Make 3 loops of 9 beads.

1 and 2 tiers are performed in the same way. Each tier has 3 branches.
Tie 2 rows of shamrocks to the crown (2 shamrocks in each row).

Tiers 3 and 4 are performed in the same way. Each tier has 3 branches.
Tie 3 rows of shamrocks to the crown (2 shamrocks in each row).
5 and 6 tiers are performed in the same way. Each tier has 4 branches.
Tie 4 rows of shamrocks to the top of the head (there are 2 shamrocks in each row).

7 and 8 tiers are performed in the same way. Each tier has 4 branches.
Tie 5 rows of shamrocks to the top of the head (there are 2 shamrocks in each row).

9 tier. Complete 6 branches. Tie 6 rows of shamrocks to the top of the head (there are 2 shamrocks in each row).

10 tier. Complete 5 branches shown in the photo. To do this, first make 10 branches, 4 rows of shamrocks in each. Then connect the twigs in pairs and wind 3 more rows of shamrocks (in each row there are 2 shamrocks).

11 tier. Complete 5 branches shown in the photo. To do this, first make 15 branches, 4 rows of shamrocks in each. Then connect the twigs 2 at a time and wind 1 row of shamrocks, we wind another twig and 2 rows of shamrocks (there are 2 shamrocks in each row).

Assembling the tree
Tie the tiers of the Christmas tree to the top of the head one by one. The distance between the tiers is from 1 - 2.5 cm. Use any brown thread; for this tree, reinforced threads were used for sewing in 4 additions.
The distance between the rows of trefoils is 0.5 cm.
The distance from the last row of shamrocks to the tree trunk is 1 cm.
In order for the tree to gradually expand downward in repeating rows (these are 2,4.6.8 rows), increase the distance to the trunk to 1.5 cm.
For a more durable design of the tree (this is necessary, since the tree is very heavy), insert a strong wire into the trunk at the level of 4 rows. For this tree, 4 strands of wire were used, which were subsequently bent as supports.
Planting a Christmas tree
Plant the tree in a solution of plaster and PVA or tile glue. Decorate the ground.
You can make such a beautiful Christmas tree with your own hands from beads. It can serve as a very good gift. For e production you will need green, emerald, salad and red beads. Below is a diagram of weaving such a Christmas tree.
And you can also weave such a beaded Christmas tree, and then decorate it with miniature beaded crafts.

In addition to the options that have already been described here, I want to offer a couple more simple, but interesting options for how to make a Christmas tree out of beads. I like this option, I made a bunch of such Christmas trees myself - beads and seed beads are strung on the wire in one line. Then the wire is twisted in a spiral:


Another option - beads are strung on the wire and connected with a loop, you need to make 8 loops of the same color, 7 colors are made (7 colors of the rainbow), each next 8 loops are larger than the previous ones by a centimeter. Then everything is assembled into a common trunk, starting with the smallest:


The closer the New Year is, the more you want to surround yourself with New Year's decor to maintain a festive mood. There are many ways for creative people to do something with their own hands. For example, a Christmas tree. Such a souvenir can be put at your workplace or presented to friends.
Make a beaded Christmas tree can it be like this

The result is a very realistic look. This beauty is done in two stages. First, we make the actual Christmas tree itself. Here . Don't be alarmed that the description is so long, everything is actually easy. And such a large volume of articles turned out due to a very intelligible explanation and an abundance of pictures for each step in weaving. Having made a Christmas tree according to the scheme, you get the following result

You can leave your work as it is. But if we still want a Christmas tree, then we need to decorate it. We make decorations for the Christmas tree from beads. This is actually the second stage of the work.
Making Christmas balls


The New Year is approaching and I want to have at home the symbol of the year - a Christmas tree. It's great if this is a hand-made craft. A little perseverance is enough and you can collect a green or white herringbone from beads of this color.
You will need white or green beads, a golden bead for the top (or, a pearl), a thin wire (50 m). For the ends of the branches - golden beads-cut, so the products look more attractive and natural. The wire for a white Christmas tree is better to be silver; any copper wire is suitable for a green one.

This is how the branches of the Christmas tree are collected:


And here are some more examples of how elegant and beautiful a beaded Christmas tree can be.


Christmas tree made of beads- can be a wonderful gift for the New Year or one of the details of the New Year's decor of your home (office).
DIY beaded Christmas tree it will not be difficult. If you want to make a Christmas tree in different colors (white, green, mixed), take the beads of the corresponding color, wire and follow the step-by-step photo scheme below:
It turns out to be a wonderful Christmas tree!
For another detailed master class, see this link. It turns out like this tree:

I wish you success in beading and Merry Christmas!
New Year's onion made of beads looks very impressive and festively cozy and at the same time shows how much of a creator or creator is a person with great imagination and golden hands.

There are many options for how to make such a fluffy miracle, but basically the loch is assembled from many prepared twigs in advance, this is the easiest way.
From long beads of bugles, you can just make a New Year's beauty just like that, without which it is impossible to imagine a real magical holiday New Year!


And this the scheme of a more difficult New Year's bead bowls, basically the same glass beads.

From ordinary beads, there is practically the same weaving pattern.


For a real holiday, do not forget to hang toys on your voluminous Christmas tree, which is very easy to make, because they can even be just big beautiful beads.

If you want to make a flat line for example, to decorate a New Year's costume or just for a festive decoration in the house, then here is a diagram.


Happy New Year, dear needlewomen, patience and happiness to you in the New Year!
To make a christmas tree out of beads you can use the following weaving patterns, as well as stock up on green beads, and what color the toys on the tree will be, usually we first make a lot of twigs, and at the end we collect them into the main big spruce - this will be weaving a volumetric Christmas tree, and for beginner needlewomen you can also weave a flat herringbone:


You can also watch video master classes:
Such beaded Christmas trees will become an excellent New Year's souvenir for family and friends, as well as these beaded Christmas trees can be used as an element of apartment decor for a holiday. And you can also hang your real spruce with such decorated Christmas trees, i.e. they will play the role of Christmas tree decorations.
Christmas tree made of beads
If you want to make Christmas crafts with your own hands, then a beaded Christmas tree is a great option.
Doing it is not very difficult and long and you can do it with the whole family.
How to make a Christmas tree out of beads and weaving patterns you will see in this video
I found another video that gives original ideas for creating stunning toys in the form of Christmas trees from ordinary beads. An interesting find for needlewomen who are fond of modern beading.
A beaded herringbone is a very painstaking and long work, the result of which will delight you for more than one day, but, perhaps, with careful handling, all your life. To make a beaded Christmas tree, you will need:
thin wire, beads of several colors (brown - the trunk, several shades of green to make the Christmas tree look more realistic, and colored beads for decoration), you definitely need to think about what you will make the stand from, because without the stand the Christmas tree will be unstable.


How to weave a Christmas tree from beads? It is very difficult to explain by writing. But to look at the entire manufacturing process and then repeat it, it is possible. I offer you a video master class on making a Christmas tree from beads.
See if this is what you need?
A little tricky and painstaking? But the result is worth it.
I wish you success and Happy New Year!
Before the onset of the winter holidays, you always want to decorate your home. This can be easily done with tinsel, rain, Christmas tree decorations and posters. As a rule, during this period, you may encounter an increase in prices for New Year's decorations, or the desired attributes may not be in the store. In this case, hand-made things are ideal. New Year's bead crafts are always relevant and look very beautiful.
Choosing a New Year's craft
 Everyone knows that a Christmas tree is an attribute of the New Year... Beads are suitable as a material. It can be twisted as you like, thanks to the fishing line or wire. The product will look even more beautiful if you use beads of different colors, sizes and shapes.
After choosing the material, you should familiarize yourself with the pattern of the beaded Christmas tree. Products are different: large and small, flat and voluminous, monochromatic and multi-colored. You can come up with your own version of the attribute. If there is no skill in weaving with beads, step-by-step instructions for beginners will help. Beading- a simple and interesting activity that requires attentiveness.
Material preparation
 There are many patterns for weaving Christmas trees from beads, but in any case, you will need the same material. To work you need:
- The beads are green. For a large tree, you will need a lot of beads. It is desirable that it be not only multi-colored, but also of various shapes, for example: round, oval, oblong and square.
- Fishing line or wire. The shape of the product will hold better if you take the line. And when using wire, the tree will take on a natural look and will not crumple. Both material is easy to straighten.
- Gypsum. It is required to design a ready-made attribute. If the product is lightweight, you can use plasticine or salt dough.
- Threads, ribbons, flowers. Such items will be needed for decoration.
- A tray from a flower pot. It will serve as a stand for the spruce.
Option for a Christmas tree from eyelets
 It is better to make a small Christmas tree if weaving from beads occurs for the first time. The scheme for making a small tree is easier, it is faster to master it. Additionally, you will need a green gouache and a brush. Work order:
- Collect all the beads that have been prepared for work on a wire. In this case, you need to mix the colors of beads of the same size.
- The essence of the beaded herringbone loop pattern is to arrange the number of beads in ascending order. Twelve pieces are twisted into the first loop, 13 into the second, 14 into the next and further in the same way. It is not scary to make a mistake in the calculation, this will not ruin the product.
- The crown of the head is made separately from 5 loops, woven together.
- Paint the wire of the main structure with green paint.
- Wrap the main wire on which the crown will be fixed with green tape.
- The formation of the Christmas tree begins from the top, to which the end with small loops is first attached, then loops follow in ascending order. Thus, you need to wrap the barrel.
- Bend the branches slightly so that the tree looks natural.
Flat decoration
 Beads make beautiful Christmas decorations in the form of toys and pendants. You can also make earrings, a brooch or a keychain. A flat Christmas tree made of beads with your own hands looks original.
In this case, a parallel type of weaving is used:
- It is necessary to take a wire half a meter long. Put 5 brown beads in the middle. Then take the same amount and stretch the end of the wire through the first 5 beads.
- It turned out two ready-made rows. In the same way, make the third row, but take the beads for this in a different color.
- Then put on 8 beads on both ends of the wire, and in the next row already take 18 pieces.
- You need to add multi-colored bugles to the rows.
- During weaving, each row must be reduced by two beads. After passing 5 rows, decrease by one.
- The very last bead is the crown. It should be decorated with a star, for example, yellow. It is done like this: in the first row we take one bead, in the second two, in the third again one.
- The ends of the wire must be twisted and cut.
This Christmas tree can be made in any size, depending on how many beads will be used.
 The next tree made of beads will have snowy branches... Therefore, the materials are complemented with white beads. You need to do the following:
- Each branch should be done separately. To do this, seven green and three white beads are strung on the wire.
- If you insert the opposite end of the wire into the last bead, you get a loop that should be twisted.
- Having made several such loops, they must be combined into a bundle.
- Take another wire and repeat the same. The bundles should be of different sizes.
- Attach the bundles in ascending order to the trunk made of wire.
- Create a star at the top.
Flat Christmas trees can be supplemented with special fasteners and used as earrings or brooches. For a voluminous tree, you will need a stand. It is easy to make from a flower pot tray by filling the container with plaster of paris or salt dough. Put the Christmas tree in the pallet and wait for the mass to harden. Sequins, ribbons, bows and more can be used to decorate the branches.
Attention, only TODAY!