Recently, many housewives who have free time are choosing various exciting activities for themselves. For example, some people are interested in bead weaving, others like creating unusual decorative refrigerator magnets. All family members are involved in such activities, gathering together in the living room, discussing pressing problems and concerns.
Weaving baskets from plastic bottles can be considered not only as a hobby, but also as an option for additional income. Craft various
make baskets from plastic bottles with your own hands together with children, while organizing joint leisure time.

For those summer residents who do not want to buy ready-made products to decorate their gardens, weaving a basket from a plastic bottle will be an excellent option for creating unique decorative elements.

Tools and materials
Let's talk about how to make a basket from plastic bottles with your own hands. In order for the result to meet your expectations, you need to take care of the tools and materials in advance:
- scissors;
- nylon threads;
- old plastic bottles;
- thick cardboard;
- glue or tape
Sequencing
In order to make a basket of plastic bottles beautiful and original, it offers a certain algorithm of actions.
- First you need to decide on the color that the original basket of plastic bottles will have. The color of the source material depends on this.
- Next, you can move on to cutting the bottle.
- From it we make strips of the same length and width.
- We bend them into “corners” blanks.
- We intertwine them with each other.
- We connect individual rows with each other.
- We attach a handle to the product.
- The final step will be attaching the bottom to the finished product.

This handmade basket of plastic bottles will be an excellent decorative element for any suburban area.
Advice! It is better to prepare in advance a sufficient number of strips, the width of which is 1 centimeter. Depending on the size of the product, a different number of such strips will be required.
Each piece is folded in half so that there is a fold towards the center. Then the halves are bent again, obtaining a strip whose length is four times less than the original sample.
A beautiful basket of plastic bottles with your own hands can be made from bottles of different colors. For example, the bottom of the product will be brown, and the sides will be green.

Designers offer a variety of options for creating such decor; it is quite possible to choose the method that seems most understandable and accessible.
To prevent the product from spreading, you can arm yourself with a fishing line.
Advice! If the finished basket will be used outdoors, it is best to glue the individual parts into one product with a glue gun.
Cardboard will quickly lose its performance characteristics when exposed to moisture, and the appearance of the product will be lost.

Second option
A basket from a plastic bottle can be made with your own hands using the “chess” method. This weaving is much more complex and requires the master to have certain skills.
For work you will need the same tools as in the first case. A cardboard box is used as additional material.
First, long strips are cut from a plastic bottle. The middle part of a plastic bottle is optimal for this.

Advice! To make such strips even and uniform, you can first stick electrical tape onto the bottle, and after the process of cutting the strips is completed, remove it.
The cardboard box will serve as a model for the basket being created, and it can also be used as a basis for creativity.
You need to turn the box upside down and fasten two plastic strips side by side in a horizontal or vertical direction. For this you will need tape. Then new plastic strips are attached in a checkerboard pattern, they are threaded between those that are already attached. Similar actions can be carried out without a box, for example, on a table.
After the bottom is woven, the side parts of the product are made in the same way. After completing the work, you need to carefully bend the edges of the plastic and glue them inside the basket.

If desired, add a handle to the created accessory. Such a basket will not be empty; for example, you can put flowers in it. Among the many advantages of such products, we note:
- ease of care for them;
- minimum cost of the product;
- aesthetic appearance;
- basket mobility
With the right color selection, you can create a real work of art with your own hands, which will become a source of pride in front of your guests.
Decorative items offered in stores are not always interesting and unique. That is why many summer residents try to create decorative elements on their own. Any craft you make yourself will be much cheaper, and no one else will have such a product. For example, wicker baskets made from old plastic bottles can be turned into original containers for country small items.

Modern designers consider plastic to be a universal and inexpensive material, so they are increasingly turning to plastic bottles in their work.
Advice! If you plan to use a plastic basket to place flower pots, you will need soil.
Lately, you can increasingly see homemade polyethylene flower pots at your summer cottage, which are not inferior in appearance to ready-made flower pots.
Nowadays, many craftsmen create unusual products in the handmade style, which involves the use of a variety of improvised means. Plastic bottles have become the most popular.

They are not only accessible, but will also be completely free, which is a significant advantage. Three types of plastic are suitable for creating crafts. We have already talked about the plastic from which bottles are made. The second type of raw material for creativity is packaging polymer. Its main advantage is its length. It is much easier to divide a wide ribbon into narrow fragments than plastic bottles.
You can also make unusual decorative baskets from polycarbonate, milk packaging boxes, paper folders, and plastic cups.
Such materials are much denser than packaging polyethylene, so the finished basket will have a more impressive and presentable appearance.

Conclusion
We do not recommend immediately getting rid of old packaging materials and plastic bottles. They can serve their owner well. With a little creative imagination and desire, you can create on your own a real masterpiece of design art, create unusual baskets, flowerpots for decorating a country house, garden paths.
Among the main advantages of polymer products, professional craftsmen note their water resistance. Finished items can be safely left outdoors without fear that after the first heavy rain, the product will lose its original aesthetic characteristics.
Plastic baskets fit perfectly into the design of a children's playground or preschool. They perfectly tolerate sudden temperature changes and any precipitation. Despite the fact that chemical technologies are used in the production of polymer materials, they are considered environmentally friendly materials and do not pose any harm to human health.

If desired, you can wash and dry the baskets at any time.
Also among the advantages of plastic decor, we highlight their elasticity and resistance to mechanical deformation. For example, baskets are suitable for picking apples or going to the forest to pick mushrooms and berries.

It is difficult to find a family in our country that does not have old plastic bottles. Do you want to look stylish in the eyes of your friends and acquaintances? To begin with, be patient, and in a couple of months you will be able to collect a sufficient number of plastic bottles for work. Next, it is important to choose a weaving option, taking into account the loads that the finished product will withstand. On long winter evenings, you can get carried away by preparing preparations from old plastic bottles for the future basket of all family members.
– this is not garbage, but material for wonderful crafts. Craftsmen have long gotten used to decorating city courtyards and playgrounds with products made from multi-colored plastic. However, the opinion that waste material is only suitable for street decoration can be safely recognized as a mistaken opinion. It’s easy to decorate any room with interesting ones, in particular an ordinary city apartment.
Craft from plastic bottles “Basket with snowdrops”
To work on basket preparing:
- two plastic bottles of equal diameter, brown and green,
- scissors.

Additionally, to decorate flowers we will need:
- glue for wood, glass and plastic,
- white bottle,
- as well as a flame from a gas burner or a box of matches.
First, cut off the top part of the brown bottle. She doesn't interest us. Cut the resulting glass into strips 1 cm wide.

Cut three rings from the green bottle. The width of the stripes is also one centimeter. To make it easier to pierce the plastic with scissors, you can heat one of the blades over a flame. In this case, the hot metal will melt the surface, that is, make a hole in it. From the brown top left over from the first bottle, cut a ring and divide it in half. We will use one of the halves to decorate the handle of the basket.

Now we pick up a brown glass. Let us conditionally divide the stripes into “even” and “odd”. We numbered them in the picture. We collect a bunch of odd stripes.

We put the first green hoop on the assembled bun.


We put on the second green hoop and lower it down.

All that remains is to collect the last bun and put on the third ring. The bundle will include odd stripes.

The hoops are difficult to press together. They try to fly off the glass. To prevent this from happening, we will turn the brown stripes outward from the basket and insert them into the pockets formed by the first and second green hoops. It is convenient for us to start working with odd stripes.

Now we fill the remaining strips. In this case, we will leave two pieces to decorate the handle of the basket. Our basket for snow-white spring primroses is ready.


Let's start making leaves and stems. To do this, cut two rectangles from green plastic that are wider than the height of the basket (only one is shown in the figure).

This is the kind of beauty we get.

Let's collect one of the rectangles into a bundle and insert it into the neck of the bottle. At the same time, we can cut grooves in the neck and insert some of the leaves and stems into them.

We fill the basket with wealth. One green plastic bottle was enough for us to not look empty.

These are snowdrops. To make them you needed a gas burner. We collected white plastic rings into petals, and so that they would hold the shape of a flower, we melted the edges a little over the flame.

By the way, we also processed the greens over the fire. The grass turned out to have interesting curls. We will glue the flowers to the green leaves with superglue.

Let's put a basket of primroses on the windowsill. There are snowdrifts outside the window. And here, as if in a fairy tale, they bloom.

More interesting:
See also:
Crafts from plastic bottles (photos and master classes)
DIY crafts from plastic bottles Over the entire existence of the site, we have acquired many...
New Year's sheep
Another work in the “Learning to be a Wizard” category is a children’s craft made from scrap materials “New...
It’s good that people have learned to make things from plastic bottles that we will use for a long time. As they say, here we are killing two birds with one stone: we are not polluting nature, and this empty container brings us no small benefit. I really liked the idea of weaving laundry baskets out of plastic bottles. Although you can easily weave boxes and bags in the same way. Things turn out amazing, and also light and durable. Japanese inventor Takashi Utsumi has developed a tool for cutting strips from plastic bottles for weaving baskets, but we can't afford it. We will use the old method: ordinary scissors or a stationery knife. It is clear that first you need to cut off the bottom and neck of the bottle, and then start cutting. The photo shows that we cut the strips in a circle, and one strip is obtained from one bottle. From my own experience, I know that cutting even strips is very difficult. And to make this work easier, I suggest sticking a patch or electrical tape around the entire circumference of the bottle and then cutting the bottle into strips along the edges of the electrical tape. The strips turn out to be quite even, just what is needed for weaving.
Basket of plastic bottles
How to weave a basket from plastic bottles? Yes, very simple. You can, of course, use this scheme and get a prettier weave, but if you don’t have enough experience, then I suggest taking a different path for now. First, we select the required shape of the box, turn it upside down and weave the bottom, positioned directly on the box. To prevent the weaving from unraveling, use clothespins and rubber bands, which you place around the edges of the box to secure the strips.
When the bottom of the basket is ready, we compact it more tightly and bend the strips over the box to weave the side walls, fix them again with a regular elastic band so that the strips do not get tangled, and continue weaving, but in a circle. The first two rows are the hardest to do, but then it will be much easier. Well, you have reached the desired height for the future basket. Turn the workpiece over and begin to complete the weaving. With the remaining strips free from weaving, we go around the top horizontal woven strip and bend them inside the basket, weaving them into the existing weaving.
It is more convenient to complete the work if your basket lies on its side. It seems like there is nothing complicated. You simply selected the box of the desired shape and completely braided it around it with strips from a plastic bottle, and when the weaving was completed, you pulled it out of the finished basket. We provide the weaving pattern in photographs.
If you like this idea, try weaving other things, like these. Baskets, bags, and various boxes made from plastic bottles are much more durable, stronger and lighter than ordinary ones, and one might say that they are also prettier and are very popular in households.
Decorative items purchased in a store are not always interesting and unique, unlike homemade decorations. Crafts made independently will not only cost less, but will also delight others with their unusualness and beauty. In particular, wicker baskets made from scrap materials can serve as containers for all sorts of small things, and as an element of a country landscape, if you place them, for example, on the lawn near the house. If you decide to learn how to weave baskets from the most ordinary and already unnecessary plastic bottles quickly and easily with your own hands, then this master class for just beginning craftsmen will be useful to you!
Plastic bottles are a universal material and at the same time very cheap. Therefore, if you have several pieces of empty plastic containers lying around, do not rush to take them to the trash. Take some time to be creative - the results may pleasantly surprise you.
We weave baskets from plastic bottles with our own hands in a master class for beginners
Before you begin, prepare the following items in advance:
- plastic bottles in large quantities;
- scissors;
- fishing line or strong nylon thread;
- a piece of cardboard or thin plastic;
- glue for plastic products.
The color of the bottles can be any, but first it is better to do the first job completely in one color, and only then experiment with shades of plastic. Baskets made entirely from green or brown bottles look best. If you are not satisfied with the final version, use regular paints.
The first way to weave a basket is with “corners”.This step-by-step instructions will help you complete each step of creating a shopping cart without errors. It’s better to start by cutting the bottles into their component parts. Cut the bottle plastic into long and narrow strips 1 cm wide. Their number varies depending on the size of the product, but, in any case, you will need quite a lot of strips, so it’s better not to be lazy.

After cutting the bottles, fold each of the resulting blanks in half so that a fold appears in the center. Also bend both halves of the strips separately, wrapping them inward. The ends of the parts should be folded with a central fold.
You will end up with a strip that is 4 times shorter in size than its original version. On one side there will be a fold, and on the other side there will be 2 free edges hidden inside the workpiece.
Now take two parts and connect them by pushing the ends of one into the second and moving both middles towards each other. You will get a "corner". Then insert the third part into it in the same way, then the fourth and so on to make a zigzag. Continue until the length of the zigzag is equal to the circumference of the basket.
Fasten the ends of the zigzag elements by tying them with fishing line or thread. Make another piece for the handle of the basket.
The number of elements depends on the desired height of the craft. When there are enough of them, you can start assembling.

Tie all the rows with fishing line and use it to attach the handle. It is better to make it 2 or 3 rows wide. If necessary, insert a bottom cut out of cardboard or plastic into the basket. If the finished basket will be located on the street, it is better to use the second option. Glue the bottom with a glue gun or just glue.
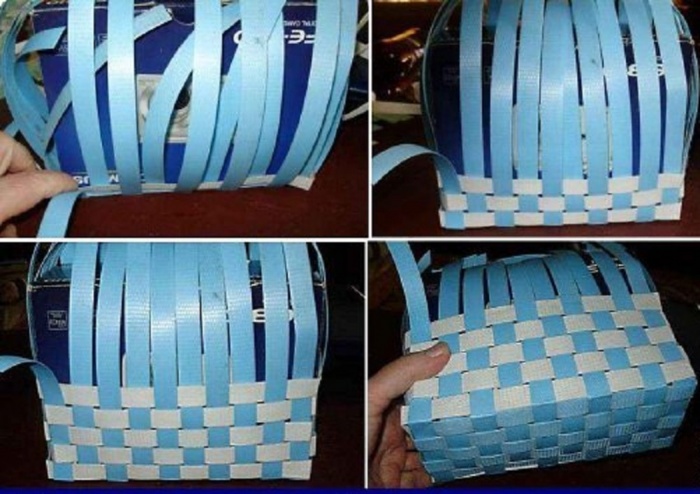
The second weaving method is “checkerboard”.This method may seem more complicated to you than the previous one, but only at first. You will need the same materials and tools as before, plus a cardboard box.
It all starts with cutting the bottles into the longest strips possible. Thin electrical tape will come in handy for this. Here's how it's done: wrap the middle part of the bottle with electrical tape at a slight angle. The layers of adhesive tape should not overlap each other. Cut the bottles along the resulting lines, peel off the tape and remove it.

Next you will need a box. It will serve as a convenient guide for the size of the product, and, one might say, a machine tool. Place it with the bottom up and fasten strips of plastic on it close to each other, in one direction (horizontal or vertical), as shown in the photo. Secure them to the sides of the box using tape. Then take more strips and thread them one by one between the parts secured to the box.
This can be done without a box, on any flat surface, for example, on a table.
Weave the sides of the basket in the same way. When they are ready, carefully bend the edges of the plastic and glue them to the inside of the product.
The handle for the basket can be made from parts - “corners”.

Such baskets are quite suitable as a stand for flower pots. If you make a basket without a bottom and fill it with soil, it will make a wonderful flower bed. The material from which the crafts are made is very durable and will not lose its beauty for many years.
The plastic is easily washed off from dirt, so the baskets can be easily moved indoors for the winter. Such an unusual decoration will certainly attract the attention of guests, and making plastic baskets will be interesting for the whole family.
The following videos show other basket weaving patterns that may interest you.
Video on the topic of the article
The active use of plastic bottles by needlewomen has good justification. Material is always at hand in large quantities. The products are waterproof, which is especially important for landscape design. Another interesting hobby could be weaving baskets from plastic bottles. The proposed master class will be an excellent guide for mastering the original technique.
Advantages of plastic and preparation for weaving
Plastic baskets can perform not only a decorative function in landscape design, but also bring practical benefits during gardening work. The strength of the material, resistance to temperature changes and precipitation, accessibility - all these qualities were appreciated by craftsmen.

If the basket is intended to decorate a site, it is designed without a bottom. This is especially convenient for further placement inside the flower bed. Using it as a container for harvest requires you to take care of a durable product with reliable handles. To work you will need:
- Plastic bottles. It is better for novice craftsmen to collect containers of the same color. When the weaving technique is at a high level, you can experiment with combining shades.
- Scissors, electrical tape.
- Nylon thread or fishing line.
- Glue for plastic.
You can decorate a finished wicker basket with flowers made from plastic bottles of a different color. It is convenient to attach the decor using a glue gun. As an option, the finished product is coated with moisture-resistant acrylic paints.

Zigzag basket
A brief algorithm of actions consists of the following steps:
- The bottom and neck of all bottles are removed.
- Plastic cylinders are cut into strips of the required size.
- Prepare preparations.
- The elements are intertwined, forming zigzags.
- The rows of the future basket are connected to each other.
- Add a handle.
- If necessary, attach the bottom.
Now about each stage of basket weaving in more detail.
Advice! Before starting work, plastic bottles need to be thoroughly cleaned of labels and glue. Otherwise, the remaining solution will quickly become a source of contamination and spoil the appearance of the decor.
Plastic cylinders from bottles are cut lengthwise, after which strips are formed. The approximate width of the part is 1-1.5 cm. It is recommended to adhere to the proportions of 1:8 relative to the length of the strip. From a 2 liter plastic bottle, a strip of 15 cm is obtained, that is, its width can reach 1.8 cm. Thus, by increasing the size of the workpiece, the time of weaving the basket will be noticeably reduced. If you do not follow the proposed proportion, the connection of the elements will turn out to be of poor quality.

Each blank for the future basket is folded in half until a fold is formed, the resulting halves are alternately bent inward. As a result, the edges of the plastic bottle part should touch the central fold from the inside. The length of the element is reduced by 4 times compared to the original strip.
Then the plastic blanks from the bottles are connected to each other by two extreme folds. The central fold remains free at first. This is how the first corner for the basket turned out. A third part is attached to it, a fourth, and so on. As a result, a zigzag is formed, the final length of which should correspond to the perimeter or circumference of the basket.

The extreme elements are fixed with fishing line. If you do not plan to use the basket on the farm, you can make handles from plastic bottles in the same way. For practical purposes, it is better to design more convenient details.
When the required number of zigzags from plastic bottles is ready, they are connected to each other with nylon thread or fishing line. The design of the bottom depends on the purpose of the product. The part can be woven or just thick plastic, secured with a glue gun.

Comment! The option with a glued bottom does not require the use of a plastic basket to carry heavy loads.
Using a similar technology, you can weave an original vase from plastic bottles.

Checkerboard weaving
A basket of plastic bottles can be made using the checkerboard weaving technique. To ensure an even shape of the product, select a suitable frame. Any rigid box will fulfill its role.

The method of cutting strips from a plastic bottle is somewhat different here. Parts for work need maximum length. Therefore, after the standard cutting of the neck and bottom, the cylinder is covered in a spiral with electrical tape so that the layers do not overlap each other. The bottle is cut along the resulting gaps, the electrical tape is removed.
Place a cardboard box of the desired shape on a table or chair upside down. Plastic strips are secured with tape as close as possible to each other between two parallel side edges. After this, they begin to weave the bottom of the basket, threading the loose strips in a checkerboard pattern. When the bottom is ready, the side edges are decorated in the same way.