With the onset of cold weather, mittens are an indispensable item in everyone's wardrobe. It is very important to protect your hands from the cold, otherwise the skin can dry out and lead to cracks and wounds.
How to knit mittens for beginners step by step
 For knitting we need: wool - 100 g., c. x 4. We begin to knit from the cuff (the initial part of the product). The circumference of the cuff is measured according to the circumference of the hand.
We knit with an elastic band 2 x 2, so that the number of loops dialed is a multiple of four. We collect loops for 2 bn., Then distribute in equal quantity to the rest. Knitting takes place in a circle. Pay attention to the fact that the front loops (l.p.) are made for the front walls, the purl (I.p.) - for the rear ones.
 We make a cuff 5 - 6 cm high, then move on to the main pattern. We knit the main pattern with a height of also 5 - 6 cm and create a hole for the thumb.
Suppose we have 12 loops on each knitting needle (cn.).
We make a hole for the thumb on the third joint venture. according to the scheme:
1. Knit the 1st st., Remove the next stitches on a pin or marker;
2. To another cn. we throw on air loops as much as we removed on a pin;
Popular articles:
 We knit further in a circle. We knit the product to the end of the scheme. After we have knitted the main part of the mitten, we begin to knit the thumb.
 We drag the loops removed to the pin to the cn. The number of loops for the thumb should be a multiple of 3. Knit the loops in a circle, starting to subtract the loops from the thumbnail. When we have 6 loops left, pull the woolen thread through the loops and tighten.
Knitted mittens for men with an ornament
 In order to knit men's winter mittens with the "Deer" ornament for beginners, we need: yarn - 150 g, knitting needles.
Basic patterns:
- elastic band 1 x 1 = 1 l.p x 1 I.p.
- front surface: l.p.
Knitting density: 16 p.x 18 p. = 10 x 10 cm.
Progress:
Left mitten with an ornament for beginner needlewomen:
We dial 36 p. On the cn. and distribute to 4 bd. We knit an elastic band 1 x 1 about 10 cm in a circle. We change the row between the first and fourth cn .. Then we make faces. satin stitch - 2 p.
We knit a drawing with an ornament according to the scheme:
1. on the 1st and 2nd bn. do 2 p. rapport A x 9 p.;
2. on the 3rd and 4th bn. we knit 18 p. of rapport C;
3. We repeat in rapport 1 the first and second p., In rapports B and C we do from 1 to 24th p .;
4. Starting from the 2nd row of persons. Smoothly, we perform additions for the wedge of the thumb:
a. on the 2nd bd. we knit loops according to the figure. When there are no 4 sts left until the end of the row, then add 1 st;
b. We knit 2 sts according to the pattern, then again add 1 st and so on according to the pattern. We include all the added loops in our general drawing;
We do repetitions in every 2nd p. x 5 times. After we have completed all the additions, we make 1 row. In the next p. we collect new 2 sts above the loops, and continue to knit in a circle up to 16 cm.
For the formation of the top, at the beginning of the 1st and 3-1 knitting needles, we knit 1 p., According to the scheme + 2 lp. together. At the end of the 2nd and 4th knitting needles we knit 2 hp. together with a broach (remove 1 p. as lp, then knit 1 lp and stretch it through the removed one), 1 lt. We repeat these decreases in each row until we have 9 p.
We take scissors and cut off the thread. Pull the thread through the loops and tighten.
When we get to the fingernail, we begin to decrease the loops. To do this, we knit 2 l.p. together until 4 sts remain. Take the scissors and cut off the thread. Pull the thread through the loops and tighten.
Right mitten: knits similarly to the left, according to symmetry.
How to knit mitts for beginners
 Mittens - fashionable winter accessory to the winter look of a young needlewoman. After reading the article, you can knit mitts for beginners yourself.
To knit mitts, we need: threads - 100 g, knitting needles x 5.
In order for the mitts to fit well on the hand, we will slightly reduce the number of loops. So, we knit 44 sts, then after 5 cm we reduce their number to 40.
 We collect the loops, and we begin knitting with an elastic band 1 x 1 about 5 cm (1 lp x 1 ip). Distribute the loops evenly over 4 b., So 11 sts on each.
 After we have finished knitting the elastic, we reduce the number of stitches by knitting 2 liters of stitches together and move on to the main drawing.
 The first 2 knitting needles are the front of the mitts, the rest are the lower. We only knit the lower part of the lp, and make the front part according to the "double rice" pattern.
 We make 1 cn., We knit 2 l.p. together for the "wedge". The basic pattern is very similar to the 1 x 1 elastic, but offset along the rows. We knit 2 p. according to the figure, the following change the direction - above the l. item. knit ip and vice versa. Thus, we alternate the rows, changing the direction. After 4 rows we knit a "wedge", starting from 2 p. Of the first joint venture. We make increases, knit 1 p., Make a yarn (n.), Then 2 p. + N.
 We work according to the picture. In the next p. we knit yarn overs lp We reach the base of the thumb. We knit 1 st of the first knitting needle, then remove 9 sts on a pin, and make 4 air loops. Next, we knit yarn overs l. In the next row we knit these loops 2 together.
 Towards the end, we again go to knitting an elastic band, then close the loops.
 Let's move on to knitting the thumb. Add 7 more to 9 p. (= 16 p.). We distribute 4 sts for each joint venture. and knit lp. - 6 p., Then an elastic band.
 We knit several rows with an elastic band and close the loops.
The left mitten mitt is ready!
We knit the right mitt symmetrically in a similar pattern.
How to knit mittens for beginners on 4 knitting needles
 Knitting warm mittens is a hot topic in the cold season. In order to knit them for beginner needlewomen, we need: wool - 160 gr., 4 knitting needles.
Knitting density: 1.7 p.x 1 cm
Before we start knitting simple mittens, we measure the girth of the wrist. We got 20 cm. The mittens are knitted for 4 bn. round.
 We calculate the number of loops: 20 cm x 1.7 = 34 sts. Then we divide them into 4 sts.: 34: 4 = 8.5 Round up to 9 sts, so we collect 36 sts. For each bn. 9 p.
Progress:
We knit the first mitten. We mentally divide 4 bn. into 2 parts - lower and upper. Thus, the first 2 bn. - the bottom part, the rest - the top.
We begin to knit the cuff with an elastic band 1 x 1. We alternate the colors of our mittens every 3 rows, so we knit up to 5 - 7 cm.
 Next, we make the main part of the mitten in a circle, up to the base of the thumb (approximately 5 cm).
We will make a hole for the finger on the 1st joint venture. for the right mitten, and the 2nd for the left. We knit 1 st. On 1 cn., Knit the rest with the front ones, and return to the 1st cn. This should create a hole. Next, knit in a circle until the end of knitting (8 cm).
 Making a toe. To do this, we subtract p. In the rows. On the 1st and 3rd bd. at the beginning we do 2 l.p. together, and on the 2nd and 4th we knit 2 hp. in the end. We knit until 2 sts remain, close them.
We return to knitting the thumb. We should get 7 loops on one cn, 6 on the other. Next, we work according to the scheme, at the end, decreasing the loops. Close the remaining 1 loop.
 We make the left mitten symmetrically to the right one.
Warm mittens are ready!
Knitting openwork mittens on two needles
 For knitting openwork mittens on 2 knitting needles for beginners, we need: wool - 120 gr., Cn.
Making the back:
2. We work with an elastic band 1 x 1 or 3 x 3, as you like. Approximately 8 cm;
3. We knit with the main pattern up to the little finger;
4. We decrease the loops and close the knitting;
We make the front part:
1. We put on the knitting needles the required number of loops (depending on the size);
2. Knit with an elastic band 1 x 1 or 3 x 3, as you like. Approximately 8 cm. Making a hole for the thumb;
3. Divide all loops into 4 parts. Remove 3 parts on a pin;
4. The rest are recruited to the joint venture. and we get as many loops as we have on the joint venture .. We knit a thumb, close the loops;
5. We work with the main pattern for the main part;
6. We decrease the loops and close the knitting;
7. We connect 2 parts;
Children's mittens knitting patterns and description
After reading the article, you will learn how to knit baby mittens for beginners yourself. In order to tie them you will need: threads and cn ..
Guided by our description and diagrams, you can easily cope with this task, even if you are a novice needlewoman.
 For knitting mittens with an ornament, we need: 25 gr. threads of different colors, knitting needles, a large needle.
We collect 32 points, wash in a circle. Knit in a circle 17 r. elastic band 1 x 1.
 After the elastic, add 5 sts in a row, alternately changing the colors of the yarn. After 14 p. from the elastic we make a hole for the finger. From the back side we knit 22 l. We knit 7 lp, and throw them back. Next, we do the main part to the end. At the end, we reduce the loops and close the knit.
 We knit a thumb on a mitten. We take the loops and knit up to 16 p.
 We knit 14 p. in height and subtract p. At the end, close the finger.
We make the second mitten in the same way as in the description.
Knitted mittens with an ornament for children
 In order to knit children's mittens with ornaments, we need: yarn - 200 gr., Knitting needles x 5.
We collect the required number of loops, we make 5 cm with an elastic band 1 x 1. We look according to the description of the scheme.
At each cn. 12 p. The hole is made on the 3rd. Knit the first loop, remove the remaining 10 on a pin. On the right knitting needle, we collect 10 loops and then we make the main part according to the description.
The second is done symmetrically to the description of our circuit.
For girls mittens with braids knitting needles schemes and description
 We collect 52 sts and knit 40 rubles in a circle. elastic band 2 x 2. Then we add 2 more p. And work according to the scheme:
 1. The finger will start after 10 p. the main pattern.
2. On the sides we add p. 3 times, thus on the cn. formed 20 p.
3. Put the item aside on a pin. We collect the missing loops, knit according to the scheme.
4. We make the main part according to the scheme. At the end, close the loops.
Children's mittens with knitting needles schemes and a description for a 3-year-old boy
 In order to knit children's mittens for the 3rd boy, we need: yarn - 200 gr., Knitting needles x 5.
We collect the required number of loops, distribute to each cn .. We make the cuff with an elastic band 1 x 1, about 5 cm (the number of loops is briefly 4). The first and second bn. - the upper part of the product, the rest - the lower one.
We make the main part of the product (5cm), add 2 sts in a row.
We make a hole for the finger. For the right hand we make a hole on the 3rd spoke, for the left - the 4th.
At each cn. 12 p. The hole is made on the 3rd. Knit the first loop, remove the remaining 10 on a pin. On the right knitting needle, we collect 10 loops and then we make the main part according to the scheme.
 After finishing the main part, we return to the thumb. We transfer the loops from the pin to the knitting needle, adding loops so that the total number is a multiple of 3.
We distribute the loops on 3 knitting needles, knit in a circle. At the end of knitting a finger, we reduce the loops and close the knitting.
The second is done symmetrically to the description of the first.
We knit the details of the birds with a crochet st. b.n. Sew beads in place of the eyes.
How to knit mittens with knitting needles with a pattern
 To knit mittens with a pattern, we need: wool - 120 gr., Knitting needles.
We work according to the description:
1. We are typing on the cn. the required number of loops (40 p.);
2. We knit with an elastic band 1 x 1 or 3 x 3, as you like. Approximately 8 cm. Make a hole for the thumb. Remove the loops on the pin;
3. We make the main part of the main pattern;
4. We decrease the loops and close the knitting;
5. Return to the thumb and knit according to the pattern;
6. We connect 2 parts;
Knitted mittens for a child video
On the Internet there are many free video lessons on how to knit children's mittens step by step. For this we need: thread - 150 gr., Knitting needles.
Watch a detailed master class in the following video
Beautiful patterns for mittens with knitting needles schemes
We present a description of several beautiful knitting patterns:
1. Openwork braids... The pattern rapport on the diagram is marked with a red rectangle. The number of rows in the rapport is 10, loops - 18. Empty cells - front. In the purl p. make the front loops purl.
 2. Openwork leaves. Pattern rapport 16 p. (Light blue). In empty cells - l.p.
 3. Openwork chess. Pattern rapport 13 p. In height, repeat the pattern from 1 to 24th p. We knit y.p. y.p. y.p., purl p. according to the scheme.

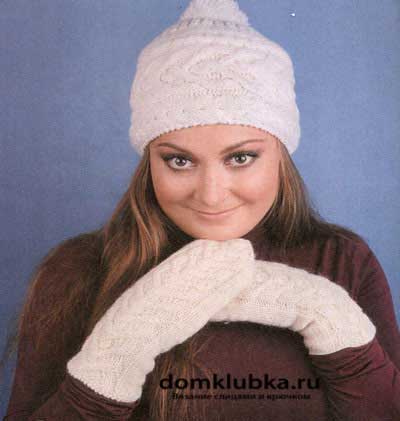
Gentle, warm, comfortable, stylish knitted mittens - what else brings so much inspiration to needlewomen in winter? Moreover, both the process of knitting mittens and the result obtained at the end are excellent. It is quite simple to knit this accessory, and it will look exclusive. If you know how and love to knit, and at the same time you want make your loved ones an exclusive gift for the New Year- there is no cooler idea than making mittens with knitting needles: a description and diagrams are already waiting for you on this page, as well as exclusive video tutorials.
Beautiful mittens with a pattern are a unique, and most importantly, a warm find for those who like to look unusual. Of course, today almost any thing can be bought in a store, however, for your own model of mittens, you can choose yarn yourself, choose a pattern and elegantly decorate your pair of mittens whatever decor you want. Of course, such a designer model in the store will not be cheap, but you can make it yourself.
Before starting work, you should carefully measure your hand so that your future product looks perfect.
What measurements should be taken before knitting mittens?
- The girth of the hand along the line from index finger to little finger(we carry a measuring tape over the bones).
- From the beginning of the hand to the tip of the middle finger.
- From pinky to wrist... The length of the thumb is also taken into account.
- We measure distance between thumb and wrist.
Also, for your future masterpieces, you need to choose the appropriate size. There is a special scale of gloves for men, women and children.

 When calculating the size of the mittens and measuring the palm, you should take into account the thickness of the yarn and the size of the knitting needles. If the knitting is dense enough, then a little more yarn is needed: when knitting mittens with bundles or braids, we take yarn by 30-40% more e than is required.

The yarn is calculated as follows:
- for women's mittens - 100-120 g of yarn;
- for children - 60-70 g of thread.
The table indicates how many loops you need to knit for knitting certain mittens. We start knitting with a brush and knit in a circle on 5 knitting needles ... We knit the cuffs with an elastic pattern- through one front loop and one purl loop, or 2 through 2. Go to the instructions for knitting mittens cuffs for beginners.

- Loops we we type on 2 knitting needles.
- Then we divide the number of loops into 4 parts(equally) and throw on the knitting needles.
- Row of loops close in a circle and tie the ends threads between each other.
- The cuffs will be 5-7cm.
- After tying the cuffs, add one stitch on each spoke.
- We knit the main part of the mittens to the area of the thumb.
Knitted mittens with a pattern: diagrams and step-by-step instructions
Now that you know how to correctly measure and knit cuffs, you can proceed to consider the pattern of mittens with knitting needles with a pattern.


Beautiful patterns on mittens are not just for women. Men's patterned mittens also exist and they look impressive and stylish.


Unusual Christmas mittens will give you a festive mood.


Consider more several stylish schemes.


Mittens with braids knitting needles: diagrams and description
In the process of knitting mittens, it is very important to correctly position the thumb. Thumb opening for right mitten will be on the third spoke, for the left - on the fourth spoke. In the photo, you can consider a small master class on knitting a finger (one of the options).

- We knit a hole for a finger... On each knitting needle you have the same number of loops, for example, 12. We knit the first loop on the third knitting needle, and pin the next 10 with a pin.
- On the right knitting needle we throw 10 air loops(you removed the same number of loops on a pin). We knit the final 12 loop.
- We knit in a circle to the level of the little finger.
- Reducing the number of links: on the first and third spoke knit 2 loops each(beginning), and on the second and fourth knitting needles we knit 2 joint loops for 2 upper lobes (end).
- On every spoke we reduce the number of links (through a row), until half of the stitches remain on each spoke (from the original number). Decrease the number of stitches in each row.
- When you have 8 stitches left, close the ring and tighten from the inside out.
We knit a thumb
- We transfer the removed loops to the knitting needle.
- When we knitted air loops, we also got edging. We recruit from them new loops in a multiple of 3.
- We distribute the loops on 3 knitting needles and knit round to the tip of the nail. We decrease the loops as described above (in point 4).
- We collect and tie the last 6 loops from the inside out.
 These 2 patterns will help you master the technique of knitting with braids.

 Here is another option for knitting mittens with a braid pattern - cute owl - for girls.
 Elegant women's mittens with flowers can be knitted for free on this mk.
How to knit baby mittens with knitting needles?
Perhaps every mother wants to learn how to knit mittens for children. This is another sure way to give your child your love, care and warmth. It is even easier to knit children's mittens with knitting needles than adults, because they are smaller in size.  Instructions for knitting children's mittens will explain to you all the nuances of work. This knitting method is considered the simplest and most versatile, and mittens are suitable for a child of 7 years old, and for 2 years, and for 1 year (see the table of sizes).
 And this one set of children's patterns will make the task a little more difficult for you, but will cause a storm of positive emotions in your baby.
 This is how delicate and cool "iron fist"... From the front they look pretty neat, but on the back of the hand there are soft “needles” made of threads, and on the fingers there is a hedgehog's muzzle. This photo contains a detailed mk.
 It should also be clarified how to finish work.
- The first way. To round off the toe, subtract the loops at the end and in the middle of each knitting needle. We close the last loops into a ring and pull the thread from the wrong side.
- Second way. On the first and third knitting needles, we knit every two first loops with a reversal. At the same time, we stretch one loop through the second. On the second and fourth knitting needles, we knit the last two loops together.
 And according to this scheme, you can knit mittens on two needles.
 This manual contains a detailed description, how to knit a finger in an accessory like seamless mittens.
 Jacquard patterns also welcomed on children's mittens.
 3 knitting needles knit cute chanterelle mittens... Your child will love this new cozy friend.
 You are such a beauty can knit on 5 knitting needles.


Popular today mittens with Indian wedge.
 Children's mittens with an ornament look laconic and stylish.
We knit mittens: beautiful models with knitting needles
We continue the interesting topic of knitting mittens and mittens. We have prepared for you a few more ways to knit mittens with knitting needles.
 - to stay closer to each other.
If you like to do needlework, namely, to knit, then read in the article how you can knit mittens, mitts, scratches of various designs for children.
In the cold, winter season, children cannot do without warm mittens. Kids love outdoor games: throwing snowballs or making a snow woman. Sometimes it happens that a child does not even have enough two pairs of mittens for one walk due to the fact that they get wet to the thread.
It is not a problem to buy mittens now, but it is much more pleasant if a caring mother-craftswoman knits warm, beautiful mittens on her own for her beloved child. However, not all moms know how they can be linked. More on this in detail.
How to knit double knitting mittens warm for boys and girls from 1 to 11 years old?
Double mittens will keep your little ones warm even in severe frosts.
In order to link them, you will need:
- Knitting needles - 5 pieces
- Threads for the product
- Pins - 2 pieces
- Hook

Progress:
- Decide on. To do this, measure the widest point on your hand (near your thumb).
- Dial a certain amount of loops... Spread them evenly on the sock knitting needles, and with the fifth knit the elastic in a circle.
- Way knitting elastic choose according to your taste: two loops - front, two - purl, or one - purl, one - front, etc.
- Rubber band height you can also knit whatever you like: 3-6 cm... It all depends on how long you want to make the mittens.
- Next, proceed to the main drawing of the product. And where the thumb will be leave the loops on the pin, without knitting.
- Make a small hole for your finger. Later knit mitten straight to the tip of the little finger.
- Then start remove hinges evenly on both sides so that the top is in the form of an isosceles triangle.
- Bind with needles, hook separately thumb.
- Crochet dial on the elastic band of the finished mittens hinges for internal parts products.
- Place the loops over four knitting needles and bind the same twin mitten, which you then tuck inside the mittens.
- According to the same description bind and second mitten.
How to knit owl mittens with knitting needles for girls: a diagram with a description
Tie pattern mittens Owl novice needlewomen can also. The main thing is to master the technique of knitting on circular knitting needles of the mittens themselves. And the pattern is not difficult to create if you do it according to the scheme.

Gray mittens for girls with a pattern - Owl
So, to get these mittens, do the following:
- Dial definite number of loops, distribute their four spokes.
- Fifth spoke knit elastic(first row: two loops - facial, two — purl, second row and all subsequent ones: according to the picture).
- Knit with an elastic band 25-30 rows... On the front of the mittens start knitting pattern as in the diagram below. Where: × - means cross the loops; - front loop; ǀ — purl loop.
- Make the eyes of the owl from beads or buttons.

Knitting pattern - Owl
IMPORTANT: When knitting, try to keep the loops the same size.
How to knit mittens with braids for girls?
Stylish pattern braids will decorate the girl's mittens and make them more voluminous. And if such mittens are trimmed with beads, then your baby will feel like a princess.

Delicate white mittens with braids
- For a simple braid, you should use twelve stitches.
- First three knit purl, then six knit stitches and purl three.
- Knit the next row according to the pattern, in total, before crossing the loops, you should knit six rows.
- The image below shows how to cross the loops to create a braid.
- For this three loops of the right harness move on the pin or extra spoke... After knit facial three loops left harness.
- Then knit three obverse with pins and knit the remaining purl loops.

How to independently knit braids on the needles?
How to knit mittens with knitting needles for girls and boys: a pattern with a description
For older children, mittens with bright ornaments are well suited. Moreover, you can combine mittens with different tones of thread. Use two, three, four shades of yarn to create a whimsical pattern. There are many online patterns for knitting these ornaments. We'll consider norwegian ornament.

- It is not at all difficult to tie such a star. It is enough to cross the threads on the back of the mittens and not to confuse where to knit white and where to knit red.
- The foundation fits(satin stitch) white yarn... A star — red threads.
- To create an ornament, you need to calculate rapport of 23 stitches in the center of the front side of the mitten so that the pattern is beautifully located on the product.
- Tie the elastic first.
- And then knit according to the picture, as in the image below.

Knitting pattern for knitting gloves with a pattern for children
How to knit mittens mitts without fingers with knitting needles for a girl and a boy: description
Mitts for a child are easier to knit than mittens. Such products are just right for mothers who are just beginning to master the knitting process.

How to knit fingerless mittens?
- Decide on the size of the product. To do this, measure three quantities: the girth of the hand in the area of the thumb, the distance to the base of the finger and the distance to the base of the other four fingers.
- Cast on ten loops and knit a row or two to find out how many loops are there per 1 cm.
- Next, based on the data obtained, dial a certain number of loops for mitts on circular knitting needles, bind the usual gum(2 purl, 2 front).
- Then choose the pattern you like, knit according to the pattern to the place where the thumb will be. Leave a few loops on a pin.
- Knit a few rows, make a hole for it.
- Tie the top mitts and edge decorate with an elastic band.
- At the end, tie only the thumb without the top.
Mittens convertible convertible knitting needles for a girl and a boy: a diagram with a description
Mitts are comfortable because the fingers are free, and nothing at all hinders their movement. However, in severe frosts, fingers must also be hidden so that they do not freeze. For this, resourceful needlewomen invented transformer mittens.

The sequence of knitting them is almost the same as that of mitts. You just have to tie one more detail - the top.
How to knit the upper part of the transformers mittens?
- Start with a rubber band... Knit two centimeters in the usual pattern: two front loops, two purl.
- Bind upper part any pattern you like to match the main one.
- Top smoothly round, gradually reducing the number of loops in the row.
- Sew on the top of the mittens to the elastic of mitts.
Knitted mittens for newborns: description
Mittens for newborns knit quickly, because the crumbs still have very small hands, and besides, there is no need to knit a thumb. Because putting on mittens knitted with thick threads will be problematic on your finger. The kid will not like the discomfort.

How to knit baby mittens?
- Dial 28 stitches on circular knitting needles. Bind three rows of knit stitches.
- Then knit six to seven rows rubber band.
- Then continue to knit row by row, without changing the number of loops, all the time with front loops. Tie the garment up to the tip of the little finger of the crumb just yet.
- Then you can gradually decrease loops so that the mittens are round.
- Decorate mittens can applique, embroidery... At the bottom insert tape to prevent mittens from falling off tiny handles.

Video: Knitting mittens for newborns with a description
Mouse mittens with knitting needles from grass for kids: a diagram with a description
These cute mittens should be knitted with two types of yarn. Use grass for the back of the hedgehog, and regular blue yarn for the main part.

Progress:
- Bind ordinary mittens on the needles of the right size
- Separately knit from weed knitting needles rectangle
- Sew on him to the mitten
- Black thread embroider the eyes of the mouse, and spout
Mittens hedgehogs with knitting needles from grass for babies: description
For these baby mittens, choose threads in gray tones. For the base - ordinary yarn, for the thorns - gray grass. Decorate the eyes of the hedgehog in the form of buttons or beads, and sew a black bead instead of the nose.

Progress:
- Bind from dark thread mittens on circular needles
- Crochet dial on the back of a hedgehog loops and carry over their on the needles
- Knit plain viscous needles until you tie the whole back
- Close the hinges and sew on the edges.
How to knit baby mittens with bumps for a girl 1-11 years old with knitting needles: diagram, description
If you like three-dimensional patterns, you can knit these mittens with knobs. To do this, take 100 grams of yarn, knitting needles, a crochet hook and start the process.

How to knit mittens with knitting needles with a pattern - bumps
Progress:
- First, cast on the loops, knit the usual one for mittens.
- Main drawing do according to the scheme, as below in the picture.
- When you reach the base of your thumb, leave the loops on the pin and continue knitting to the end.
- Then reduce the number of loops on both sides to form a triangle at the top of the mitten.
- Tie your finger with a satin stitch.

Pattern scheme and description of the knitting sequence - Bumps
How to knit mittens Minions with knitting needles for a boy 1 - 11 years old?
For such funny mittens of Minions, prepare bright yellow yarn and threads of black, blue. Also, to knit large glasses, take white, gray yarn. Make the eyes with black buttons.

DIY mittens - Minions
It remains only to tie the combined mittens with an elastic band and make glasses. Then sew them to the mittens.
Two-color mittens with knitting needles for a girl and a boy: a diagram with a description
If you have bright yarn of two colors, then you can knit beautiful mittens for the baby by combining them in the way shown in the picture below.

Knitted mittens for babies - two-tone

How to knit baby mittens kittens with knitting needles: diagram, description
We invite you to knit funny, striped kittens in the form of mittens. For such mittens, prepare:
- Light gray threads, dark yarn
- Knitting needles
- Safety pin, scissors

Cute baby mittens - kittens
Progress:
- Dark yarn tie an elastic band for mittens
- Next, knit light threads two rows
- Knit dark yarn two rows
- Leave loops for thumb on a pin
- Knit a mitten further along the pattern until you reach the kitten's head.
- Head do in bright colors
- When you start to close the hinges, leave place for ears
- Make them from dark threads
- In the end embroider threads eyes, antennae, nose
How to knit children's mittens chanterelles with knitting needles: diagram, description
- These are the red chanterelles made from 80 grams of orange yarn.
- You will need very little white thread for the spout. We knit the ears, like the thumb (only in smaller sizes), after we finish with the main part of the mitten.
- Sew the eyes and nose with black thread. ... And sew the paws separately, having previously tied them with a crochet of red threads.
- White yarn, and red, black, green, gray threads
- Knitting needles, scissors, hook
How to knit children's mittens with knitting needles with bullfinches: diagram, description
Any mother can knit very beautiful bright mittens with white bells for her child. It is enough to have patience and time and prepare material for mittens.
You will need:

White mittens with a patch - Bullfinches
Progress:
- With white threads, start knitting with an elastic band
- Then move on to the main part of the mitten.
- On the outer half, tie a bullfinch, as in the diagram below.
- Tie a mitten and don't forget to place your thumb.
- Then finish the job.

What mittens to knit for a teenager girl and boy
It is better for young men to knit mittens with ornaments or without any patterns at all. For girls, you can choose many options for mittens: openwork knit, with a volumetric pattern, bright pattern, appliqués, etc. Patterns and tips for knitting you can see
In cold winter weather, warm gloves will not only warm your hands, but also add a stylish element to your look. Any knitter can knit original mittens with knitting needles, even with minimal work experience. The models presented in this article assume the ability to knit a basic model of mittens.
Mittens with a braid pattern
For work you will need:
- b / w yarn of medium thickness - 150g;
- set of knitting needles # 4;
- pin.
Description
We type with knitting needles 52p. and go to circular knitting, distributing the loops over 4 bn. Having knitted 20 rows of elastic bands 2l.x2 life, we make an increase of 2p. Then we continue according to the scheme.
We knit the finger, starting from the 10th p. On the sides of the two central loops of the small braid we add: in each 2nd p. three times, in every 3rd p. three times, in every 4th p. three times. When on cn. for a finger we get 18-20 points, transfer them to a pin. We collect 2 more points above them. and continue to knit according to the pattern.
We knit the finger separately, using the description of the basic model of mittens for beginners, which is on our website.
We knit the main part of the mitten according to the scheme. At the end, carefully tighten the remaining loops and fasten the thread on the seamy side.
Master class
Mittens with a "Rooster" pattern
The model combines two types of ornament: geometric and animalistic. The rooster - a symbol of the next year - knitted on mittens will surely delight you!
Dimensions: mittens length - 28.5 cm; width - 9cm; thumb length - 7.2 cm; width - 4cm.
For work you will need:
- b / w brown yarn - 150g;
- b / w yarn of red, green, white colors - for a pattern;
- set of knitting needles number 3.
Description
We start knitting with a set of knitting needles 44p. We turn to round knitting. We knit 7.5 cm elastic bands 1 liter x1 life. We pass to the front surface. We knit pattern No. 1 to the height of the thumb - this is about 7cm. To knit the thumb, we outline 9p. and knit it with pattern # 2 according to the description of the basic model for beginners, presented on our website. In total, you need 20p for the thumb. For the toe of the mittens, we start decreasing 24 cm from the beginning of work. And we do it using the pattern diagram and description for beginners.
Stylish mittens with an interesting pattern for beginners: video master class
Embossed mittens
Dimensions: length - 26cm, circumference - 20.5cm.
For work you will need:
- b / w yarn - 120g (113g per 206m);
- set of socks cn. No. 3.75;
- markers;
- marker thread.
Bump pattern
From 1p. we knit 5 loops: 1l., 1n., 1l., 1n., 1l. We turn knitting, 5 life. Turn knitting again. Tie 5 persons. Turn knitting again. We knit 2p. in 1 life., 1 life., 2p. in 1 life. - we get only 3p. Turn knitting again. Then we remove 1p., 2p. in 1 person., throw on the removed item on the knitted item. We still have 1p.
Description
We dial 40p. and go to circular knitting. We put a marker at the junction. Let's link from the 1st to the 24th p. according to the scheme.
We repeat from the 17th to the 24th p. twice more. Then from the 17th to the 21st p. one more time. We have 64p at work.
We will connect the thumb with the 22nd p. We knit according to the pattern, using the scheme, until the last 13p. 2nd cn., Attach a marker thread, tie 12p with this thread. Then continue the series with the main color.
We continue to knit from 23rd to 51r. scheme.
Knit mittens toe according to basic descriptions for beginners.
Knitting the thumb
We raise 24p. along the canvas and knit in a circular manner:
1p .: persons .;
2p .: out;
3r .: persons .;
4p.: Out .;
from the 5th p .: elastic band 1 persons x1 life.
Having knitted 4cm, we make decreases:
1p: 2p. in 1L. - 12 times. We have 12p .;
2p .: persons. for the lower lobule;
3p: 2p. in 1L. - 6 times. We have 6p.
Break the thread, thread through the remaining loops, tighten, bring to the wrong side and secure.
Simple mittens: video master class
Mittens "Kitten"
Dimensions: wrist size 19cm. The rest of the dimensions of the right mitten - see the photo. The left one is mirrored.
For work you will need:
- yarn of the main color - h / w or with mohair content - 80g;
- yarn of black, dark gray, light gray, blue - 10g each;
- a needle with a large eye;
- pins;
- set of cn. No. 2.5.
Knitting
We will knit the mittens with two knitting needles. Then carefully sew the knitted halves. This method is the most optimal for beginner knitters.
Left mitten
Top
Cast on 36p with needles. and perform an elastic band 2 persons.x2 life. You can knit "braids" instead of an elastic band:
1p., 3p., 5p.: * 4p., 2i. * - repeat from * to * - until the end of the river.
2p., 4p .: according to the picture;
6p .: for 4 years. we knit a "braid" in the loops - see the photo.
Knit the cuff to the desired height. This is usually 6-9cm, about 30 rows. Then we go to the front surface. Having connected 4 p., From the 5th p. We knit a kitten according to the scheme.
The size of the picture is -27p. wide, 43r. in height. Therefore, at the beginning p. knit 7p. main color, 3p. dark gray, then - according to the pattern. A kitten's scarf can be knitted according to the pattern, or you can simplify your task - knit it separately and sew it on. We knit up to the height of the little finger, i.e. about 14 cm. Then we go back to the "braid" pattern.
We begin to decrease the loops. We do this in one of the classic ways - we knit a round or triangular toe. For a round knit in 2p. together through 1p. For triangular - we knit 2p symmetrically on both sides. together in the front rows. The remaining loops are pulled together with a thread and fastened.
Palm
We knit according to the description of the top. At a height of 6-7 cm from the beginning of the faces. smooth surface (this is about 17 rubles), we begin to knit the thumb. For this, tying 26L, remove 8p. on a pin, 2l. In the next r., Tying out. p. to the pin, dial 8p. Then we continue to work on the description of the top (only without the pattern).
Thumb
Remove 8 sts from the pin, pick holes on the sides of 2 sts. and we take into work the 8p recruited from above. We have 20p. Around 3 bd. we knit the height to the beginning of the nail. Then we make decreases: evenly decrease four times by 1p. in each p. When 3p remains, we cut off the thread, tighten the loops, bring the thread to the wrong side and fasten.
If you know how to knit, then knitting mittens will not be difficult for you. And so that the mittens are not only warm, but also beautiful, they can be knitted with various patterns, patterns and braids.
White braid pattern mittens
For these tops you need 100 grams of yarn. 100 m. It is better to take thick yarn.
# 7 circular knitting needles work best.
On the needles we collect 30 loops and knit 6-9 cm with an elastic band. Elastic band knit 1 p. Purl 1 p. Front.
After tying the elastic, move on to the braids pattern. To start forming the pattern, knit 2 p. Purl 9 p. Front and again 2 p. Purl. The rest of the pigtail is knitted only with facial loops, as shown in the diagram. Look at the diagram to the left and follow it. You just need to start knitting according to the pattern, and then the principle will be clear.
Having knitted 15 centimeters, we leave 6 loops on the finger, threading a pin into the loops, and put 6 new loops on the knitting needles and continue knitting.
When the mitten is about the size of your hand, start starting the loops.
First, on the sides of the picture and approximately in the middle of the palm. When 8 stitches remain, tighten the stitches.
So we got beautiful knitted mittens.
Patterned Gauntlets

These mittens with beautiful braids are knitted on five needles or so-called stocking needles. We cast on 52 loops, it turns out, 13 loops on one knitting needle. The elastic is knitted 2x2 for about 40 rows. Below is a diagram and description of how to knit braids correctly.
We knit a finger on the 10th row. On the side of the small braids, add to the two middle loops - in the second row 3 times. Then in the third row 3 times. When there are 18 loops, put them on a pin and continue to knit a mitten. The finger can be tied later. It fits just like the mitten itself, only in a smaller size.
Next comes double knitting, in the first row on the needles we knit alternately one front loop and two together with the front one. In the second row with front loops, two loops together, and so on until the end of the row. Pull off all remaining loops.


Beautiful Knitted Gauntlets
Knit mittens with front stitch, circular knitting, all front loops.
Knit a braid according to the scheme (see the scheme below).
Divide 48 stitches into four knitting needles and tie together to form a circle. Of the first two knitting needles, these are 24 loops, there will be a palm. Of the other two knitting needles, this is also 24 loops, there will be the back side. The first and second knitting needles are knitted with the front stitch.
We count on the third and fourth knitting needles for a pattern, 3 knit loops, 9 loops on a braid, on one needle and on the second 9 loops on a braid and 3 knit loops. Then, after 40 rows, remove 7 finger loops on a pin, and cast 7 air loops on a knitting needle.
Having knitted the mitten along your hand, start running, for this, in every second row, decrease the loop. To get a triangular launch, you need to shoot from the 1st and 3rd spokes at the beginning of the row. With 2nd and 4th needles, last sts. After 24 stitches remain, start decreasing in each row. Pull the last 8 loops.
Knit a finger
Separately, on a knitting needle, remove 7 loops from the pin, on the second knitting needle, cast on 7 loops from the top edge and remove two loops on the sides. You should have 18 stitches. Knit a finger in a circular stitch, all loops are facial. After the desired size, run your finger, just like the mitten itself.
The edges of the mittens can be crocheted and decorated with beads or beads.