Every craftswoman is simply obliged to be able to knit braids. After all, these are very beautiful patterns, they can decorate many knitted things. For beginner knitters, some patterns can seem daunting. We advise you to try to knit a braid pattern with knitting needles of the scheme and the description of which are presented in this article and make sure for yourself that everything is complicated - in fact, it starts with a simple one. Follow the instructions in the diagrams and you will succeed!
Descriptions use abbreviations:
- pattern repeat - P;
- facial rows - LR;
- purl rows - IR.
"Gertrude"
In this criss-cross pattern, the braids are decorated with jumpers. This braid looks especially good on bulky things.
The number of items must be a multiple of 24 + 15p. + 2cr. The pattern should be knit according to the pattern.
The diagram shows only the LR, in the IR we knit all stitches according to the risk. LR start with 1cr., Then repeat P the required number of times, finish 15p. to the arrow and 1cr.
Vertical P consists of 1p. for 16 rubles.
"David"
Knitted with diverging and converging braids for medium and thick yarns.
The above diagrams show how to knit such a rice-ok in two versions: a braid pattern for forward / reverse and for circular knitting.
For straight / reverse knitting with braids, the number of stitches should be a multiple of 24 + 2p. + 2cr. We start and finish the row - 1 cr.
For circular knitting of a pattern, the number of stitches is multiple of 24.
"Robin"
Combined embossed braids and plaits look great not only on clothes, but also on pillows and blankets.
The above diagrams show how to knit such a rice-ok in two versions: for forward / reverse and for circular knitting.
For straight / reverse knitting with braids, the number of stitches should be a multiple of 12 + 7p. + 2cr. We start and finish the row - 1 cr.
For circular knitting of a pattern, the number of stitches is a multiple of 12.
Combined braid pattern
An interesting combination of weaves of different widths adds extra charm to the knitted pattern.
We knit with knitting needles according to the scheme, which shows only the LR. For IR loops, we knit apparently risk.
Horizontal P consists of 12p., Vertical P - with 1p. for 18 rubles.
Braid pattern with tracks
The presence of vertical tracks from the front loops visually “pulls out” the overall pattern. The combination knitted according to this algorithm is suitable for adult and children's models made of medium yarn.
We knit according to the scheme, which shows only the LR. For IR loops, we knit apparently risk.
Horizontal P consists of 18p., Vertical P - with 1p. for 32 rubles.
Braids with leaf ornament
A charming composition of braids and small leaves looks great on jumpers, cardigans.
Knit the pattern of the braid with the leaves with knitting needles according to the scheme, which shows only the LR. A green cell in the diagram means there is no loop.
The horizontal and vertical P of the pattern are 23p, respectively. and 27 rubles.
Curly braid
The curly braid with knitting needles is knitted with simple crossings from 4 loops. How to knit such weaves is described in detail in the instructions under the diagram.
On cx. only LHs are shown. We perform IR according to risk.
Horizontal P is equal to 14p. + 2p. + 2cr. We do it vertically once with 1p. for 18 rubles, then knit, repeating from the 3rd p.
Openwork braid knitting pattern
Such a pigtail looks best from dense yarn of medium thickness. This is a wonderful pattern for women's summer blouses, tops.
On cx. only LHs are shown. We perform IR according to risk. We will knit the yarn overs in the IR. NS.
Horizontal P is equal to 16p. + 3p. + 2cr. We start knitting with loops in front of R. Vertical P is equal to 1p. for 26 rubles.
Braids on the seamy surface
The intricate weave gives the product knitted with such a pattern elegance and originality.
On cx. only LR.IR are shown according to risk.
Horizontal P on cx. indicated by arrows, vertical P is 40p.
Spit and mesh pattern
Detailed diagrams and descriptions explain how to knit this interesting pattern. Contrary to popular belief that braids are a pattern for dense, warm clothes, try to knit a summer blouse with such braids with a mesh.
The plait checkerboard holds the canvas well, preventing the knitted product from stretching and losing its shape. Braids and mesh are knitted on a multiple of 22 + 1p + 2cr. On cx. only LHs are shown. We perform IR according to risk.
Vertical P - 28p.
Braids "Shell"
Patterns that are monotonous and simple at first glance with knitting needles often look completely different in the finished product. This option is exactly that. Try it on a women's pullover and you will be pleasantly surprised with the result.
How to knit such pigtails - see the diagram. It has LR and IR.
R contains 12p. + 2cr. + 7p. for the symmetry of the risk. We repeat in height from 1p. for 8 rubles.
Wide openwork braid
This knitted pattern of wide openwork braids and side narrow braids is perfect for youth models of jumpers.
A detailed knitting pattern for beginners shows LR. How to knit the seamy side - we look apparently at risk. Knit yarns in IR with purl p.
Horizontal (in the diagram marked with a parenthesis) and vertical P are respectively equal to 26p. and 20 rubles.
Such braids look good on children's things, small interior items. The braids keep the shape of the canvas, preventing it from stretching.
On cx. shown LR, IR knit according to risk.
Braids with shadow
This pattern is a continuous weave of loops. All of them are knitted with facial.
On cx. only LRs are shown. Purl. side knits out. NS.
Horizontal P consists of 15p. For knitting, you will need extra. spoke. If desired, the movement of the loops can be crocheted.
Thick braids
A beautiful convex pattern of braids is suitable for knitting bulky things on the needles.
Description:
- 1p. (LR): 6p., * 2i., 10l. * - from * to * repeat to extreme 8p., 2i., 6y.;
- 2p. and all IRs: 8p., * 10p., 2p. * - from * to * repeat to extreme 6p., 6p.;
- 3p .: as 1p .;
- 5p.: 6l., * 2i., Remove 5p. for add. cn. at work, 5l., 5l. with add. knitting needles, 2i., 10l. * - from * to * repeat to the extreme 8p., 2i., 6l.;
- 7p., 9p .: as 1p.;
- 11p .: as 5p .;
- 13p., 14p .: as 1p.;
- 17r.: 6l., * 2i., 10l., 2i., Remove 5p. for add. cn. at work, 5l., 5l. with add. knitting needles * - from * to * repeat to extreme 8p., 2i., 6y.;
- from 19 p. by 21r .: as 1r .;
- 23r .: as 17r .;
- 24 rub. (IR): as 2p.
Braid chain
A pattern that is simple to implement and versatile in use.
The detailed diagram shows the LR. How to knit the seamy side - we look apparently at risk. Knit yarns in IR with purl p.
P is equal to 5p. + 2p. for symmetry + 2cr.
Braids with extended loops
This very delicate pattern can be used when knitting women's blouses, jumpers, hats. For beginner knitters, the pattern may seem a little daunting.
Horizontal P is equal to 18p. + 2cr. On cx. LR and IR are shown. LR should be read from right to left, IR - vice versa. We carry out once with 1p. 12p., then repeat from 3p. for 12 rubles.
Explanations according to the scheme:
- 1p .: 1i., 3l., 1l. from 3n., 8y., 1y. from 3n., 3y., 1i .;
- 2p: 1p., 3i., 1p. pull out (at the same time, throw off the yarns, transplant to the right cn., without knitting, the thread before work), 8i., 1p. pull out (repeated), 3i., 1l.;
- 3p.: 1i., 2l., 1l. from 3n., elongated p. cross to the left with 4l. (remove the elongated one, knit 4 l., then knit the elongated faces.), cross the elongated one to the right with 4 l., 1 l. from 3n., 2y., 1i .;
- 4p. and further: we read in the same way according to the scheme.
Small paired braids
Neat rice for knitting with medium thick threads. Ideal for baby clothes.
Braids knitting patterns are designed for straight / reverse knitting and circular knitting. HR and IR are shown.
Horizontal P is 7p + 3p. for symmetry + 2cr. Repeat vertically with 1p. 6p.
Braids with elongated transitions
A simple pattern on the purl of ch. will decorate any thing. Looks good on interior items such as pillows.
You should dial 18p. + 3p. symmetry + 2cr. We repeat in height from 1p. for 12 rubles.
Miniature pigtails
A very delicate pattern that requires some patience when doing it. It is better to use yarn for him not very thick, otherwise the pigtails will look ugly.
The diagram shows LR and IR.
The initial set is equal to 10p. + 2cr. We perform in height from 1p. for 16 rubles.
Braids - buds
An interesting solution to the classic pattern is suitable for knitting various things for adults.
How to knit LR is shown in c., In IR we are determined by risk.
The initial set is equal to 19p. + 1p. + 2cr. We perform in height from 1p. for 14 rubles.
Braids with fine lace
The fabric knitted with this pattern holds its shape firmly, does not stretch. The pattern can be used in various models of clothing and when knitting interior items.
The diagram shows LR and IR.
The initial set is 16p + 8p + 2cr. In height, repeat from 1p. for 12 rubles.
34/36 (38/40)You need
Yarn (45% wool, 45% polyacrylic, 10% alpaca; 100 m / 50 g) - 550 (600) g brown; knitting needles number 6; circular needles No. 6.Patterns and schemes
"Braid" for 24 loops
Knit acc. Scheme 1. It shows the front rows. In the purl rows, knit the loops according to the pattern. Between the edge loops, perform the given loops 1 time. Repeat rows 1-16 continuously.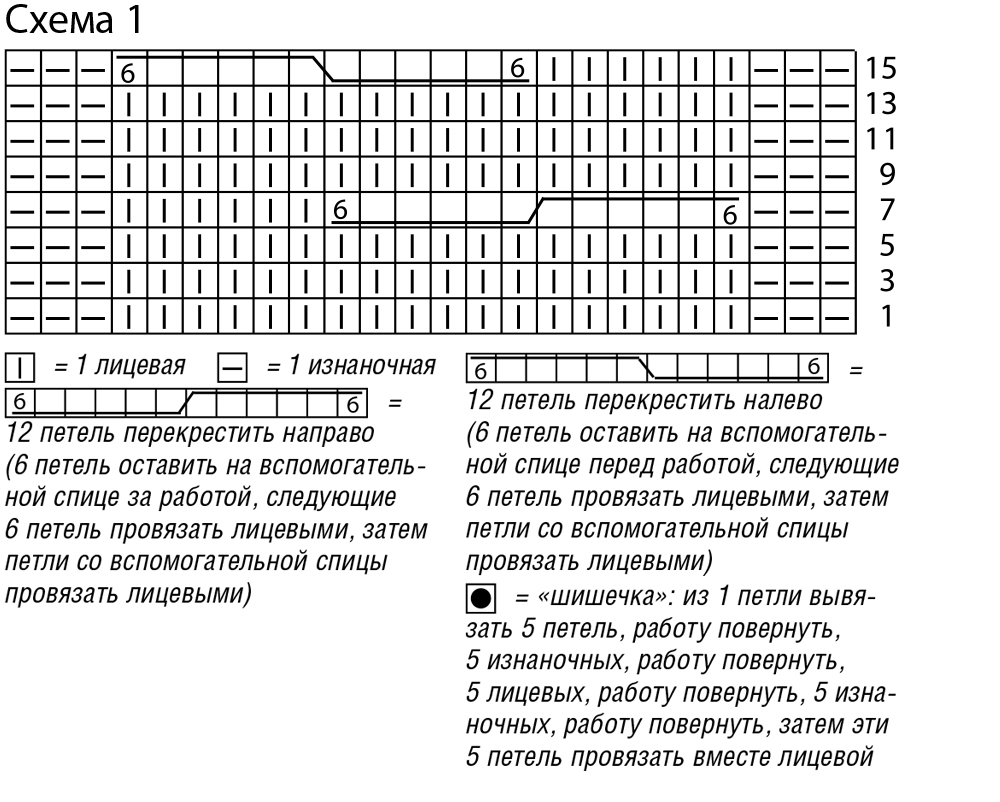
Purl garter stitch
Rows Forward and Backward: Knit and Purl Rows - Purl.Circular rows: alternately purl 1 circular row, knit 1 circular row.
Pattern from "bumps"
The number of loops is a multiple of 4 + 1 (3) + 2 edging = knit acc. Scheme 2. It shows the front rows. In the purl rows, knit all the loops with the purl. For size 1, start with 1 edge, repeat the rapport, end with loops to the arrow and 1 edge; for size 2, start with 1 edge and loop before the rapport, repeat the rapport constantly, end with loops after the rapport and 1 edge. Run 1-10 rows 1 time.
Front surface
Rows in forward and backward directions: Knit rows - knit loops, purl rows - purl loops.Round Rows: Knit only.
Elastic
Rows in the forward and backward directions (the number of loops is a multiple of 4 + 2 + 2 edging).Front rows: hem, alternately 2 front, 2 purl, finish with 2 front, edge.
Purl rows: knit loops according to the pattern.
Circular rows (the number of loops is a multiple of 4) = alternately 2 front, 2 purl.
Sequence of patterns
3.5 cm = 8 rows of purl garter stitch,
12 cm = 24 rows with front stitch,
3.5 cm = 8 rows of purl garter stitch,
5 cm = 10 rows with a "bump" pattern,
3.5 cm = 8 rows of purl knit.
A total of 36 cm = 76 rows.
Knitting density
18.5 p.x 21 p. = 10 x 10 cm, knitted with a "oblique" pattern;14 p.x 23 p. circle r. = 10 x 10 cm, purl garter stitch;
14 p. X 20 rubles / circle. = 10 x 10 cm, knitted with a pattern with "bumps" and front satin stitch.
Attention!
First, make a strip of "braids" across. Then knit the top and bottom right on the side edges of the braid. Arrows on pattern = knitting direction.Dimensions (edit)

Completing of the work
Back
Cast on 26 loops on the needles and knit "oblique".After 48 cm = 102 rows (52 cm = 110 rows) from the initial row, close all loops.
For the lower part, dial on the left side edge of the "braid" 67 (73) loops and tie 1 purl row with the front ones. This series is not taken into account in subsequent calculations. Continue work acc. sequence of patterns.
After 36 cm = 76 rows from pattern 1, continue to work for the strap with an elastic band, while in the 1st row, reduce 3 (1) sts. = 64 (72) sts. With a strap width of 6 cm, close all loops according to the pattern.
For the upper part, dial on the right side edge of the "braid" 67 (73) loops and knit with the front stitch.
After 2 cm = 4 rows from pattern 1, subtract 1 x 2 p. For the shoulder bevel on both sides, then subtract for the 1st size in each 2nd row * 2 x 2 p. And 1 x 1 p., From * repeat 2 more times; for size 2, close 9 x 2 p.
After 12 cm = 24 rows from the "braid" close the remaining 2 sts of the shoulders and leave the middle 29 sts for the neck.
Front
Knit like a back, but after 3 cm = 6 rows from the "braid" close the middle 11 sts for the neckline and finish both sides separately.For rounding along the inner edge, close in each 2nd row 1 x 3 sts, 1 x 2 sts and 4 x 1 sts. At the height of the back, close the remaining 2 sts of the shoulders.
Assembly
Sew shoulder seams.For the collar, dial on the circular knitting needles the left 29 loops of the back neckline, dial 51 loops along the edge of the front neckline and knit with an elastic band in circular rows on all 80 stitches. After 22 cm from the beginning of the knitting of the collar, close all the loops according to the pattern.
Sew side seams on the bottom at 38 (36) cm. Leave the top at 20 (22) cm open for the armholes.
For the planks, cast on the circular knitting needles along the edge of each armhole for 56 (64) loops and knit with an elastic band in circular rows. With a plank width of 14 cm, close all the loops according to the pattern.
Sew the placket halfway inward.
Photo: magazine "Sabrina" №12 / 2016
Knitting patterns with braids have been very popular for a long time, things related to braid patterns are considered classic. Despite the fact that knitting braids is done according to the same technique, there are many options for knitting braids. Basically, the weave of the braid is performed when knitting the front surface, often in order to highlight the volumetric braid, it is knitted against the background of the purl surface.
A braid in knitting can be with a weave to the right, if, when crossing the loops, the loops removed on an additional knitting needle are left at work. When crossing the loops to the left, the removed loops are located in front of work.
Braid pattern depends on the number of crossed loops, direction and frequency of weaves. When knitting things with a braid pattern, you must first knit a large sample, since the crossed loops pull together the knitting. Warm things are often knitted with a braid pattern - sweaters, jackets, hats, models with braids stretch well and at the same time retain their original shape.
Knitting braids performed in one technique. Along a row, several loops are removed on an additional knitting needle, the loops are placed in front of or behind work, depending on which direction the braid should be formed. Then the loops are knitted behind the removed loops, after the loop from the additional knitting needle and further along the row. It is better to remove loops on a special knitting needle for knitting braids with a bend in the center, but you can also use a regular short knitting needle.

To cross 16 loops to the left, in a given area, remove the first 8 loops on the auxiliary knitting needle, leave these loops at work. Knit the next 8 stitches along the row, then 8 stitches removed from the additional knitting needle, also knit. After completing the front row, knit the braids on the wrong side of the loop of the braids.


In this pattern, a lush braid is obtained. A total of 24 loops are involved in width. After every 10 rows, first cross the first 16 loops to the right, then after 10 loops 16 loops from the 9th to the 24th cross to the left.
Robin braid pattern:

ROWS IN FORWARD AND REVERSE DIRECTIONS: The number of loops is a multiple of 12 + 7 + 2 chrome.
IN CIRCULAR ROWS: The number of loops is a multiple of 12.
Knitting pattern with Robin braids:

Braid David Pattern:

FORWARD AND REVERSE DIRECTIONS: The number of loops is a multiple of 24 + 2 + 2 chrome.
Each row starts and ends with 1 chrome.
IN CIRCULAR ROWS: The number of loops is a multiple of 24.
Knitting pattern with braids David:

Daphne's braid pattern:

The number of loops is a multiple of 18 + 2 + 2 chrome. In persons. R. knit according to the pattern, while starting with 1 chrome. and loops before the rapport, repeat the rapport constantly, finish 1 chrome. In out. R. knit all loops according to the pattern. 1-28th p. repeat constantly.
Knitting pattern with Daphne braids:

Gertrude braid pattern:

The number of loops is a multiple of 24 + 15 p. + 2 chrome. In persons. R. knit according to the pattern, while starting with 1 chrome, repeat the rapport constantly, finish 15 points to the arrow and 1 chrome. In out. R. knit all loops according to the pattern. 1-16th p. repeat constantly.
Knitting pattern with Gertrude braids:


Bell braid pattern:

The number of loops is a multiple of 18 + 6 + 2 chrome. In persons. R. knit according to the pattern, while starting with 1 chrome., repeat the rapport constantly, end with loops after the rapport and 1 chrome.
In out. R. knit all loops according to the pattern. 1-18th p. repeat constantly.
Knitting pattern with Bell braids:

Marina braid pattern:

The number of loops is a multiple of 14 + 13 + 2 chrome. In persons. R. knit according to the pattern, while starting with 1 chrome. and loops before the rapport, repeat the rapport constantly, end with loops after the rapport and 1 chrome. In out. R. knit all loops according to the pattern. 1-34th p. perform 1 time, then 3-34th p. repeat constantly. When closing the loops over the "braids", knit 2 faces together.
Knitting pattern with braids Marina:


Laura braid pattern:

ROWS IN FORWARD AND REVERSE DIRECTIONS: "Spit" on 32 p.
Knitting pattern with braids Laura:

Arana's Scythe Pattern:

ROWS IN FORWARD AND REVERSE DIRECTIONS: "Spit" on 28 p.
Knitting pattern with braids of Arana:

Anna braid pattern:

The number of loops is a multiple of 20 + 10 + 2 chrome. In persons. R. knit according to the pattern, while starting with 1 chrome. and loops before rapport, repeat constantly repeat, end with loops after rapport and chrome. In out. R. knit all loops according to the pattern. When performing increases and decreases, make sure that the number of yarns and stitches knitted together coincides. 1 time perform the 1st - 38th p., Then the 3rd - 38th p. repeat constantly.
Knitting pattern with braids Anna:

Cyrus braid pattern:

The number of loops is a multiple of 18 + 10 + 2 chrome. In persons. R. knit according to the pattern, while starting with 1 chrome., repeat the rapport constantly, end with loops after the rapport and chrome.
In out. R. knit all loops according to the pattern, yarns - purl. From 2 consecutive yarns, knit the first out., The second - persons. 1st - 18th p. repeat constantly.
Knitting is easy and simple. With their help, you can create original things that are suitable only for you. Every woman has knitted outfits in her wardrobe: beautiful sweaters, scarves, warm mittens for the winter. Knitted items are now at their peak of popularity, and this is justified. Many different techniques allow you to create creative, fashionable accessories and clothing.
One of the interesting and unusual patterns is a braid with knitting needles. This easy pattern, which even novice needlewomen can master, has many execution techniques. In any case, it is easy to learn how to knit correctly - whether it is a braid of twelve, sixteen or three loops, you knit on straight knitting needles, or circular. Volumetric double or triple. They are the ones that will be discussed in this lesson..
The volumetric braid is knitted with knitting needles using the upper loops, more precisely, their movement... Several auxiliary lines are knitted with these loops. The number of loops should be divisible by three. The pattern of a volumetric braid can consist of eighteen loops, six for one braid element (there are three of them). To knit bulky braids, you need two straight knitting needles, and one additional one size smaller.
The volumetric pattern is knitted with the front satin stitch... To begin with, the first 12 links are knitted, then the last 6 are performed in the amount of three strips. This is done in order to be able to transfer the elements to the left side of the knitting. The first and last loops of the rows also need to be knitted. The product will need to be turned over several times during knitting.
When working on a new strip, you should leave the links on the additional knitting needle and tie the last six loops of the volumetric braid. Then all the links are knitted on the third knitting needle.
Now you need to complete 3 stripes without moving them. In the new row, all the loops are moved to the right. Six links are transferred to an additional knitting needle, the rest are knitted in four rows with inversion. Then the loops are knitted from the auxiliary knitting needle. Next, you will need to alternate them to the right or left, through every third row. This is how they get a voluminous braid..
We bring to your attention a knitting pattern for a voluminous braid... With the help of it, you can easily master this technique.
Braid of nine loops with knitting needles
Let's look at the braid shaping technique step by step. We type seventeen loops on the knitting needles. We start knitting from the first row:
- We do not knit the edge. Knit purl three, knit nine and purl four.
- We move on to the second row: here, too, we simply remove the edge and knit: three front, nine wrong side, three front. And we knit the last edge on the wrong side. It turns out here is such a blank.

- We proceed to the third row. Remove the edge, knit three inside out. Here we will make the first movement: we transfer three loops to the auxiliary knitting needle so that they are on the front of the work.
- Now we knit three knitting needles and transfer the loops from the auxiliary to the left knitting needle. We also knit them with the front ones. Then there are three facial and four purl. The first transfer is complete.

- We knit the fourth and sixth rows in exactly the same way as the first, and the fifth as the second.
- In the seventh row, we make the second move. Remove the edge, knit three purl and three front. We remove the next three loops with an additional tool so that they are on the seamy side. We knit three front loops, we return the loops with additional. knitting needles on the left. We knit them with the front, and the remaining loops on the wrong side.

- We knit the eighth and tenth rows as the first, the ninth as the second.
Now, to get the pattern, you just need to knit further according to the already set pattern. Alternate actions from the third to the tenth row until you get the pattern you want.

You should get a pigtail like this..
Braid pattern of 12 stitches with needles
This pattern is very popular now.... It is with the help of it that nowadays fashionable hats with pigtails are knitted. A voluminous 12-loop braid pattern can adorn products such as cardigans, plaids, sweaters.
Knitting pattern for a braid of 12 loops

Braid of 16 loops knitting pattern

In the scheme, only the front rows are drawn, the purl rows are knitted according to the pattern.
The rapport of this pattern consists of twenty loops and fourteen rows.

Legend for the scheme:

We knit double and triple braids

Double braid is one of the lightest patterns... It is very easy to learn and learn how to do it. The double braid is so named because it consists of only two plexuses.
This is a very dynamic and mobile ornament, you can change it as you like. For example, increase or decrease the gaps between patterns.

In order to start knitting a double braid according to this pattern, you will need to dial the correct number of loops. There should be three of them for symmetry, two edging and plus loops for the pattern - their sum should be divisible by 12.
The first and fifth rows are knitted in the same way: three front loops, three purl, the last three knit together on the wrong side.
The second row is knit and seamy on the other side.
In the third row, a transfer is made with a tilt to the left. Knit in three front and back loops, for extra. the spoke is moved three more. Then three loops are knitted inside out, and the displaced ones are returned and knitted with their face. The seventh row is done in the same way, only with a tilt to the right.

With the help of this detailed scheme with a description, it will be easy for you to figure out how to knit a double braid.

A triple braid, at first glance, may seem like a complicated pattern for novice needlewomen, but this is absolutely not the case. The entire first row is knitted with front loops. All purl rows are performed in the same way. In the third row, five loops are not knitted, but transferred to an additional knitting needle. The next five are face-tied. Then ten more knit stitches follow, and five are again transferred to an additional knitting needle. After knitting five knit, and then all the loops that moved.
From the fifth to the eighth, all rows are knitted with a face. Row 9 - five faces. n, five are transferred, five persons transferred are returned and knitted with facial. The eleventh row consists entirely of front loops. Thus, the rapport of the triple braid is knitted.

A voluminous braid with knitting needles is a very interesting pattern; it will be useful for many novice needlewomen to learn how to knit in this way. This pattern has many interpretations for every taste and color. You can knit with the help of such a pattern almost anything you want, because there are a lot of variations of volumetric braids. There is, for example, a very beautiful Turkish braid with elongated loops, which will adorn a women's blouse, a children's sleeveless jacket, and a voluminous snood. A thick braided braid can serve as a decorative element for both a warm cardigan and a handmade bag. A convex braid of 15 loops is used when knitting hats and sweaters. Beginner knitters like flat braids-plaits, which perfectly coexist with an openwork rhombus, a herringbone braid is suitable for more experienced ones, because now it can be knitted diagonally and on two sides, symmetrically to the central axis, and this method requires skill. In general, not only diagonal braids can decorate the drawing in the canvas - the braid can be both vertical and transverse. There is even a double-sided braid that looks the same from the front and back of knitting, so it's perfect for knitting scarves. The pattern can consist not only of whole braids - the texture of the canvas can also be created by their individual elements, such as in the Braid pattern. To understand which braid will look more spectacular on your knitting - large and lush, or it is better to choose small braids (weaving largely depends on the thickness and material of the thread), it is better to knit the pattern first.
Braids are always a great idea for any knitted product: they are universal, because they are suitable for children, women and men; there are a huge number of their varieties - there is always something to choose from; braids and plaits look wonderful on most models of knitted things, be it hats, sweaters, scarves, cardigans, snoods, mittens, sweaters, dresses, booties, vests, pants and much more.
Using schemes with descriptions of knitted braids, it is almost always possible to knit not just another thing, but a unique author's product, from which not only the craftswoman will be delighted, but everyone around.
How to knit braids with knitting needles - patterns and descriptions of patterns

It should be noted that there is a specificity of work here, which you should definitely familiarize yourself with before starting knitting. So, how to knit with braids? For this auxiliary knitting needles are required which come in different sizes. Their thickness should be selected according to a simple principle: the auxiliary knitting needles should be slightly smaller than the working knitting needles.
What is the principle of knitting braids? During operation, the loops are constantly moving. Several loops are transferred to the auxiliary knitting needle, leaving them behind or in front of the work, after which, in accordance with the selected pattern, a number of loops are knitted, and then the loops previously put on the auxiliary knitting needle are put into operation.
To make it clear on what principle the braids are knitted, we will consider several options for working with knitting needles in this style, including for novice needlewomen.
Popular articles:
Simple braid - master class for beginners
To understand the basics of knitting braids with knitting needles, consider the simplest option, ideal for beginners. This MK for knitting braids assumes that the auxiliary knitting needles are replaced with a simple pin, which is extremely convenient if you have not yet acquired the necessary tools.
How to knit a braid with knitting needles - a master class for beginners

We will make a braid for 8 loops. We select 14 loops for the sample (12 loops for the braid and its "framing" + 2 edging) and follow the pattern.
1st row: Purl 2, facial 8, purl 2;
2nd to 4th row we knit what the knitting looks like - we knit the front loops over the front ones, over the purl ones - purl loops (photo 1).
5th row: 2 purl, 4 loops to reshoot, without knitting them, on the auxiliary knitting needle and leave in front of the work; knit the next 4 loops with the front ones (at the beginning of knitting them, try not to have a large broach between the loops). Then 4 stitches from the auxiliary knitting needles are removed onto the left knitting needles and we also knit them with the front knitting needles. It turned out that the hinges, as it were, crossed with an inclination to the left (photos 2 and 3).
6th to 12th row - we knit according to the picture.
Now let's look at more complex knitted braids with knitting needles - schemes with a description will help in this difficult business for beginners.
Beautiful volumetric pattern

A voluminous braid with knitting needles will make any thing special, and will definitely add a little romance to the image. Just one volumetric pattern is enough, such as this wonderful braid, and the thing already takes on a unique look.
In the diagram, the front and back rows are indicated. The width of the motif is 40 loops, repeat in height from the 1st to the 32nd row.
Braid knitting pattern and designations:

- purl (purl - in the front rows, front - in the purl)
- front (front in front rows, purl - in purl).
 - Cross 4 loops to the left (remove the 3rd loops on the auxiliary knitting needle and leave it before work, knit 1 loop with the wrong side, then 3 loops with the auxiliary knitting needles).
- Cross 4 loops to the right (remove 1 loop on an auxiliary knitting needle and leave at work, knit 3 loops with the front ones, then knit 1 loops from the auxiliary knitting needles with a purl).
 - Cross 5 loops to the right (remove 2 loops on the auxiliary knitting needle and leave at work, knit 3 loops with the front ones, then knit 2 loops from the auxiliary knitting needles with the wrong needles).
 - Cross 5 loops to the left (remove the 3rd loops on an auxiliary knitting needle and leave it before work, knit the 2nd loops with the wrong one, then 3 loops with the auxiliary knitting needles with the front knitting needles).
 - Cross 5 loops to the left (remove 3 loops on an auxiliary knitting needle and leave before work, knit 2 knit loops, then 3 knit loops from the auxiliary knitting needles).
![]() - Cross 5 knitting needles to the right (leave 2 loops on auxiliary knitting needles at work, knit 3 knitting needles, then 2 loops with knitting needles with knitting needles.
- Cross 5 knitting needles to the right (leave 2 loops on auxiliary knitting needles at work, knit 3 knitting needles, then 2 loops with knitting needles with knitting needles.
![]() - Cross 4 loops to the left (remove 2 loops on an auxiliary knitting needle and leave before work
, Knit 2 loops with front loops, then 2 loops with auxiliary. knitting needles).
- Cross 4 loops to the left (remove 2 loops on an auxiliary knitting needle and leave before work
, Knit 2 loops with front loops, then 2 loops with auxiliary. knitting needles).
![]() at work
, Knit the 2nd loops with the front loops, then 2 loops with aux. knit knitting needles with knitting needles).
at work
, Knit the 2nd loops with the front loops, then 2 loops with aux. knit knitting needles with knitting needles).
 - Cross 4 loops to the left (remove 2 loops on the auxiliary knitting needle and leave before work,
Knit the next 2nd with purl, then 2nd loops with auxiliary. knitting needles).
- Cross 4 loops to the left (remove 2 loops on the auxiliary knitting needle and leave before work,
Knit the next 2nd with purl, then 2nd loops with auxiliary. knitting needles).
 - Cross 4 loops to the right (remove 2 loops on an auxiliary knitting needle and leave at work
, Knit the 2nd loops with the front loops, then 2 loops with aux. knitting needles with purl).
- Cross 4 loops to the right (remove 2 loops on an auxiliary knitting needle and leave at work
, Knit the 2nd loops with the front loops, then 2 loops with aux. knitting needles with purl).
 - Cross 5 loops to the left (remove the loops on an auxiliary knitting needle and leave before work, knit 3 knit loops, then 2 knit loops from the auxiliary knitting needles).
 - Cross 5 knitting needles to the right (leave 3 loops on the auxiliary knitting needle at work, knit 2 knitting needles, then 3 loops with the auxiliary knitting needles).
Pattern for a hat

The braid pattern for the hat is a permanent classic of winter fashion. For a harmonious set, the braid is often knitted also on scarves or sneakers, as well as on mittens - this makes the image complete. Well, for demi-season and winter hats, such a simple pattern for knitting braids with knitting needles with a description is useful.
Scheme and designations:

- purl loop.
- front loop.
- remove the loop with a crochet.
- knitting two stitches together with the front one.
Braid for a men's sweater

The look of a sensual man in cold weather is ideally complemented by a warm knit sweater with braids - proven by many romantic comedies! Therefore, it's time to knit a beautiful thing for a dear person.
This braid with knitting needles for a men's sweater is also knitted using an additional knitting needle.
Progress:
On the needles, the number of loops is recruited, dividing by 11 plus 2 loops for the symmetry of the pattern, plus 2 edge loops.
1,3,7,9 rows: * 2 purl, 9 facial *, 2 purl;
2 and all even rows: 2 facial, * 9 purl, 2 facial *;
5 row: * 2 purl, 3,4,5 loops are removed forward on an additional knitting needle, 6,7,8th loops are knitted, then 3,4,5th loops are knit, 3 loops are facial *, 2 are purl;
11 row: * 2 purl, 3 front, 6,7,8 loops are removed back to an additional knitting needle, 9,10,11th loops are knitted, and then 6,7,8th loops from an additional knitting needles *, 2 purl.

What to choose for a women's cardigan?

A braid for a women's cardigan can look different: large, small, repetitive, combined with other braids or in a single copy, but it will always give the knitted thing an original look.
Knitting pattern for braids and designations:

![]() - Cross 10 loops to the left (remove 5 loops on an auxiliary knitting needle and leave before work
, 5 next loops knit, then 5 loops with auxiliary. knitting needles).
- Cross 10 loops to the left (remove 5 loops on an auxiliary knitting needle and leave before work
, 5 next loops knit, then 5 loops with auxiliary. knitting needles).
![]() - Cross 10 loops to the right (remove 5 loops on an auxiliary knitting needle and leave at work
, next 5 loops knit, then 5 loops with auxiliary. knit knitting needles with knitting needles).
- Cross 10 loops to the right (remove 5 loops on an auxiliary knitting needle and leave at work
, next 5 loops knit, then 5 loops with auxiliary. knit knitting needles with knitting needles).
Both front and back rows are indicated in the diagram. The front (odd rows) we read from right to left, the purl (even rows) we read from left to right.
The width of the braid is 20 loops. We repeat in height from the 1st to the 12th row. The number of rows in the pattern in height can be increased, depending on the required pattern.
In the classic version, if we weave 5X5 braids, then between the weaves we knit 10 rows high (including front and back). Here, in this model, the number of rows in the scheme needs to be increased to 16 rows in height.
Pattern for mittens

Good mood and warmth this winter will create mittens with knitting needles from braids, which you can knit for yourself, your sister, girlfriend, mother.
This knitting option can be difficult for beginners., since the mittens need to be knitted using five stocking needles.
Progress:
Cast on 52 stitches - 13 stitches per needle. We knit an elastic band 2x2, about 40 rows. We follow the diagram and description to understand how to properly knit braids on mittens.
We knit a finger on the 10th row. On the side of the small braids, add to the two middle loops - in the second row 3 times. Then in the third row 3 times. When there are 18 loops, throw them on a pin and continue to knit a mitten. The finger can be tied later. It fits in the same way as the mitten itself, only in a smaller size.
This is followed by double knitting, in the first row on the needles we knit alternately one front loop and two together with the front one. In the second row with front loops, two loops together, and so on until the end of the row. Pull off all remaining loops.
Scheme and designations:


What pattern is suitable for a baby pullover?

You can also decorate a children's pullover with knitting needles with a beautiful braid motif. It will come in very handy for winter products, adding its own zest when creating a sweater for a child. Let's take the central braid as a basis.

In the scheme according to which we will knit a braid, only the front rows are shown. In purl, knit according to the pattern. The width of the motif is 36 loops. We repeat in height from the 1st to the 20th row.
Diagram and explanations:

- purl (purl - in the front rows, front - in the purl).
- front (front - in front rows, purl - in purl).
- Cross 3 loops to the right (remove 1 loop on an auxiliary knitting needle and leave at work, knit 2 loops with the front ones, then knit a loop from the auxiliary knitting needles with the front one).
- Cross 3 loops to the left (remove the 2nd loops on the auxiliary knitting needle and leave it before work, knit 1 loop with the front one, then knit the 2nd loops from the auxiliary knitting needles with the front knitting needles).
- Cross 3 loops to the right (remove 1 loop on an auxiliary knitting needle and leave at work, knit 2 loops with the front ones, then knit a loop from the auxiliary knitting needles with a purl).
- Cross 3 loops to the left (remove the 2nd loops on an auxiliary knitting needle and leave before work, knit 1 loop with a purl, then 2 loops with an auxiliary knitting needle).
![]() - Cross 4 loops to the left (remove the 2nd loops on the auxiliary knitting needle and leave before work, knit 2 loops with the front ones, then the 2nd loops with the auxiliary knitting needles with the front ones).
- Cross 4 loops to the left (remove the 2nd loops on the auxiliary knitting needle and leave before work, knit 2 loops with the front ones, then the 2nd loops with the auxiliary knitting needles with the front ones).
 - Cross 4 loops to the right (remove 2 loops on the auxiliary knitting needle and leave at work, knit 2 loops with the front ones, then knit 2 loops from the auxiliary knitting needles with the front ones).
 - Cross 4 loops to the left (remove 2 loops on an auxiliary knitting needle and leave before work, knit the next 2 with purl, then 2 loops with knitting needles).
 - Cross 4 loops to the right (remove 2 loops on the auxiliary knitting needle and leave at work, knit 2 loops with the front ones, then knit 2 loops from the auxiliary knitting needles with the wrong needles).
- Cross 2 loops to the left (remove 1 loop on an auxiliary knitting needle and leave it before work, knit the 2nd loop with the front one, then knit 1 loop from the auxiliary knitting needles with the front one).
Plaid pattern

To knit a blanket with knitting needles from braids is a real challenge for the needlewoman, because this work takes a lot of time and requires a lot of effort and patience, but the result will delight the whole family for many years! What needs to be done to knit the future favorite blanket of the family? The answer is simple: an unpretentious braid pattern that will add coziness to a knitted blanket.
We knit a plaid braid:
The volumetric braid consists of 12 loops. The pattern rapport is 8 rows high. Rows 1 to 8 form the pattern. In every 4th row, the braid loops overlap alternately.

Progress:
1st and 5th rows:* 9 int. n., 12 persons. n., 9 out. p. *, repeat from * to *;
2nd and all even rows: knit all loops according to the pattern;
4th row:* 9 int. p., 8 p. cross to the left (leave 4 p. on the auxiliary knitting needle before work, 4 knitting needles, then knit with the front 4 p. from the auxiliary knitting needles), 9 out. p. *, repeat from * to *;
8th row:* 9 int. n., 4 persons. p., 8 p. cross to the right (leave 4 p. on the auxiliary knitting needle at work, 4 knitting needles, then knit with the front 4 p. from the auxiliary knitting needles), out 9. etc., *, repeat from * to *.
Repeat the pattern, starting from the 1st row, to the desired height of the braid.
Video tutorial
If the photos of patterns and products with braids knitted were not clear enough, a video lesson on knitting a volumetric braid with knitting needles will help you understand some important points.