This fall, everyone's favorite is back in fashion again. poncho – it gained popularity in almost all fashion houses this year. Even though it's pretty extravagant wardrobe item , he was to the taste of many girls and women. With it, you can create unique original images for every day.
It replaced our usual short coats for autumn and early winter.. It, due to its thick knitting, came in handy for this cool season. It can be worn on top of a cardigan or tunic, or over a jacket. Such a women's poncho began to be made with long sleeves, with buttons, sometimes with cuffs, a hood or a collar. In our article you will find a wide variety of patterns describing how to crochet a warm poncho for a girl, for women, simple, round, for overweight women. This section will help beginners to knit their first thread product for the first time, guided by excellent and interesting tips.
Crochet poncho for women
This wide cape with regular neckline
came into fashion back in the 70s. It took quite a bit of time for these clothes to become an integral part of women's wardrobe
. After some time, they began to decorate and decorate it in different ways, forgetting that this is a Mexican brainchild. 


Now it can be worn as adult
so buy it children
. Also at any time of the year: even in winter, even in summer. It is also great for women of any body type. the thing is free and will help hide extra centimeters
. But even better is that now it can be crocheted, because we will attach a variety of patterns and knitting descriptions to the article. 


The most daring and catchy image this season was hooded poncho
. It is knitted from a thicker and warmer yarn, often made with sleeves.
For spring, designers offer mesh and openwork items made of light woolen fabric. They perfectly accentuate the silhouette.
But the most fashionable are beautiful and fashionable plaid poncho, with prints and patterns, fringes, patterns
. Be sure to consider whether it fits in its color scheme to the season outside the window! 


How to crochet a poncho: diagrams and description
Crochet poncho: patterns and descriptions for women for beginners are waiting for you below. And now we will give a couple of tips to everyone who wants to create such a thing:
- Always use natural threads, yarn.
- Buy yarn from reserve so that at the most inopportune moment not to perform unnecessary actions.
- Calculate everything correctly measurements in cm.
- If knitting for the first time, then take the trouble to find a few video lessons and master classes knitting to learn.
- Take a good look at what is offered. scheme and description. Find a transcript of all the abbreviations used in the diagram.
- Carefully and carefully monitor the received product: wash it properly, take care of it in order to extend its service life.
So let's start simple: poncho crochet "Pink Lagoon". For him, take the right amount of yarn and follow the diagram and description.
Next is a diagram of a product connected from motives. It is very simple to perform.

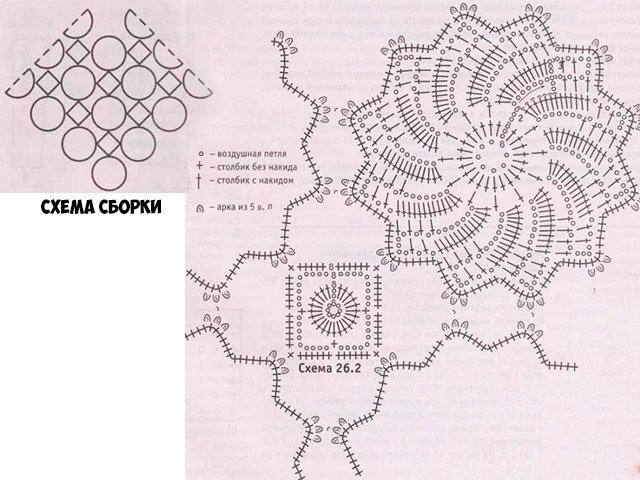

The next openwork poncho is the best for evening walks, dates, cycling.
Poncho crochet grandmother's square
To create such a square poncho, knit according to the pattern below. For beginners, we will write a detailed description:

Crochet a poncho for a woman: new models
New models poncho They are distinguished by beautiful patterns and bright colors. We offer you a model of squares with beautiful knitted flowers. Such a thing can be worn by overweight women, it will hide very well what needs to be hidden.
To do this, take 500 grams of light-colored yarn : can be beige, pink, white. Hook number 3 is quite suitable for the job. So, the square is knitted in a circular pattern, starting with a chain of 6 VP. connected in a ring S.S.
- 1 R.: 12 S.B.N. (do not knit the first S.T., instead make 2 V.P.). In the 2nd V.P. began to complete R. With the help of S.S.
- 2R.: 12 bumps with an interval of 5 V.P. Row finish 2 V.P., 1 S.S.N. in the first bump.
- 3R.: arches from S.B.N.,
(replace the first S.T. with 2 V.P.). Knit bumps in the corners, then for the corner P. knit 3 V.P. and S.S. at the top of the bump. Finish R.S.S. Repeat from 1 to 3 R.
You need to make 110 squares and attach them to each other.
Crochet shawls, stoles, poncho patterns and description
Simple crochet summer poncho
Just summer products from motifs - flowers from peach thread 400 grams and a hook size 2.5.


Poncho crochet for girls
Any little girl want to be real fashionista like her mom. To do this, you just need to tie her a pretty poncho so that she can brag about it to her friends.
Little princesses should always look beautiful, regardless of the weather. When it starts to get colder, but the gentle sun still periodically warms up, you should think about dressing the child warmer, but at the same time with taste. To do this, you can purchase a cape. It is difficult to find such a decorative thing on the market, and if it exists, it will not always suit your taste. Therefore, you will have to do this work yourself. Crochet cape for a girl is easy to knit, so even a novice needlewoman can complete the task.
Many bolero knitters use knitting needles, but not everyone likes this tool when they want to make clothes more airy and with a beautiful pattern. For crocheting, a thin thread is used, but if you want to make the knitting larger, then you should choose the appropriate hook. And it is best to consult with a little fashionista that she will like it. You can knit as a classic model with various decorative elements, as well as with a hood, which is suitable for cooler and more unstable weather.

openwork product
A vest can be a great winter wear for boys, which warms and gives freedom to the hands, and a cape is suitable for young beauties. This cape can be created independently thanks to a hook or knitting needles. This master class will teach you how to correctly knit an openwork cape for a girl using a crochet hook.
Please note that we will knit a cape for a girl for the age of 2-3 years. If the child is older, then you can simply adjust the size and amount of material for him.
What we need to prepare:
- threads of the selected color Angora Ram (40% mohair, 60% acrylic), 500 m per 100 g;
- hook number 3.
The product will be created taking into account the proposed scheme, which is provided below.


Let's get to work. We collect 107 ordinary loops that form a chain.
1st row: we collect one ordinary buttonhole, and then you need to make a single crochet into the second buttonhole from the tool, then we make five ordinary ones, skip three ordinary ones, create a single crochet into the final ordinary buttonhole. We repeat * five regular, skip 3, single crochet *, thus it is worth knitting to the very last buttonhole of this row, where we get a total of 29 arches.
2nd row: cast on four regular buttonholes, turn the knitting on the last buttonhole of the row. The next step will be knitting the double crochets into the middle buttonhole of the arch of the row that was before it, again the usual one and two double crochets into the same loop, then we knit * three regular ones, the single crochet into the middle of the arch of the row that was before that, three regular, two double crochets in the middle of the arch of the row that was before it, a regular one and two double crochets in the same buttonhole *. And so on to the very end of the row. But in the last buttonhole of the previous row we knit two double crochets, we look at how it should be on the diagram:


3rd row: when we finish the second row, we need to make three more regular buttonholes and then unfold the canvas. Next, we form a double crochet, while you need to insert the hook into the usual buttonhole of the previous row. Then air and two columns with a crochet in the same buttonhole. Now we knit in this way * five air, two columns with a crochet, air, two columns with a crochet *. And so on until the end. In the very last buttonhole of the previous row, we knit a double crochet column. Finished the third row. We knit the 4th row in the same way as the 2nd, in the same way. And so we knit 12 rows, alternating the 2nd and 3rd. It is important that the number of rows be a multiple of four. Next, we need to make a frill according to the diagram below.
13th row: we knit air, five columns without crochet in the buttonhole of the previous row, * three air, three columns with a crochet, while you need to insert a hook under the air of the previous row, then air and three columns with a crochet in the same buttonhole, three air, five columns without crochets the buttonhole of the previous row * and so on until the end.


14th row: three regular, double crochet in the middle single crochet of the row that already was, three regular, two double crochets in the same buttonhole, * three regular, two double crochets in one buttonhole of the row that was already , two more double crochets in the next two buttonholes of the row that we already knitted, four double crochets, while we thread the hook under the usual buttonhole of the past row, then two double crochets in the next three loops of the past row. Again three air, two double crochets in the middle single crochet of the row that we already knitted, three ordinary, two double crochets in the same buttonhole *. And so on until the very end.
15th row: regular, single crochet, three regular, single crochet, * three regular, double crochet, two air, two double crochets in the next buttonhole of the previous row, two air, skip the loop and knit two double crochets in the next buttonhole, two air, skip one, two double crochet in the next two buttonholes of the previous row, two air, skip one buttonhole, two double crochet in one buttonhole, two air, skip one, two double crochet in one buttonhole, two air, skipping one, two double crochet in one, two air, double crochet, three air, single crochet in the middle arch of the previous row. And so the whole 15th row.


16th row: we knit three regular, two double crochets, * regular, three double crochets under the next arch of the row that has already been knitted * and so on six times. After the usual, we knit three double crochets under each arch of the row with which we worked before.
17th row: we knit three ordinary ones and single crochets, look at the diagram. Then you still need to tie two frills and attach them to every fourth row. Next, we knit similarly frills from rows 13-17. And bring the hook under the buttonhole of the fourth row, at the same time grab the thread and knit a single crochet column, and so we knit five single crochet columns, clinging them to the buttonholes of the fourth row, after three ordinary ones. For convenience, you can bend the product and then we knit three regular ones, a double crochet column, an air one, three double crochet columns into an arch of the fourth row. We knit further as from 13 to 17 rows. Let's see what happens. Between the second and third rows, insert a string of air loops, which is decorated with pompoms, and the cape for the girl is ready!


Video on the topic of the article
This article presents videos with which you can learn how to knit beautiful capes for girls using a crochet hook with your own hands.
In this master class, I will tell you how to knit such a charming cape for a girl. It can be a great addition to your holiday outfit. We are just ahead of the New Year holidays. Cape not only complement the outfit, but also warm, if it suddenly becomes cold.
You can knit the same cape for yourself if you wish. After all, it is quite a stylish accessory. Usually capes are worn with open dresses, but if desired, it can be matched to absolutely any dress.
The cape knitted according to this description is suitable for a girl of 2-3 years.
For work I used Angora RAM yarn.
Composition: 40% mohair, 60% acrylic
Thread length: 500 m
Skein weight: 100 g
Hook number 3.
The yarn is very profitable, it took less than half a skein for my cape. Products from it are soft, warm and pleasant to the body.
So let's go ![]()
First you need to knit the base of our cape. Here according to this scheme.

Air loop (ch.p.)
Single crochet (st. b / n)
Double crochet (st. s / n)
Column with 2 crochets (st. s / 2n)
We collect a chain of 117 ch. (the number of ch should be a multiple of 16 + 5 ch)

1st row: Cast on 1 more ch. and knit st. b / n in the second loop of the chain from the hook,


3 vp skip, knit st. b / n next. c.p.

Again * we knit 5 ch, 3 ch skip, knit st. b/n*

We repeat from * to the end of the row, I got 29 arches.

2nd row: cast on 4 ch. at the end of the first row and turn over our knitting,

knit st. s / n in the middle loop of the arch of the previous row,


then knit * 3 v.p., Art. b / n in the middle loop next. arches before. row,


Repeat from * to the end of the row. In the last loop before. row we knit st with 2 / n. (see diagram).
So we have already knitted 2 rows.

3rd row: at the end of the 2nd row we knit 3 ch. and turn knitting,

knit st. s / n (we introduce the hook under the VP of the previous row.),

then 1 v.p. and 2 tbsp. s / n there,


Repeat from * to the end of the row. In the last loop before. row, knit st. s / n (see diagram).
Here is row 3 ready.

4th row: (similar to the 2nd row) ch 3, st. s / n under vp prev. row, ch 1, 2 tbsp. s/n, * 3 v.p., Art. b / n in the middle loop of the arch before. row, 3 ch, 2 st s / n, 1 ch, 2 st s / n.* Repeat from * to the end of the row. In the last we knit a loop 1 tbsp. s / n (see diagram).
Fragment of connected 4 rows.


Then we start knitting a lace frill.
We knit according to this scheme

13 row: we knit 1 ch, then 5 tbsp. b / n in the loops before. row,


then 3 s / n (introduce the hook under the ch of the previous row), ch and 3 more s / n there too.


then repeat from * to the end of the row.
Fragment of connected 13 rows.

14 row: ch 3 Art. s / n in the middle art. b/n prev. rows, ch 3,

2 tbsp. s / n in the same loop,


then 2 sts s / n in one loop before. row,

then another 2 tbsp. s / n in the next. 2 loops before. row,


then 2 tbsp. s / n in the next. 3 loops before. row.


Knit from * to the end of the row. Fragment of connected 14 rows.

15th row: knit 1 ch, st. b / n, 3 vp, art. b / n (hook in the middle loop of the arch of the previous row),


1 st. s / n, ch 2,

2 tbsp. s / n in the next. loop before. rows, ch 2,

1 p. skip and knit 2 tbsp. s / n in the next. loop, again 1 p. skip and knit 2 tbsp. s / n in the next. loop, ch 2,

skip 1 p. and knit 2 tbsp. s / n in the next. 2 loops before. rows, ch 2,


Repeat from * to the end of the row.
Fragment of connected 15 rows

16 row: ch 3, 2 tbsp. s / n (we introduce the hook under the arch of the previous row),

*1 vp, 3 tbsp. s / n under the trail. arch before. row,*

Repeat from * 6 times,

Here are our finished 16 rows.

17 next I did a strapping of 3 ch. and Art. b / n (see diagram).
We knit similarly to the lower frill, which is described above (rows 13-17).
The hook is inserted under the loop of 4 rows,

grab the thread and knit st. b/n


so we knit 5 tbsp. b / n clinging them to the loops 4 rows


In order to knit it was more convenient, we bend our knitting

and knit 3 tbsp. s / n, 1 vp, 3 tbsp. s / n in the arch 4 rows.


This is what we should end up with

Between the 2nd and 3rd rows, I inserted a rope from the v.p. and decorated it with pompoms.
Our cape is ready!

You can download larger diagrams for this cape
I hope you succeed and my master class was useful. I will be glad to feedback!
Good luck to everyone and have a great mood!
If you want to receive fresh articles, lessons and master classes from the site site to your mailbox, then enter your name and e-mail in the form below. As soon as a new post is added to the site, you will be the first to know about it!
The poncho is directly related to Latin American culture and is the traditional clothing of this people. Its main feature is its versatility. Suitable for both winter colds and cool summer evenings. Today, such a cape has many interpretations - from romantic and elegant to comfortable and youthful casual. A poncho for a girl will become a favorite thing in the wardrobe, especially if it is knitted by the hands of a loving mother.
Children's poncho with a hoodHistory and features
The first original warm capes were the traditional clothing of the Indians of South America, but it is believed that this type of clothing was invented back in the days of the ancient Incas. The poncho has a simple, rather even primitive cut, but, thanks to its versatility and convenience, it still does not lose its relevance. In Mexico, such traditional clothes are still sewn from coarse woolen cloth, the pattern resembles a square or rectangle.
 Poncho with a hood is knitted in the shape of a rectangle
 Knitted round poncho
The main feature of the poncho is the absence of sleeves. But modern models may have some kind of sleeve, which gives the model an original look.
 Poncho with neatly knitted crochet sleeves
Sewing options:
Such clothes can be of any length, the most convenient option is below the waist;
 Crocheted short poncho for a child
 Openwork elbow-length poncho
 Long poncho with asymmetric collar
Decor in the form of pompoms, tassels and any other accessories is welcome;
 Long poncho with pom-poms

 Poncho with decorative knitting and buttons
 Poncho made of felted wool will reliably protect your child from drafts and hypothermia
The poncho pattern is strictly geometric, it can have the shape of a sun or a half-sun, a trapezoid.
 Crocheted baby poncho consists of squares
 Knitted warm poncho of the classic "trapeze" shape
 Children's half-sun round poncho
Today, children's ponchos are especially popular, because such clothes are ideal for little fidgets. A warm poncho for a girl always gives a feeling of comfort, does not constrain movements, and helps to create a gentle and cute image for a little fashionista.
DIY poncho
For your children, you always want to create something with your own hands. Mom puts a particle of her soul and all her love into a product created by her own hands. If you knit a poncho for a girl with knitting needles or crochet, then it will be exclusive and unique. To create an original and incredibly comfortable item of children's wardrobe, you will need a pattern, knitting tools and. The poncho is recognized as the easiest clothing to make, so anyone, even a novice needlewoman, can knit, and especially sew.
 A teenage Burberry-style poncho can be easily sewn from a scarf or stole in a matching color.
 Poncho is sewn of fur fabric with original ears on the hood
So you can create an original sweater, bolero, blouse or even a coat in the form of an original cape.


The main advantage that a poncho has for a girl is maximum protection from wind and drafts, but at the same time, the baby’s body breathes freely and prevents overheating that is dangerous for children.
Tailoring of a children's cape
- in order to need:
- fabric (dense wool for the autumn-winter season, cozy soft knitwear for a warm spring-summer season);
- crayon or soap;
- air loop closure or buckle;
- measurements;
- sewing tools.
To sew a poncho, the following measurements are required: the length of the product and the length from the neck to the wrist. As a rule, the pattern does not raise questions even for beginners in the sewing business. The fabric is initially folded twice to get the correct square or rectangle. Then a circle is drawn along the length of the poncho with a small piece of soap or a piece of soap, and excess fabric is cut off. Next, the fabric unfolds once, so an even semicircle is obtained. A neckline is cut out strictly in the center, you can take a girl's T-shirt as a template. The top layer of material is carefully cut strictly in the middle from the very bottom to the neck. The edges of the fabric are processed. Can be decorated with beads, beads, decorative seam. A fastener is sewn (glued) near the neck. An original and simple piece of clothing for a little princess is ready.
Knitting needles
 A decorative pigtail pattern often adorns knitted ponchos for children.
 A knitted poncho cape with an original "bump" pattern will be a decoration for any girl
 Cute baby poncho in turquoise with zigzag knitting
 Multi-colored poncho for girls knitted with purl loops
 Snood poncho is a design combination of the famous snood scarf with a knitted poncho cape
To knit a poncho for a baby with knitting needles, you will need:
- yarn (acrylic yarn is best, shade optional);
- a set of stocking needles;
- set of circular needles.
First you need to tie the neck, for this 60 loops are typed. It is important to fix the loops well in order to give the edge elasticity. The neck in a poncho is knitted strictly in a circle, the peculiarity of the scheme is 1 * 1 - 7 rows. Further, the loops can be conditionally divided into 4 rows, all loops must be knitted. A simple circuit description is as follows:
- 1,2,3 front rows;
- 4 row - 1 yarn over, then remove 2 loops on an additional knitting needle, knit 2 loops, and knit 2 loops with an additional knitting needle, then 1 yarn over and 11 facial loops. Repeat the original rapport to the very end of the row;
- in the 5th, 6th, 7th row, all loops are knit;
- 8th row by analogy with the 4th row, only knit 1 yarn over with 13 front loops, so in a circle to the end of the row.
The work has the following description: knitting a poncho with knitting needles is always done in a circle from the top of the product down.
In every fourth row, 8 loops are added, so the model expands to the bottom. The sleeves must be knitted in a circle with an elastic band 1 * 1 - 6 rows with two stocking knitting needles, fold the thread twice. At the end of the work, all loops must be closed. Such an unusually comfortable item of children's wardrobe will please not only mother, but also a little fashionista.
We knit a poncho cape for a girl with our own hands. Part 1.
We knit a poncho cape for a girl with our own hands. Part 2.
Crochet
 An openwork poncho in light khaki color will immediately turn casual clothes into a festive one. Poncho crocheted in a circle with multi-colored threads
It always looks elegant and is perfect for the spring-summer season.
In order to crochet an interesting and unusual poncho model, you will need thin yarn and hook number 4. The basis of the crochet model is a lace square, which is knitted using a pattern, the size of one square is 12x12. It is necessary to connect 48 separate squares according to one scheme. Then all the lace elements are connected into one single piece, leaving a hole for the neck. The edges can be finished with a contrasting thread. To create an openwork crochet product, any patterns are suitable, you can knit not only squares, it all depends on the desire and skill of the needlewoman. For those who filigree crochet, you can "play" with contrasts in colors, choose any shape, add original decor, braid or belt. You can separately knit a collar or a hood, and then connect all the details together.
 Crochet pattern. Pattern "pineapple"
Poncho is a versatile garment that comes in handy in a variety of situations. The variety of styles and colors will help diversify the girl's wardrobe, create exclusive and incredibly delicate images. A baby in a poncho will not be left without attention, especially if the product is created by the hands of a loving mother.
We knit a simple crochet poncho for a child
During the warm seasons of the year, there are also cool days. Therefore, today we will crochet a cape for a girl. This cape will keep your baby warm in inclement weather. Description of work and photo from Anna.
Cape for girls crochet
This cape is designed for a girl 1-2 years old. Such a product can be knitted for any age, the main thing is to correctly determine the length of the initial chain.
For knitting you will need:
- 1 skein of yellow "Children's novelty" yarn and a little blue yarn of the same company;
- Hook 3 mm;
- Scissors.
Designations:
- vp - air loop
- sc - single crochet
- ssn - double crochet
Description
For a child 1-2 years we collect the initial chain of 70 loops. For different age We measure the girth of the neck and collect a chain of this length.
We make 3 loops on the rise. They count as 1 sc. In the same place we knit 2 more dc. In 2 new loops we knit 1 dc.
Then we count 4 loops and knit 1 sc in the 5th. Again we count 4 loops and in the 5th we perform 2 dc, 2 ch and 2 more dc. Skip 4 stitches and knit 1 sc. So we repeat the elements of the entire series. Each time we skip 4 loops and knit 1 sc, then 4 dc and 2 ch between pairs.
Photo 1

We complete the series in the same way as we started. We knit 1 dc in 2 loops. Then we perform 3 dc in 1 loop.
Photo 2

Along the edges we have 5 ssn. In the new row we make only 1 lifting loop. We knit 5 sc. 1 per loop. We make 3 ch and we knit 3 dc in the sc of the bottom row. Then take out the hook. We start it from the front side to the top of the first column of 3. We stretch the removed loop and knit 3 ch. This is an element popcorn pattern. Let's repeat it. 3 ssn. We take out the hook, insert it into the top of the first column and stretch the loop. We knit 3 in. In the dc of the lower row, we perform 1 sbn, then 2 ch and again 2 sbn.
Then ch 3 and repeat the element.
Photo 3

So we knit the whole row. That is, in sbn we knit 2 elements of popcorn from 3 dc. Between them 2 in. Then ch 3 and 2 sc, ch 2 and 2 more sc in the next sc of the bottom row. Ch 3 again and popcorn in sc.
In the next row, we rise by 3 loops, as we will knit dc. At the same point we knit 1 dc, then another 4 dc 1 into the loop. There will be 6 ss in total. We knit 3 in. Between the elements of popcorn we knit 1 sc.
Next, 3 ch and 3 dc under 2 ch of the bottom row. Then 2 ch and 3 more dc here.
ch 3 and ch 1 under ch 3 between popcorn.
Photo 4

We complete the series as we started. We knit 4 dc, and in the last loop 2 dc.
Photo 5

In the new row, we will repeat the row that was knitted before the previous one. That is, first we knit 6 sb in the loops of dc. Next, we will perform 3 ch and in sb we will connect the elements of popcorn, and between them we will not forget to make 2 ch. Then again 3 ch and in the dc we perform 1 sbn each (3 sbn in total), then 2 ch and again 3 sbn.
Photo 6

Now we will connect a series of ssn. It will be the same as the one that we have already knitted. After lifting loops to this point, perform 2 dc. Now there will be 7 dc along the edges of the product. Next ch 3 and 1 sc between popcorn. Then 3 ch and under 2 ch we already knit 4 dc, 2 ch and 4 more dc. Then, as usual, ch 3 and 1 sc between popcorn.
So the whole line. At the end, we also knit 5 dc, 1 in a loop, and in the last 2 dc.
The next row consists of sc. It is exactly the same as already knitted. Only this time we will knit 4 sb into elements from 4 dc, and not 3.
In the new row, again we make 3 lifting loops and 1 dc here. Then 1 sc. In total there will now be 8 ssn. Then 3 ch and 1 sc. Next, 3 ch and skip 1 dc of the bottom row. We knit from the second. We perform 3 dc in each loop, 1 column. 2 dc we will connect under 2 ch. Then we will make 2 ch and in the same place we will tie 2 more dc. In the next 3 loops, 1 sc. Next ch 3 and 1 sc between popcorn.
Photo 7

And the next row will consist of sc and popcorn elements.
All further knitting will be repeated. We will make additions only in the rows cc1n. Always in the first loop and the last loop we knit 2 dc. With each row along the edges, the number of columns will increase by 1. Then, in the elements from ss1n, we will also add 1 column on each side. At the same time, we will always skip 1 dc of the bottom row, and under ch we will always knit 2 dc, 2 ch and 2 more columns.
We alternate the rows of sc and dc to the desired size of the cape.
Photo 8

In this master class, 18 rows are knitted.
We cut the thread. We attach the blue thread to the loop of the initial chain. On the edge of the cape we tie with the usual sc. On the bottom we knit 3sc, pico of 3 loops, then again 3 sc and pico. So all the way down.
Photo 9

And on the new edge we just knit sc.
Photo 10

We do not cut the thread after tying. We will knit a collar. We make 3 lifting loops. We need to repeat in exactly the same first row as when knitting the main part of the cape.
Photo 11

All collar knitting is exactly the same. We knit only 5 rows.
Photo 12

Right under the collar, attach the thread and pick up the chain. At the end we will sew a pom-pom. The same from the second side.
Photo 13

The cape for the girl is ready!
Like the product and want to order the same from the author? Write to us.
More interesting:
See also:
How to crochet a swimsuit
Crocheted swimsuit Summer is just around the corner, and Svetlana offers to create a rather original...
How to sew baby shorts
A master class on how to sew shorts for a child, with a pattern and description, was prepared by Terekhova Galina Vladimir ...
How to knit booties with knitting needles
How to knit booties for newborns We already have several master classes on knitting booties, ...
Light and simple knitted jumper
Delicate and airy jumpers have become very fashionable. And so we will knit such a soft and light jumper with...
Knitting master class. Sundress with ruffles for a girl
Summer is very close! We suggest you knit a new thing for your baby. Another crochet with...
Hat-helmet for girls (knitting)
How is the weather, dear readers? We have had snow and blizzards for the third day already (I hope not for good...