Sewing hats is not an easy task, you need to have the skills of drawing up drawings, to be able to do the correct calculations. The finished product should fit perfectly on the head. There are complex patterns, but there are those that can be mastered even by people who have never sewed.
In the article, you can find simple patterns that will not take much time to make.
Using fleece to sew hats
Fleece has a distinct advantage over other materials. This is 100% polyester, which undergoes a special treatment that protects the product from the appearance of pills. It is quite simple to care for it, the material does not wrinkle, it is well washed and dries quickly. Pleasant to the touch, does not cause irritation when in contact with the body.
The fleece hat is warm, elastic and fits snugly to the head. A large selection of colors gives many options in order to make the desired product.
How to sew a hat yourself?
The fabric is made using a special technology, it contains threads that make the material softer on the inside. The finished product is so practical that it can be hidden in a pocket if necessary. The pattern of the men's fleece hat is easy to work with. There are several steps to go through.
- Preparation of all the necessary materials and tools.
- Taking measurements and calculating.
- Building a pattern.
- Collection of parts, fitting and fitting.
What materials are needed for sewing
To sew a headdress, you need a fabric, a meter tape, tailor's chalk, scissors, threads to match the fabric.
Before it comes to assembling the parts, the pattern must be done on paper. For this, in fact, you need the paper itself and a simple pencil. The product is sewn on a sewing machine, if one is not available, then the work can be done with a small manual seam. Due to the fact that the fabric has a slight fluffiness, the seam will be invisible.
For convenience, when sewing parts, you can pre-split them with pins, so the pins will also come in handy.
fleece
After preparing all the materials, you need to measure the circumference of the head. We divide this value by 4 and get the size of the width of one wedge. After that, you should find out the depth of the headgear. For this, a meter tape measures the distance from the forehead, through the crown and to the back of the head. The result is divided by two. This is one wedge, 4 pieces of such parts are needed.
For example: the circumference of the head is 50 cm, we divide this value by 4 (the number of wedges). 50: 4 = 25 - wedge width.
Measurement from forehead to crown was 46 cm, we divide it by 2 (front and back of the head). 46: 2 = 23 - the height of the cap.

To build a wedge, you need to draw a triangle, where the height of the triangle (23 cm) is the height of the product, and the base of the triangle (25 cm) is the bottom of the wedge. The segments from the base to the top should be rounded. By the same principle, a fleece hat with earflaps is cut. The pattern is distinguished by the presence of a few more additional details, but the basis is the same.
Fleece hat sewing technology
The fleece hat can be lined or unlined, depending on the season. The fabric does not shoot up or crumble, so the inner edges can be left as is. If the hat is unlined, then for a neat look it is still better to process the seams on the overlock.

The pattern is applied to the fabric and all 4 pieces are cut in one motion. They are sewn together. It is necessary to monitor the front and back side of the material, so as not to sew the face to the wrong side, otherwise you will have to unpick and do all the work from the beginning.

You can first sew 2 parts each and connect the resulting halves together. Or sewing one piece at a time to each other.

Fleece can be different. In this case, the hat can be made with a rim, which is then folded up. Or leave the hat as it is, just tuck the bottom seam.

Sewing hats with earflaps from fleece
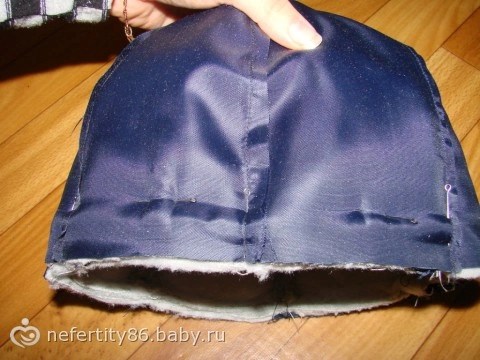
When sewing hats with earflaps, you need to make a lining. For beauty, you can choose fleece in two colors. Such models, allowing you to close the forehead, back of the head and ears, are often used in the cold season. You can sew an earflap with or without ties.
In this case, wedges are cut, as in the previous model, taking into account their own measurements. Do not forget that the pattern should be transferred to the fabric with a margin of 0.5 cm for the seams. You can find ready-made patterns of fleece hats in sewing magazines. For a hat with earflaps, you still need to cut out a visor (two parts of the same size).
Connect the wedges for the lining together, but leave a small open seam (6-7 cm) through which the finished product can be turned out. There should also be 4 parts that are sewn to the bottom of the cap (2 front, 2 lining), which will protect the ears.
Sew the details of the visor together, cut off excess allowances and turn them out. Connect the elements that will cover the ears and also turn them out on the front side.
The main parts are ready, now they need to be assembled into one product. Fold the lining of the hat and the hat itself face to face, so that all the seams are visible. Insert the visor inside between the underlay and the main part and fix its raw edge with pins between the main parts. On the sides of the visor, in the same way, put inside the parts that will cover the ears and fix with pins.
Now that all the necessary components are assembled, you need to sew them and the lining in a circle with one seam. This leaves the visor and side pieces inside the two sewn pieces. Now you should find an unsewn area (6-7 cm) in the lining and turn out the entire product through it.
Sew the open area by hand with a blind stitch using threads to match the fabric. You can find other patterns of fleece hats, when the visor and "ears" are cut out in one piece. When sewing, this one piece will need to be inserted between the main fabric and the lining fabric. The work algorithm is the same: sew all parts together and turn out through the open seam.
Sewing a sports hat from fleece
There is an even simpler version of the cap. The pattern of a fleece sports hat can be of two parts, or one if the two are cut together. If there is only one piece, then there will be only one seam - at the back. If there are two, then there will be two seams - on the sides. The patterns need to be made 6-7 cm longer, so that this piece of fabric can be tucked inward and thus insulate a part of the cap in the area of the ears.

Whichever option is chosen, first of all, you need to sew up the darts at the top of the product, and then sew the parts. We can say that the hat is almost ready. It remains to process the inner seams and tuck the edging. You can sew a decorative patch on the side.
If there is an overlocker for stretch fabrics, then it will be much easier and faster to work, because a line is immediately laid in one seam and the edge is processed.
A cap with earflaps has been the most popular winter hat for both adults and children for many years. Only the shape of its details changes somewhat: the visor becomes either larger or smaller, then it is lowered over the eyes, then raised upward, the ears are tied in different ways. Modern fur hats with earflaps are sewn on soft insulation, without a dense frame, as before. They are soft, lightweight, comfortable to wear. There are many new materials for the top of the hat and for the lining.
Material selection 
 Ear flaps can be sewn from both natural and artificial fur.
If you use natural fur, it doesn't have to be new. It is quite possible to use pieces of fur from an old fur coat or sheepskin coat. Choose the best, less worn parts of the fur. Details with earflaps can be made up of several pieces according to the "mosaic" principle. Fold the "mosaic" so that the pieces of fur are the same color, and the direction of the pile is in one direction.
 To make it easier to work with natural fur, first pull it on the board, stuffing the edges of the skin with small studs on it. At the same time, fasten the fur with the pile down. Then slightly moisten the skin with a damp sponge.
The fur should be cut only along the flesh - that is, on the wrong side, and not with scissors, but with a razor or a sharp knife.
If from fur you will make only the edge of the earflaps - the front lapel and the lapel with ears, then make the head and the lower side of the edge in this case from a different material: dense fabric, leather, suede or raincoat fabric. When using these fabrics, glue the details of the cap from the inside with doublerin.
For the inside of the hat, you will need a batting or synthetic winterizer and a lining. From modern materials, fleece has proven itself well as a lining.
Building a pattern
Start work by building a pattern. The best way to do this is to use graph paper. Redraw the pattern as accurately as possible from our drawing, where the side of the cell is 5 cm, per graph paper, having previously made a 5x5 cm grid on it.The pattern is given for size 56 (head circumference - 56 cm) without seam allowances.
If you need to change the size of the cap, enlarge or reduce the pattern by cutting the details of the cut along the middle vertical line. Place the pattern on the prepared fur from the side of the flesh and circle it with a sharp pencil or ballpoint pen. Cut the fur details of the hat, as already mentioned, with a razor or knife from the side of the skin, keeping the fur in weight so as not to damage the pile.
Details of patterns:
1 - front lapel (2 children);
2 - lapel with ears (2 children);
3 - a rim to the head (1 piece);
4 - the bottom of the head (2 pieces);
5, 6 - rim and bottom of the lining (2 pieces each);
7, 8 - wedges to the head (b det. Or 4 det.);
9 - visor (2 children).
First cut the details of the edging - the top and lining, then the head of the cap: the rim and the bottom. The shape of the head can be different. With a lack of material, it is advantageous to make it from wedges, and wedges from different materials (leather and suede, suede and cloth) can be combined.
Ear flaps can be made with a visor, the pattern of which is also given (det. 9). The visor is made of the same material as the head of the cap. For density, thin plastic can be inserted into the visor. Stitch the edge of the finished visor with a finishing stitch. The wedge pattern is also given without seam allowances.
Having cut all the details of the hat, start sewing.
Important! Before cutting, check that the measurement of the head circumference taken corresponds to the parameters of the pattern, taking into account the thickness of the lining, insulation and the allowance for freedom of fit.
If necessary, correct the pattern and only then proceed to cutting.
Remember to give seam allowances.
Experiment, you can sew completely different products using one pattern, using materials of different colors and textures.
Moreover, you can change the shape of the visor, "ears", etc.
Sequence of work

Sew all fur parts on your hands, with small stitches over the edge (Fig. 1). Details from other materials can be sewn on a sewing machine, retreating from the edge no more than 0.5 cm.
Sew the details of the edging - the upper and lower details of the visor (det. 1) and the lapel with ears (det. 2). Turn them out. Insert a 15 cm long string in the center of the ears. To prevent the underside of these parts from pulling and not being visible, lightly fit the upper fur parts along the rounded lines. To do this, cut them slightly larger than the bottom ones (by about 0.5 cm).
Sew the head of the earflaps. First - darts on the bottom (det. 4), then both halves of the bottom along the midline. And at the end, sew part 3 to the edge of the bottom, having previously sewn its vertical edges. Figure 2 shows the finished cap head.
https: //img0..jpg "align =" left "width =" 500 "> To the finished" cap "you need to sew a" edge "- a strip of fabric. In the future, a lining will be sewn to it. An oblique inlay is used as a" edge " Those who have come across sewing should know what it is or any strip of fabric cut at an angle of 45 degrees.
In order for the edge to lie well and not tighten the cap, its total length should be 2-2.5 cm longer than the head circumference.
Attach the front of the lapel to the head. The inner part of the earflaps is made dense, quilted with batting or padding polyester. Hide the details of the lining - the rim and the bottom - from the lining fabric and from the batting and sew them together on the machine (Fig. 4) (you can buy a ready-made quilted lining on a padding polyester). Sweep the rim and bottom and insert the inner part into the earflap.
Adjust the volume and length of the lining and only then sew it on the machine. Finally connect both parts of the cap by sewing the lining to the bottom of the earflaps.
More pattern options


 In conclusion, a few practical tips that can help you get started.
Rough fur, leather or suede sew with a thin short needle with strong threads folded in half (nylon, cotton with polyester). Use a thimble.Some seams on parts with fur can be made not with your hands, but with a sewing machine. After sewing, the pile from the seam on the front side must be pulled out with a thick needle.
Iron parts made of leather and suede with a warm iron through a dry cloth(Be careful with steam, because suede requires dry heat, not moisture - the steamed areas of suede can change color or become coarse).
A certain shape of fur details can be achieved not only with a cut. If you slightly moisten the mzdra, then it will easily stretch or, conversely, dry out, shrink. Use these properties when pulling the fur over the board when the shape of the fur piece does not match the pattern.
If you want to renew old fur, then brush it with cornmeal or bran.... Take a handful of flour (bran), sprinkle on the fur and rub with your hand. Then shake off the fur and brush. To get fluffier fur, gently comb it with a comb.
To make the skin softer and more elastic, brush it with castor oil or sour milk.
A cap with earflaps is considered one of the most popular hats today, both among men and women. In addition, children of different ages are very fond of wearing such a hat. In such a hat it is always cozy, warm, which saves in the most severe frosts. Since this headdress has gained more and more popularity, we decided to tell you how to sew a hat with earflaps, for example, from fur (natural or synthetic, there is no difference here).
First you need to decide what will be the difference between the model of a female hat with earflaps and a male one. The female version will differ in the shorter length of the headphone and the back, that is, the back. For men, the headphones on the cap will be larger, so that they can tie them on top of the cap.
Note that this headpiece is so versatile that it doesn't matter what material you choose for sewing it. We will consider sewing a fur-based cap with earflaps, since it is this material that is considered classic for sewing a cap with earflaps.
In order for you to correctly understand the pattern of a cap with earflaps, we will present a photo where all its component parts will be described in detail. In the next photo we will show a pattern of a 56-57 size earflaps. This hat will be considered a feminine version. In the photo, one cell will correspond to two centimeters.
Hat sewing technology at home
First of all, you should cheer you up a little by the fact that this task is NOT impossible for you. If you follow all the steps sequentially and do not put off the sewing of the hat aside, then you can sew the hat in a few hours. Here are some tips that will greatly facilitate the process of creating a pattern and sewing a hat itself.
- First of all, while cutting out the details, you need to follow the direction of the pile, since all the components of the earflaps must be of the same shade.
- To design a hat, you first of all need: paper for a pattern, a lining like a batting in the vicinity, you will need to insert a denser lining with non-woven fabric into the visor, while the lining and fur should be connected with small hand stitches.
Pattern for a hat with earflaps
- In order for the scheme of the earflaps to be correct, you first need to measure the girth of the head and draw a circle on the pattern paper with a radius that will be a quarter less from the measured radius of the head. Next, you will need to bend the circle in half and cut it along the fold line. After that, step back 1 cm around the circumference and round off the cut line. Make two symmetrical grooves, respectively, 2 cm wide and 4 cm deep from above.
- Next, you will need to draw a rectangle with sides of 12 and 18 cm, while one of the short sides should be cut off in a circle. This element will fit the ears of the hat.
- Next, subtract the width of the ears (24 cm) from the measured head volume and divide the value that remains in half. Draw a rectangle of the resulting length, while its height should correspond to 10 cm.There should be two such rectangles, while the first will correspond to the back of the cap, and the second rectangle will correspond to the visor, which will need to be cut in the upper corners around the circumference.
Sewing process
- Select sewing thread. You need to choose dense, in tone, starting with 20 and ending with 50 numbers. The thickness will depend on the thickness of the fur.
- After choosing the threads, you need to grind all the darts, which are placed on the halves of the cap;
- Next, you need to connect both halves of the cap, so that all the grooves coincide with each other;
- After that, you will need to connect the headphones to the head of the cap;
- The visor connects to the headphones;
- Make a sub-hem for the cap, which will be sewn to the top edges;
- During this process, one should not forget about landing on rounded parts;
- When sewing the headphones, you will also need to insert the string for the ties;
- Further, we advise you to connect a sub-face with a cap;
- After that, it will be possible to sew a braid to the bottom edge of the front of the cap, the width of which should reach 1.5 cm. You need to sew the braid with a furrier's seam.
Today I will tell you the secret of making such a hat - unisex, suitable for boys, girls, as well as their parents :). 

For such a hat, you can use fleece, polartek, any kind of raincoat fabric +++ whatever insulation you like. I have a raincoat fabric - Oxford (a kind of membrane), Polartek 300 units (thermal cloth) and Thinsulate 100ka (insulation.)
Let's start with the pattern. You will need three measurements: head circumference, face circumference, and the distance from the eyebrow line, through the crown of the head to the base of the skull.
For example, you got OG-48, OL-52, and 34 
First, let's build a bowler hat, it will consist of 6 wedges. To do this, add 4 cm to the exhaust gas.Total 52 (if a very thick insulation, then it is advisable to make an increase of 6 cm.)
We divide 52 cm by 6 wedges, we get 9 cm - this is the width of the wedge. We divide the distance from the eyebrows to the back of the head in half 34/2 = 17 - this is the height of the wedge we build a rectangle: 17 height - 9 cm wide 
Mark the center on the upper side and complete the isosceles triangle.  We mark the centers of the sides and raise them by 0.8-1 cm, smoothly form the bend.

We get just such a detail  Then build your ears. The length of the ears of the edge of the ears should be 2/3 of the half-girth of the head minus 1-2 cm or the length of 4 wedges - 2-4 cm.It turns out (9 * 4 - 2) / 2 = 12.5 cm. And the height: the girth of the face minus the distance from halve eyebrows to the back of the head. (52-24) / 2 = 14 cm.
We build a rectangle of 12.5 by 14 cm.On the right side from above, set aside 3 cm and arbitrarily shape the ears with a smooth line. 
The visor should be 2 wedges - 2 cm. That is. 18 cm - 2 = 16 cm.
We build a rectangle with a width of 16 cm - the height is arbitrary, about a little more than half the height of the wedge. 
We draw arbitrarily the line of the top of the visor. The pattern is ready, you can cut it. We cut out all the details with a seam allowance, I make 0.7 cm. 6 wedges, 2 ears and a visor. We cut out the details of the lining and insulation literally 1.5 - 2 mm less than the details of the top. 
We sew the details of the insulation and the details of the lining along the contour. We also sew the ears along the middle seam. 
Then we grind down the details of the "bowler hat" one by one, not in 2, not in 3, namely one to the other one after another, then we get such a beautiful center from which the seams of the wedges diverge. 
We do the same with the details of the top and the visor, so that the details turn out beautifully, we make die cuts at the places where the stitching turns. 
The seams between the wedges of the top MUST be ironed out so that the seam allowances lie in one direction. 
Here are all the details are sewn, it remains to assemble the hat: 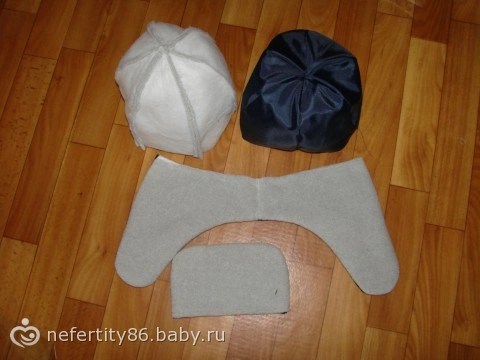
We outline the visor and ears to the lining and stitch it - do not be lazy - this is a guarantee that when the side is hidden, the parts will not crawl away and will not leave. Be sure to combine the center of the necklace with the central seam from the front, and the center of the ears with the center of the occipital seam. Here's a raskrivushka should come out. 

Next, we turn the lining face up, and it is better to pin the dangling ears and visor with pins so that the details do not walk around.  And we put the top cap on the lining cap. Combining all the main seams and cleaving with pins, it is better for beginners to bast in, otherwise the raincoat fabric loves to crawl.
We make the final seam and turn it inside out. How???? It was possible to deliberately leave a hole in the lining, I'm not looking for easy ways - I always steam the seam to turn it out :))) 
You are turning back, Baaaa, this is such a crap :))))) 
Losing it we turn it into a hat - manually fix the visor with secret stitches, sew up a hole in the lining and sew on the strings. Voila ... I sewed a hat for my father-in-law to work in the north, we have one size, so I tried it on for myself. 
But as:)
And one more little forecast: tomorrow I'll show you how to sew a warm kitty hat. 